
Removing
Parts that must be removed or disconnected when removing the gearbox from the vehicle are shown in fig. I:30.
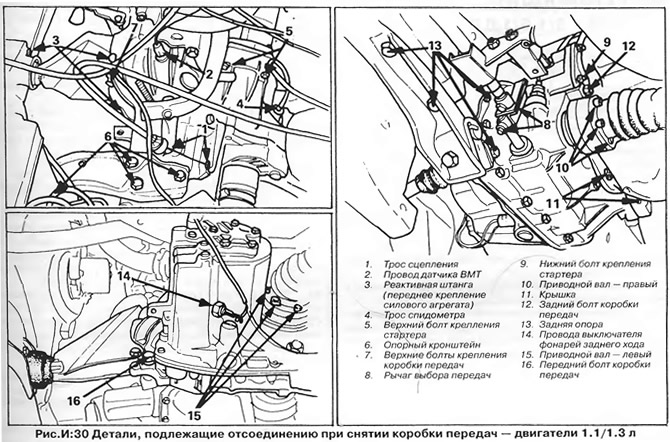
1. Disconnect the wire "masses" from the battery.
2. Disconnect the wire from the TDC sensor (in the presence of) and gear shift sensors (Formel model "E").
3. Disconnect the torque rod from the body and transmission.
4. Disconnect the speedometer cable from the gearbox.
5. Turn out the top bolts of fastening of a starter. Bend back the metal petals.
6. Support the weight of the engine with a hoist (hoist) or a jack with a wooden pad.
7. Disconnect the transmission support bracket from the top of the transmission and body side member.
8. Turn out two top bolts of fastening of a transmission to the engine.
9. Turn out a bolt with a square head from a rod pin at the gear selector lever and remove the lever.
10. Turn out the bottom bolt of fastening of a starter, remove a starter and suspend it on a wire hook.
11. Disconnect the right drive shaft (see chapter "Front suspension").
12. Turn out three screws of fastening of a cover of a case of coupling.
13. Turn out the bottom bolt of fastening of the engine to a transmission.
14. Disconnect a back support from a transmission and a body.
15. Disconnect wires from the switch of lanterns of a backing.
16. Disconnect the wire "masses" from the gearbox housing.
17. Disconnect the left drive shaft and hang it out of the way on a wire hook.
18. Install a movable jack with a wooden gasket under the gearbox housing, support the weight of the gearbox with a jack and unscrew the front bolt securing the engine to the gearbox.
19. Slide the gearbox off the dowel pins and carefully lower it down (this requires the participation of an assistant).
Installation
The gearbox is installed in the reverse order. Pay attention to the following:
1. Lift the gearbox, slide it over the dowel pins and secure.
2. Early models (build date before 12.10.7) make sure that aluminum washers are installed between the support bracket and the gearbox. On later transmissions, the studs and crankcase casting are reinforced at this point and washers are not installed.
3. Before final tightening of the support and torque rod bolts, align the engine assembly with the transmission. The transmission support bracket must be centered on the body bracket and the torque arm must be centered on the bracket to which it is attached (see chapter "Engines 1.1/1.3").
4. The square head bolt that secures the selector rod pin can be reused, but if a hex bolt was installed instead, it must be replaced with a new one.
5. Tighten all bolts and nuts to the torque specified in section "Technical data".
6. Adjust the shift actuator as described above.
7. Check clutch pedal free play, adjust if necessary as described above.
8. Check the oil level in the gearbox and final drive (see chapter "Vehicle maintenance work").
Input shaft oil seal
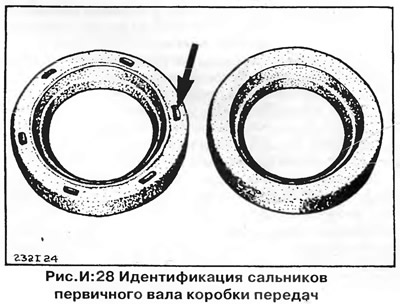
To replace the oil seal, you need to remove the gearbox from the car.
Please note that gearboxes assembled before 12.08.5 and from 13.08.5 have different oil seals. New type oil seals are distinguished by six recesses on the end surface.
Loosen the release bearing guide bushing bolts inside the clutch housing. Remove the old oil seal from its socket by wringing it out with a screwdriver or pulling it out with a wire hook. Lubricate the lip and outer surface of the new oil seal and carefully press it into place using a tube (mandrels) the desired diameter. The stuffing box should be 2.5mm below the surface of the body, while it should rest against the collar inside the body bore.
Axle flange seals (drive shafts)
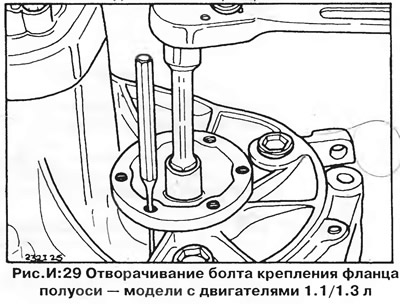
Flange seals can be replaced without removing the gearbox. Disconnect the drive shaft from the axle shaft flange as described in chapter "Front suspension", and hang the drive shaft on the wire hook.
Place an oil collecting pan under the axle shaft flange. Fix the flange with a punch or similar tool as shown in fig.I:29. Turn out a bolt of fastening and remove a half shaft flange. Pull out the oil seal using a screwdriver or a suitable hook.
Lubricate the edges and outer surface of the new oil seal and press it into the seat until it stops. Fill the space between the edges of the new oil seal with universal grease, then install the axle shaft flange and tighten the mounting bolt with a torque of 2.5 kgm.
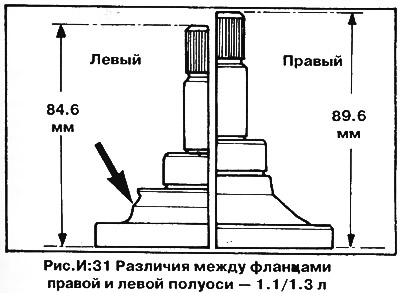
The right and left seals are the same, but the flanges are different. The difference between the right and left flanges is shown in fig. I:31.
Check the oil level in the gearbox and add it if necessary (see chapter "Vehicle maintenance work").
Visitor comments