



Removal
Before removing the clutch, you must remove the gearbox (see later in this chapter).
1. Mark the relative positions of the drive disc and flywheel to ensure correct assembly later (A, figure I:4).
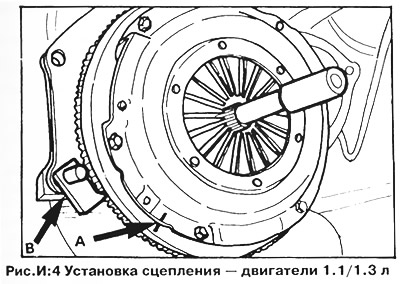
2. Secure the flywheel with a screwdriver or a special locking device (B, figure I:4). Loosen the six drive disc mounting bolts. Loosen the bolts evenly, in a diagonal sequence, to avoid bending the clutch housing.
3. If the bolts have a hex head, you will need a 7mm Allen key.
4. Holding the drive disk, remove the bolts and remove the drive disk together with the driven clutch disk from the flywheel. The drive disk is fixed to the flywheel with three mounting pins.
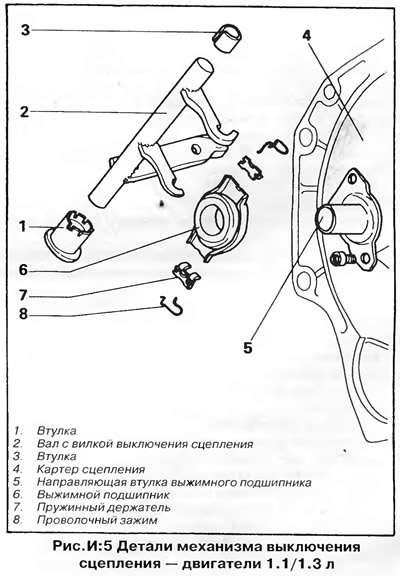
5. The release bearing is located in the clutch housing near the primary shaft of the gearbox. To remove the bearing, you need to release the clamps that secure the bearing to the clutch release fork (figure I:5). Mark the position of the clips before removing, then press down on the lower end of the wire retainer to release it from the fork and remove the upper end from the bearing race. Remove the bearing.
6. Inspect the clutch components as follows:
Clutch slave disc
The driven disc is one of the most important parts of the clutch, which is most susceptible to failure.
Inspect the friction linings on both sides of the disc for wear, burning, or oil contamination. If the linings are worn down to the rivet heads or have other defects listed above, replace the disc.
If the disc is contaminated with oil, determine the source of contamination and eliminate its cause - only then can a new disc be installed. Contamination of the disc with oil can occur due to a defect in the primary shaft seal of the gearbox or the rear crankshaft seal (replacing the seals is described in Chapter "Engine 1.1/1.3", and also in this chapter).
Before installing the disc, make sure that its hub slides freely along the splines of the gearbox input shaft without excessive lateral play.
Leading disk
Inspect the working surface of the pressure plate for scratches, scoring or other damage, especially if the driven clutch disc linings have been worn down to the rivets. Replace the drive disc if defects are found.
Inspect the diaphragm spring petals for wear where they contact the release bearing. Check the strength and reliability of the rivets, as well as the connection points of the spring with the pressure plate and clutch housing.
If there are any damaged parts, replace the entire assembly.
If there are no external defects, check the pressure plate for warping (using a steel ruler and feeler gauges). If the height of the unevenness exceeds 0.3 mm, replace the drive disc.
Flywheel
Inspect the flywheel friction surface in the same way as the pressure plate. In case of deep scratches, scoring, cracks or signs of overheating (blueing or small cracks are acceptable) have the flywheel machined or replaced.
Release bearing
Inspect the release bearing for wear, damage, or play. Hold the bearing by the inner race and rotate the outer race of the bearing while pressing it along the axis. Replace the bearing if it rotates with difficulty or is noisy, or if there is no grease in the bearing (the bearing has a lifetime supply of grease and its lubrication during operation is not provided). *Do not wash the bearing in solvent, as this will remove the grease contained in it. Check the outer surface of the guide bushing for burrs or nicks. The bearing race should slide freely on the bushing without binding. Do not lubricate the plastic bushing.
Installation
1. To correctly align the driven clutch disc with the flywheel, use a special device (mandrel) for centering the clutch (figure I:4). If the clutch disc is not centered when installing it, then later when installing the gearbox there will be great difficulties.
2. In February 1978, the diameter of the pilot hole in the end of the crankshaft was increased from 15 mm to 21 mm - make sure that the diameter of the mandrel corresponds to the diameter of the hole.
3. Clean the friction surfaces of the flywheel and drive disk from residual oil and dirt.
4 Install the driven clutch disc onto the flywheel. There is usually a marking on the side of the disc hub facing the flywheel. Center the disc by inserting a drift into it and install the drive disc onto the flywheel.
5. When installing the old drive disc, align the marks made before removal (A, figure I.4).
6. Install the clutch mounting bolts and tighten them in a diagonal sequence gradually, with a torque of 2.5 kg·m. Remove the centering device.
7. Assemble the release bearing with the clutch release fork. The lower ends of the wire retainers should engage with the fork.
8. Lubricate all friction surfaces of the clutch release mechanism, including the outer contact surface of the release bearing, with molybdenum grease.
9. Install the gearbox as described below and adjust the clutch cable.
Visitor comments