



Removal
The parts that must be removed or disconnected when removing the transmission from the vehicle are shown in Figure I:35.
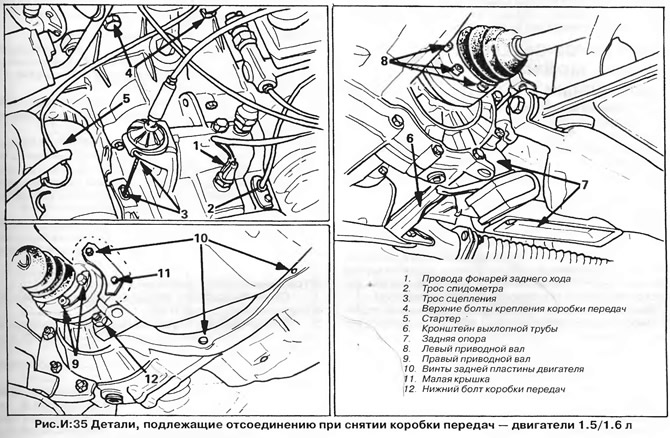
1. Disconnect the ground wire from the battery.
2. Disconnect the wires from the reverse light switch.
3. Disconnect the speedometer cable from the transmission. Cover the hole with a rubber plug to prevent oil loss and dirt from entering after removing the transmission.
4. Disconnect the clutch cable from the gearbox.
5. Disconnect the drive from the gearbox in the following order:
Remove the wire clip and disconnect the upper and trailing arms from the gear selector shaft lever. Disconnect the transverse gear selector link from the pivot arm. Remove the trailing arm assembly (see section "Gear shift drive").
6. Disconnect the wires from the TDC sensor (if available) at the top of the clutch housing.
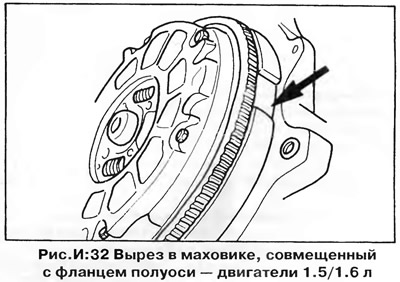
7. On cars with a 4-speed gearbox, manufactured before November 1978, the gearbox has a stud located next to the flange of the right half-shaft, and in order to remove the stud from the hole in the engine, the gearbox must be moved away from the engine strictly along the axis of the crankshaft. In order for the flange of the right half-shaft to pass the flywheel, there are three cutouts in the flywheel (figure I:32), and if the flywheel is not set in the correct position, the flange will catch on the flywheel. Therefore, before removing the gearbox, it is necessary to remove the TDC sensor from the hole in the upper part of the clutch housing (or a plastic plug) and turn the engine crankshaft so that one of the three protrusions (B, figure G:44) or risk (A, figure G:44) on the flywheel aligned with the TDC indicator on the clutch housing (figure G:44). These marks should not be confused with the 0-shaped TDC mark (one of the protrusions is located at 76 BTDC) Once the flywheel is set to this position, the engine should not be turned.
8. On later production cars, the stud is replaced by a bolt and nut, and it is not necessary to install the flywheel in this way, since the gearbox can be turned during removal. On injection models, the flange of the right half-shaft has a cutout, which should be turned towards the flywheel.
9. Support the weight of the engine with a lifting device or jack placed under the oil pan with a wooden block near the transmission.
10. Disconnect the transmission support bracket from the upper part of the crankcase and the body side member.
11. Remove the two upper bolts securing the gearbox to the engine.
12. Disconnect the wires from the starter, remember their location. Remove the starter.
13. Disconnect the reaction rod (front powertrain mount) from the gearbox housing and from the body.
14. Disconnect the ground wire from the gearbox housing.
15. Remove the exhaust pipe bracket (if available) from the main gear housing.
16. Disconnect the rear support of the gearbox from the final drive housing and the body.
17. Disconnect the left drive shaft and hang it to the side on a wire hook (see chapter "Front suspension").
18. Disconnect the right drive shaft and hang it to the side.
19. Unscrew the three screws securing the rear engine plate covering the clutch housing. When removing the gearbox, the plate remains on the engine.
20. Remove the remaining screw holding the small cover located behind the right axle shaft flange and remove the cover.
21. Unscrew the rear (lower) nut (or bolt) securing the gearbox to the engine.
22. Press the gearbox off the mounting pins and lower it down (see points 7 and 8). Given the heavy weight of the gearbox, this operation should be performed by two people, especially if a jack is not available.
Installation
The gearbox is installed in reverse order. Please note the following:
- a) On early production vehicles, before connecting the gearbox to the engine, one of the flywheel cutouts must be aligned with the flange of the right axle shaft (see figure I:32).
- b) Raise the transmission and place it on the locating pins. Be careful not to move the engine backplate from its position.
- c) Before final tightening of the torque rod bolts and gearbox mounts, align the engine and transmission. The gearbox support bracket should be centered on the body bracket, and the torque rod should be centered on the bracket to which it is attached (see chapter "Engines 1.1/1.3").
- d) Tighten the mounting bolts and nuts to the torque specified in section "Technical data".
- d) Adjust the gearshift drive as described by Bailie.
- e) Check the free play of the clutch pedal, if necessary, adjust the cable as described earlier.
- g) Check the oil level in the gearbox and final drive (see chapter "Car maintenance work").
Primary shaft seal
To replace the seal, you need to remove the gearbox from the car.
Remove the seal from its seat by pressing it with a thin screwdriver or pulling it out with a wire hook. Fill the space between the edges of the new seal with universal grease. Also lubricate the edges and the outer surface of the seal. Press the seal into place evenly, without distortion, using a mandrel (piece of pipe) of the required diameter.
Semi-axle flange seals
The axle flange seals can be replaced without removing the transmission from the vehicle. Disconnect the drive shaft from the axle flange as described in Chapter "Front suspension".
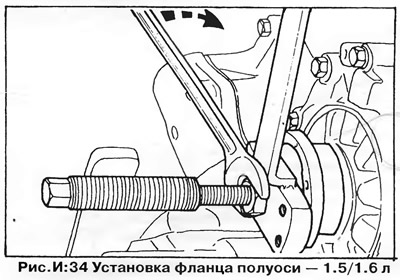
To remove and install the axle flange, you will need a puller (figure I:33, I:34)
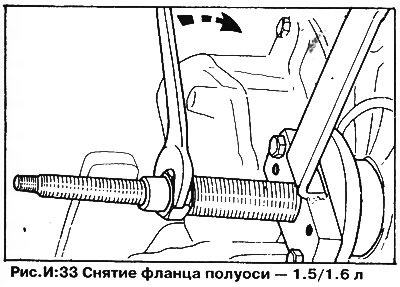
Place an oil collection pan under the axle flange. Remove the plastic cover from the center of the flange, remove the retaining ring and disc washer securing the flange to the axle shaft. Remove the flange using a puller (in figure I:33 the puller is attached to the flange using two M8x30 bolts).
Pull out the seal using a screwdriver or hook. Fill the space between the lips of the new seal with universal grease. Also lubricate the lips and the outer surface of the seal. Press the seal into place until it touches the outer ring of the bearing.
Install the axle shaft flange and press it onto the axle shaft splines using a puller (figure I:34). Install the Belleville washer, then install the snap ring into the groove of the axle shaft. Make sure the Belleville washer is concentric. Replace the plastic cover.
Check the gearbox oil level and top up if necessary (see chapter "Car maintenance work").
Visitor comments