



Contents: Dismantling ↓ Installation ↓
The cylinder head can also be replaced with the engine installed. When dismantling the cylinder head, its bolts must be tightened every 1000 km. To do this, each bolt is loosened in the correct sequence by approximately 30 degrees and then tightened to the specified torque. The head does not necessarily have to be warmed up to tighten the bolts. A torque wrench is required to tighten the bolts.
Dismantling
The following signs indicate that the cylinder head gasket is defective: water leakage, the presence of water in the oil, boiling of cooling water (do not turn off the engine, open the lock (in the surge tank).
Disconnect the battery from the case.
Drain the cooling water, see section "Cooler replacement".
Remove the air filter insert.
Remove spark plugs and distributor injectors, see sections "Checking glow plugs" and the next one.
Remove the timing belt (only from above), see section "Removal and installation the timing belt".
Loosen and remove all water hoses on the cylinder head.
Unscrew the exhaust pipe, see section "Exhaust system".
Disconnect the electrical wires from the switch, spark plugs, oil pressure regulator and water temperature sensor, see also section "Engine dismantling".
Clean the inlet pipes at the points where they connect to the injectors with gasoline and unscrew them. Close the openings with suitable plugs.
Unscrew the cylinder head cover.
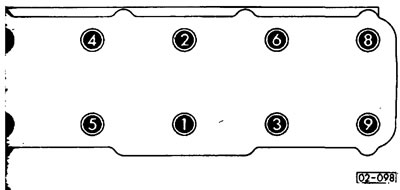
(02-098) Unscrew the cylinder head bolts in descending order of numbers, i.e. starting with 10.
Remove the cylinder head and head gasket.
Installation
Starting with engine CS 000339, the cylinder head is secured with cylindrical head bolts with internal teeth, although previously cylindrical head bolts and M11 hexagonal bolts with internal edges were used.
Attention! Depending on the size of the protruding part, three different thickness gaskets are installed. When choosing a gasket, pay attention to the designation and use only the same gasket as the old one.
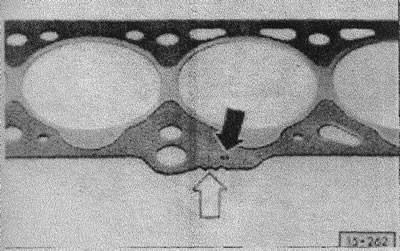
(15 - 262) numbers - black arrow, cutout - white.
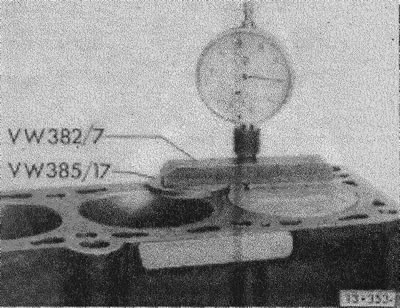
(13-353) If necessary, the thickness of the gasket can be determined by measuring the piston protrusion at the top dead center.
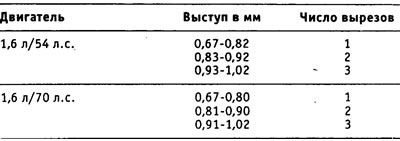
Attention! If different values are obtained when measuring the protrusions of 4 pistons, the largest value is taken into account.
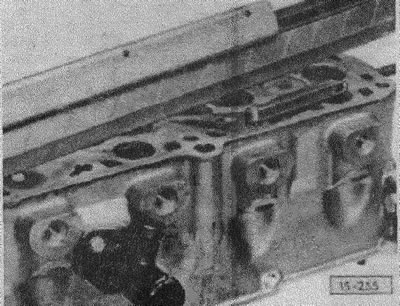
- (15-255) Before installing the cylinder head, it is necessary to check it for curvature. To do this, place a steel ruler on it and measure the curvature in various places. Its value should not exceed 0.1 mm, otherwise the head is subject to replacement.
- before installing the head, the crankshaft is set to the dead center position, see also section "Removal and installation the timing belt". Then turn the crankshaft counterclockwise until all pistons are approximately at the same level below top dead center.
- apply the appropriate cylinder head gasket using additional sealing means. Install the head.
- to center the head, screw the cylinder head end bolts into holes 7 and 9.
Caution! Always replace internally toothed bolts. Follow instructions when tightening cap screws.
- Remove the centering bolts and tighten the socket head bolts carefully.
- (02-098) With the engine cold, tighten the hexagon socket head cap screws in order from 1 to 10 with a torque of 50 Nm, then tighten them in order with a torque of 70 Nm. Finally, tighten them in the same order with a torque of 90 Nm.
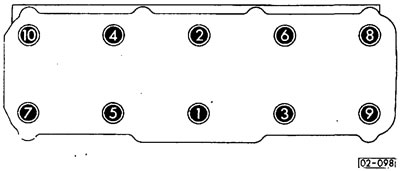
Attention! Warm up the engine to an oil temperature of over 50 degrees, until the radiator fan turns on and, without first loosening them, tighten the bolts to a torque of 90 Nm, observing the order, see Fig. 02-098.
Attention! After 1000 km of running, the bolts with inner edges must be tightened with a cold engine. To do this, the bolts are loosened one by one by an angle of about 30 degrees, and tightened with the prescribed torque. Thus, start with bolt 1, loosen it by 30 degrees, and tighten it with the corresponding torque of 90 Nm. Then move on to the 2nd bolt, etc.
- the cylindrical head bolts with internal teeth are tightened in sequence in three stages with the prescribed tightening torque. The tightening torque for the 1st stage is 40 Nm, for the 2nd stage - 60 Nm (when the engine is cold). At the 3rd stage, all bolts are tightened with a regular wrench by 1/2 turn (180 degrees), it is permissible to tighten 2 times by 90 degrees.
Attention! Warm up the engine to an oil temperature of over 50 degrees, until the radiator fan turns on and, without first loosening them, tighten the bolts in one go with a regular wrench by 1/4 turn, observing the order, see Fig. 02-098.
Determine the final twist angle. Put the valve on, positioning it along the cylinder head and turn it. Until the key handle is across (90 degrees) or, respectively, on the other side along (180 degrees) the cylinder head.
- After approximately 1,500 km of running, after the repair is completed, it is necessary to tighten the cylindrical bolts with internal teeth. To do this, without preliminary loosening, tighten the bolts in one go with a regular wrench by 1/4 turn (90 degrees), observing the order. The engine must be cold or warmed up.
- Apply a new gasket to the cylinder head cover. Install the cover and tighten the bolts to 10 Nm, install the spark plugs, see the relevant section, install the spray nozzles, see the relevant section.
- Clean the intake manifold pipes with gasoline and tighten the union nuts.
Attention! When installing the cylinder head with the camshaft mounted, there is no need to adjust the valve clearance.
- Connect the electrical wires to the switch, oil pressure regulator and water temperature sensor.
- Screw the exhaust pipe to the exhaust outlet, use a new gasket.
- Connect all water hoses and secure them with clamps.
- Fill with coolant, see the relevant section.
- Install the timing belt, see the relevant section.
- Check the start of the fuel pump supply, see the relevant section.
- Install the air filter insert.
- Check the engine oil level.
- Attach the battery to the body.
Visitor comments