
English Русский
Български
Беларускі
Український
Српски
Hrvatski
Română
Polski
Slovenský
Magyar
  |  Articles  |  Sitemap  |  Contacts  |    |
Car maintenance Ford Car maintenance Hyundai Car maintenance Chevrolet Car maintenance BMW Car maintenance Audi Car maintenance Opel Car maintenance AvtoVAZ
VWmanual.ru


Main   Passat   Golf   Polo   Touareg   Tiguan   Sharan   Transporter   Others  
Transporter T3 (1979-1992) Transporter T4 (1990-2003)

Dismantling and installation of valves (VW Transporter T3)

  • Main
  • Transporter
  • Transporter T3
  • Diesel engines
  • Engine repair
  • Dismantling and installation of valves
            0


Contents: Dismantling ↓ Installation ↓

Dismantling


Disassemble the cylinder head, see the relevant section.

Remove the camshaft, see the relevant section.

Attention! If the valves are to be used in the future, all parts of each valve distribution (valve, pusher, mounting washer, spring) must be applied together.


Remove the dowel washers and cup tappets.

Caution! Mark the tappets and washers as they must be installed in the same place.
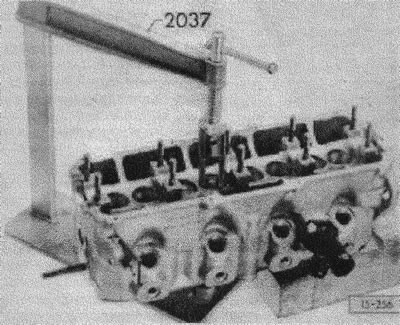

Caution! Mark the tappets and washers as they must be installed in the same place.


(15-256) Pull out the valve springs. Workshops use a special tool. You can also use two screwdrivers to press the valve head down, then pull out the valve key. Before doing this, put a rag in the combustion chamber so that the valves do not fall down.
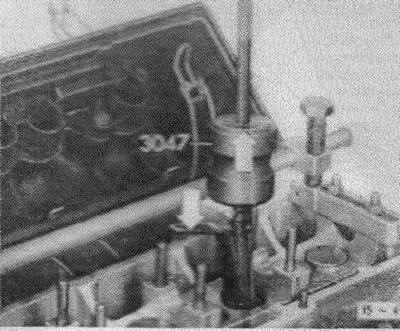
(15-256) Pull out the valve springs. Workshops use a special tool. You can also use two…


(15-451) Pull out the valve stem seal. A special tool is required for this. The seal must be replaced each time.


Pull out the valve.

Installation


Before installing the valve seats, it is necessary to treat them, see next section.

Check the valve guides, see the relevant section.

When installing, remove the burr from the valve stem at the points where it is attached to the split conical valve sleeve.

Caution! Observe the instructions for valves with one or three grooves, see. "Valve drive".


Insert the valve head at the bottom.

Lightly lubricate the stem and insert the valve.
Lightly lubricate the stem and insert the valve.


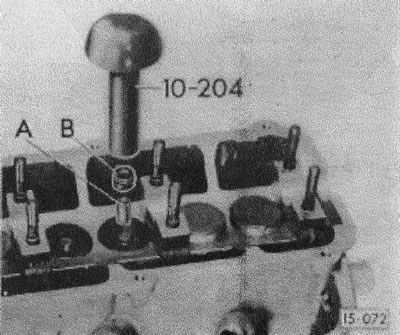
(15-072) put a plastic sleeve A on the rod (comes with a seal). Lightly lubricate the stem seal and carefully push it onto the valve guide using a special mandrel. Remove the sleeve and mandrel.

Caution! If installation is performed without using a sealing sleeve, the seals will wear out and the engine will consume too much oil.


Place the springs and valve head on top.

Press the springs down and insert the split conical cup.

When installing the cup tappet, pay attention to the marking. The tappets must be installed in their original place.

(The information is presented on the website: «www.vwmanual.ru»)

The cylinder head must be complete with tappets, washers for adjusting the valve clearance and camshaft, see. "Dismantling and installation of the camshaft".


Renew cylinder head gasket, install head, see. "Removal and installation the cylinder head".

Caution! Tighten the cylinder head bolts in the correct sequence and to the specified torque, see. "Removal and installation the cylinder head".


Adjust the valve clearance, see. "Adjusting valve clearance".

This article is available at russian, bulgarian, belarusian, ukrainian, serbian, croatian, romanian, polish, slovak, hungarian
The text has been checked: Tarasov Ivan

Share information:

Previous articles
Dismantling and installation of the camshaft
Valve drive — design description
Removal and installation the cylinder head, replacing the gasket
Cylinder head — design description
Checking and adjusting the timing belt tension
Toothed belt transmission — design description
Next articles
Valve seat finishing
Checking the valve guides
Replacing piston rod seals
Adjusting valve clearance
Checking the compression in the cylinders
Emergency engine start


Similar articles from other manuals for VW cars:
Removal and installation valves Passat B3 (1988-1993)
Grinding of engine head valves Golf 2 (1984-1993, petrol)
Removal and installation the wiring harness for the solenoid… Tiguan 1 (2007-2015)
Cylinder head and valves — general information Sharan 1 (1995-2000)
Camshaft, valves and pump-injector drive Caddy 3 (2003-2010)
Link to this page in different formats


Visitor comments


No comments yet


How much will 25 + 30 =


Transporter T4 
  • General information
  • User manual
  • Maintenance
  • Power unit
  • Engine repair
  • Ignition system
  • Lubrication system
  • Cooling system
  • Fuel system (petrol)
  • Fuel system (diesel)
  • Injection system (petrol)
  • Exhaust system
  • Transmission
  • Clutch
  • Car gearbox
  • Chassis
  • Car suspension
  • Steering
  • Brake system
  • Wheels and tires
  • Body
  • Exterior
  • Interior
  • Doors and windows
  • Heating system
  • Electrical equipment
  • Equipment and devices
  • Lighting and signaling
  • Power devices
  • Electrical circuits
Transporter T3 
  • General information
  • Maintenance
  • Petrol engines
  • Engine repair
  • Lubrication system
  • Cooling system
  • Power and exhaust system
  • Carburetor 34 PICT
  • Carburetors 2E3 and 2E4
  • Fuel injection system
  • Ignition system
  • Diesel engines
  • Engine repair
  • Lubrication system
  • Cooling system
  • Power and exhaust system
  • Transmission
  • Clutch
  • Car gearbox
  • Chassis
  • Front suspension
  • Rear suspension
  • Steering
  • Brake system
  • Body
  • Body and interior elements
  • Doors, locks and windows
  • Electrical equipment
  • Lighting system
  • Equipment and devices
  • Power devices (diesel)
  • Power devices (petrol)
  • Wiring diagrams (diesel)
  • Wiring diagrams (petrol)
VWmanual.ru © 2016-2026 | Mobile version | News and articles | Sitemap: EN BG BY UA RS HR RO PL SK HU | Write message | Site search
Passat B2 • Passat B3 • Passat B4 • Passat B5 • Passat B6 • Golf 1, diesel • Golf 1, petrol • Golf 2, petrol • Golf 2 • Golf 3 • Golf 4 • Golf 5 • Polo 3 • Polo 4 • Touareg 1 • Tiguan 1 • Sharan 1 • Transporter T3 • Transporter T4 • LT 28 • LT 2D • Beetle • Caddy 3 •
Our website uses cookies to ensure functionality and convenience.