
English Русский
Български
Беларускі
Український
Српски
Hrvatski
Română
Polski
Slovenský
Magyar
  |  Articles  |  Sitemap  |  Contacts  |    |
Car maintenance Ford Car maintenance Hyundai Car maintenance Chevrolet Car maintenance BMW Car maintenance Audi Car maintenance Opel Car maintenance AvtoVAZ
VWmanual.ru


Main   Passat   Golf   Polo   Touareg   Tiguan   Sharan   Transporter   Others  
Transporter T3 (1979-1992) Transporter T4 (1990-2003)

Removal and installation the timing belt (VW Transporter T3)

  • Main
  • Transporter
  • Transporter T3
  • Diesel engines
  • Engine repair
  • Removal and installation the timing belt
            0


Contents: Dismantling ↓ Adjusting the installation ruler ↓ Installation ↓
Attention! When using the bus as a taxi or for frequent short-distance trips, the toothed belt must be replaced every 120,000 km.


Dismantling


  • remove the upper casing and cylinder head cover.
  • remove the plastic cover from the gearbox.
  • (13-597) Turn the crankshaft to the dead center for the 1st cylinder. To do this, turn the crankshaft belt pulley (at idle) until reaching the top dead center position for the first cylinder (see arrow). Never turn the crankshaft using the timing belt gear.
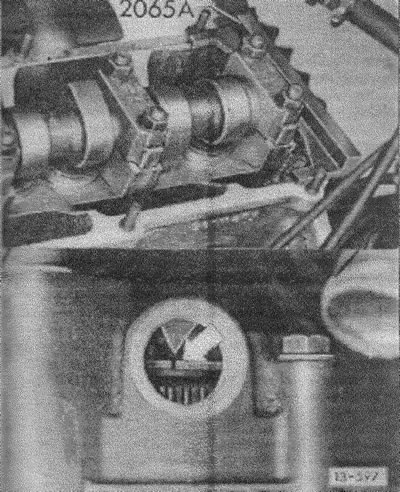
(13-597) Turn the crankshaft to the dead center for the 1st cylinder. To do this, turn the…

  • the crankshaft is at the top dead center of the first cylinder, and if the cam pair of the first cylinder points up, see section "Adjusting valve clearance".
  • at the same time, the marking on the flywheel must coincide with the pulley (see arrow). In this position, a setting ruler can be inserted into the spline of the cam pulley.
  • lock the camshaft using a setting ruler. The ruler has a protrusion that prevents the camshaft from turning.

Adjusting the installation ruler


Turn the locked camshaft so that one end of the installation ruler rests against the cylinder head. At the other end of the ruler, use a measuring roller to check the resulting gap. Insert a measuring template with a gap value reduced by half between the ruler and the cylinder head. Turn the camshaft until the ruler rests on the gauge. Insert a second measuring gauge with the same set value between the ruler and the cylinder head at the other end.
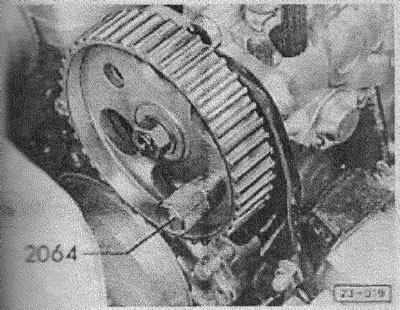


Turn the locked camshaft so that one end of the installation ruler rests against the cylinder head.…


Lock the fuel pump gear using a locking mandrel.

Loosen the tension roller nut and release the timing belt.

Caution! If the camshaft is turned with the timing belt removed, no piston should be at top dead center. Otherwise, damage to the pistons or valves may occur.


Slowly turn the camshaft, but before this you need to set all the pistons to the same position below the top dead center.

To do this, make a mark with chalk on the top of the crankshaft belt pulley (provided that the camshaft is in the top dead center position of the first cylinder), then turn the camshaft pulley a quarter turn (90 degrees) to the right or left. The chalk mark will show whether it is forward or backward when viewed in the direction of travel.

Loosen and remove the V-belt (see section "Replacing the V-belt").

Remove the V-belt pulley and the lower timing belt cover.

Installation


  • in the gearbox hole, check whether the dead point marking on the flywheel matches the control mark.
  • loosen the camshaft wheel mounting bolt by 1/2 turn. Use a rubber hammer to loosen the wheel from the cone.

Note! Models starting with 2.84 have a sealed gear guard. In these vehicles, the camshaft gear is disengaged from the cone through a 6mm hole in the rear guard using a mandrel and hammer.


  • put the toothed wheel on according to Fig. 13-693 and remove the locking mandrel of the fuel pump gear.
  • tighten the toothed belt.
  • tighten the tension roller nut to a torque of 45 Nm.
  • tighten the camshaft wheel mounting bolt to a torque of 45 Nm.
  • remove the installation ruler.
  • turn the crankshaft 2 revolutions in the direction of rotation. Hit the toothed belt between the camshaft wheel and the fuel pump gear with a rubber hammer and check the belt tension again, tighten the belt if necessary.
  • check the start of the fuel pump, see section "Checking and adjusting the fuel pump start".
  • install the V-belt pulley and lower casing, tighten the V-belt, see section "Tensioning the V-belt".
  • install the gearbox opening cover.
  • replace the gaskets and screw on the cylinder head cover, see section "Cylinder head".
  • install the timing belt cover.

This article is available at russian, bulgarian, belarusian, ukrainian, serbian, croatian, romanian, polish, slovak, hungarian
The text has been checked: Tarasov Ivan

Share information:

Previous articles
Sealed toothed belt guard
Additional vibration damper
Removal and installation the engine
Operating principle of a gas turbine supercharger
The principle of operation of a diesel engine
Main technical data of the engine
Next articles
Toothed belt transmission — design description
Checking and adjusting the timing belt tension
Cylinder head — design description
Removal and installation the cylinder head, replacing the gasket
Valve drive — design description
Dismantling and installation of the camshaft


Similar articles from other manuals for VW cars:
Loosening/tightening the timing belt Passat B3 (1988-1993)
Timing Belt (Camshaft Drive Belt) Golf 1 (1974-1984, petrol)
Installing the timing belt Polo 3 (1995-2003)
Removal, installation and tensioning of the timing belt Touareg 1 (2002-2006)
Removal, installation and tensioning the timing belt Tiguan 1 (2007-2015)
Installing the toothed drive belt and adjusting the timing drive Sharan 1 (1995-2000)
Checking the timing belt (4-cylinder petrol engines) Caddy 3 (2003-2010)
Link to this page in different formats


Visitor comments


No comments yet


How much will 40 + 13 =


Transporter T4 
  • General information
  • User manual
  • Maintenance
  • Power unit
  • Engine repair
  • Ignition system
  • Lubrication system
  • Cooling system
  • Fuel system (petrol)
  • Fuel system (diesel)
  • Injection system (petrol)
  • Exhaust system
  • Transmission
  • Clutch
  • Car gearbox
  • Chassis
  • Car suspension
  • Steering
  • Brake system
  • Wheels and tires
  • Body
  • Exterior
  • Interior
  • Doors and windows
  • Heating system
  • Electrical equipment
  • Equipment and devices
  • Lighting and signaling
  • Power devices
  • Electrical circuits
Transporter T3 
  • General information
  • Maintenance
  • Petrol engines
  • Engine repair
  • Lubrication system
  • Cooling system
  • Power and exhaust system
  • Carburetor 34 PICT
  • Carburetors 2E3 and 2E4
  • Fuel injection system
  • Ignition system
  • Diesel engines
  • Engine repair
  • Lubrication system
  • Cooling system
  • Power and exhaust system
  • Transmission
  • Clutch
  • Car gearbox
  • Chassis
  • Front suspension
  • Rear suspension
  • Steering
  • Brake system
  • Body
  • Body and interior elements
  • Doors, locks and windows
  • Electrical equipment
  • Lighting system
  • Equipment and devices
  • Power devices (diesel)
  • Power devices (petrol)
  • Wiring diagrams (diesel)
  • Wiring diagrams (petrol)
VWmanual.ru © 2016-2026 | Mobile version | News and articles | Sitemap: EN BG BY UA RS HR RO PL SK HU | Write message | Site search
Passat B2 • Passat B3 • Passat B4 • Passat B5 • Passat B6 • Golf 1, diesel • Golf 1, petrol • Golf 2, petrol • Golf 2 • Golf 3 • Golf 4 • Golf 5 • Polo 3 • Polo 4 • Touareg 1 • Tiguan 1 • Sharan 1 • Transporter T3 • Transporter T4 • LT 28 • LT 2D • Beetle • Caddy 3 •
Our website uses cookies to ensure functionality and convenience.