



Remove the coil springs.
Disconnect the electrical connectors located between the rear axle assemblies and the body.
Remove the stabilizer.
Secure the vehicle on both sides to the lift brackets using tension straps.
Otherwise, it may slip off the lift
Place an engine and transmission jack with a universal transmission support under the subframe and secure the subframe with a strap.
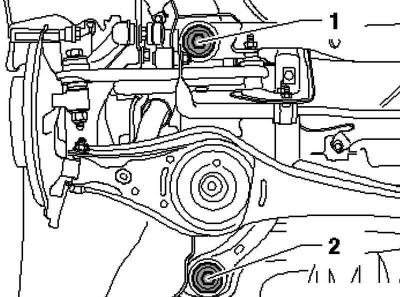
Fig. 4.63. Subframe fastening
On both sides, unscrew the hex bolts 1 or 2 (Fig. 4.63).
Note: For clarity purposes, the illustration shows only the left side of the vehicle.
The original can be viewed on the portal VWManual
Note: To secure the subframe, screw in the fixing devices in positions 1 and 2 on both sides of the vehicle in turn.
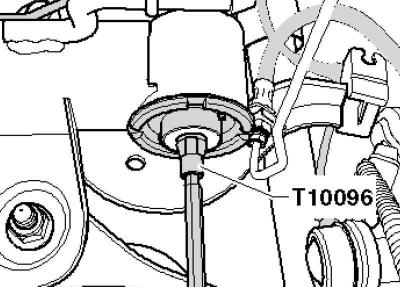
Fig. 4.64. Fixing the subframe.
Fix the position of the subframe with clamps (Fig. 4.64).
Note: The fasteners should be tightened to a torque not exceeding 20 Nm, otherwise their threads may be damaged.
On both sides, replace the subframe mounting bolts with clamps in turn and tighten them to a torque of 20 Nm.
Now the subframe position is fixed.
Using an engine and gearbox tilter, lower the subframe by 10 cm.
Remove the front rubber support.
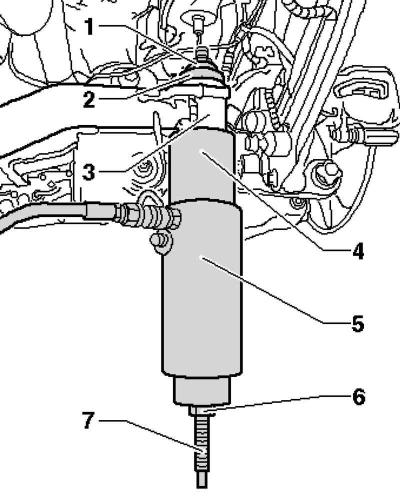
Fig. 4.65. Installing special tool: 1 – nut; 2 – press washer; 3 – subframe; 4 – pipe; 5 – hydraulic cylinder with insert; 6 – nut; 7 – lead screw
Install the special tool (Fig. 4.65).
Install the tool by tightening the screw nuts.
Using a pump, press out the silent block.
Note: When removing the rubber-metal support, the outer ring of the support is cut off. This is accompanied by a loud sound.
After removing the rubber-metal support, it must be knocked out of the pipe with light blows of a hammer.
Installing the front silent block
Install a special tool with a silent block on the subframe, see Fig. 4.65.
Install the tool by tightening the screw nuts.
While pressing the pump pedal, carefully press the silent block until the flange is "tightly" adjacent to the subframe.
Remove the rear rubber-metal support
Install the special tool, see Fig. 4.65.
Using a pump, press out the silent block.
Note: When removing the rubber-metal support, the outer ring of the support is cut off. This is accompanied by a loud sound.
Note: After removing the rubber-metal support, it must be knocked out of the pipe with light hammer blows.
Installing rear silent blocks
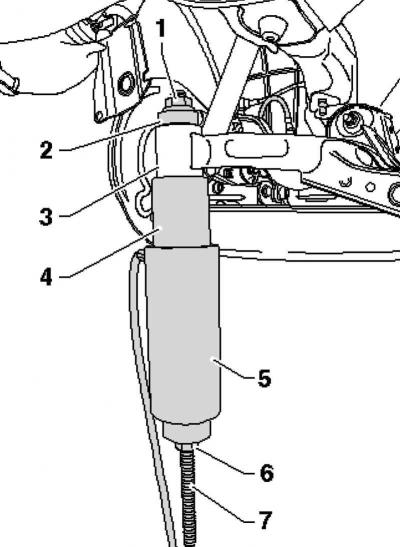
Fig. 4.66. Installing a special tool on the subframe
Install a special tool with a silent block on the subframe, see Fig. 4.66.
Install the tool by tightening the screw nuts.
While pressing the pump pedal, carefully press the silent block until the flange is tightly adjacent to the subframe.
Further installation is carried out in reverse order.
Bleed the brake system.
Adjust the wheel alignment angles.
Visitor comments