
On vehicles with a clutch release cable, disconnect the shift and select cables from the gearbox, remove the clutch cable sheath retaining plate, and remove the cable as described in section «Clutch».
On vehicles with hydraulic clutch release, remove the gear selector cable and selector lever (pic. 4-10) and remove the clutch slave cylinder without disconnecting the hydraulic pipeline.
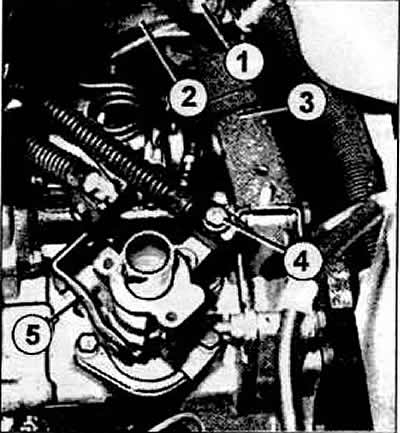
Pic. 4-10.
1 — a bolt of an arm of a suspension bracket of a transmission;
2, 3 — gearbox suspension bracket;
4 — a bolt of fastening of a cable of a choice of transfers;
5 - gear selection lever.
Disconnect the flexible speedometer drive shaft from the gearbox. Working through the top of the vehicle, remove the upper gearbox-to-engine bolts.
If necessary, remove the air filter intake. Unscrew the three bolts securing the right rear suspension bracket of the power unit. Loosen the bolt on the left transmission mount bracket. On vehicles with anti-lock brakes, access to the suspension bracket may require removal of the coolant expansion tank.
Lay aside the power steering hoses. Loosen the top nut of the front suspension bracket of the power unit. Using hoists or a garage gantry crane, lift the power unit and separate it from the suspension brackets, removing the electric cooling fan if necessary. Remove the starter and the front suspension bracket of the power unit. Take the hose of the power steering behind the rubber cushion of the front bracket and fix it. Loosen the mounting bolts and remove the anti-vibration weight from the subframe (pic 4-11). Depending on the equipment, remove the heat shield of the inner joint of the right front wheel drive shaft (pic. 4-12).
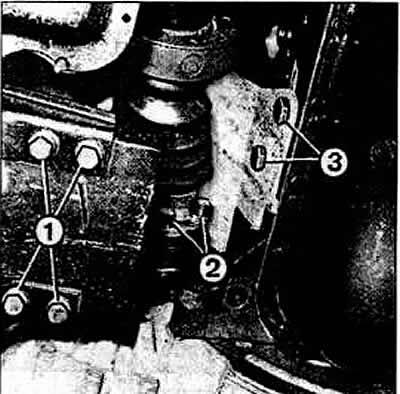
Pic. 4-11.
1 - anti-vibration load fastening bolts;
2 - bolts for fastening the front wheel drive shaft to the differential output shaft flange;
3 - heat shield fastening bolts.
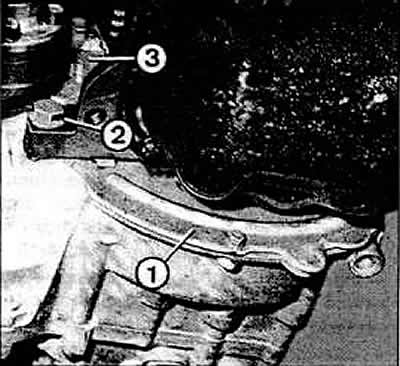
Pic. 4-12.
1 - bottom cover of the clutch housing;
2, 3 - bolts for fastening the heat shield of the inner hinge of the right front wheel drive shaft.
Disconnect the front wheel drive shafts from the differential output shaft flanges and hang them with wire hooks to the body.
Move the power unit to the right, raise it slightly and remove the suspension brackets from the transmission side. Loosen the screws securing the clutch housing covers and remove the covers. Loosen the lower gearbox-to-engine bolts. Slowly lower the transmission over the bottom of the vehicle. The gearbox is installed in the reverse order of removal, taking into account the following:
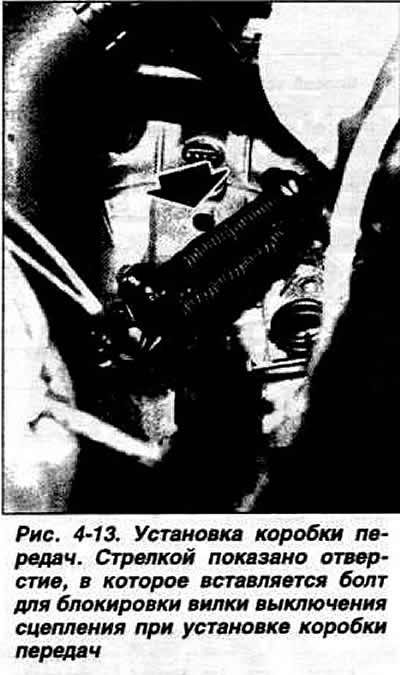
- before installing the gearbox, press the clutch release fork all the way into the clutch housing and fix it in this position with the M22 bolt, inserting it into the hole of the clutch housing intended for this (pic. 4-13):
- when installing the gearbox, make sure that the upper cover of the clutch housing is in the correct position;
- tighten the bolts of the gearbox to the engine without preload;
- on vehicles with a cable-operated clutch release, after installing the gearbox, press the clutch pedal at least five times until it stops, then move the clutch lever on the gearbox about 10 mm in the opposite direction. In this case, the lever must move freely;
- after installing the gearbox, adjust the gear change drive and fill the crankcase with oil.
Visitor comments