
Removing
Parts that should be disconnected before removing the transmission are shown in fig. K:4.
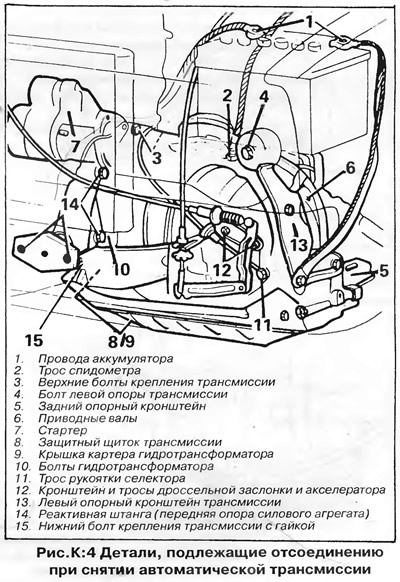
1. Disconnect the wire "masses" from the battery.
2. Disconnect the speedometer cable from the transmission. Seal the opening with a rubber plug to prevent oil loss and dirt from entering.
3. Turn out two top bolts of fastening of transmission to the engine.
4. Loosen the left transmission support pad bolt. Place a jack under the engine sump next to the transmission (placing a piece of wood under the pallet) and raise the power unit to relieve the supports.
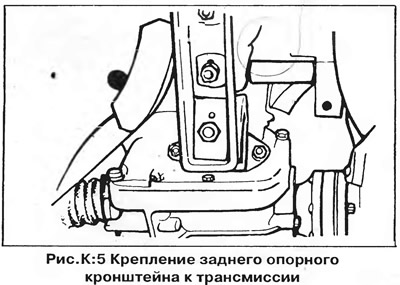
5. Disconnect the rear support bracket from the transmission and vehicle body (pic. K:5).
6. Disconnect the drive shafts and hang them to the body on wire hooks.
7. Disconnect wires from a starter and remove a starter.
8. Remove the transmission guard from below.
9. Remove the converter housing cover.
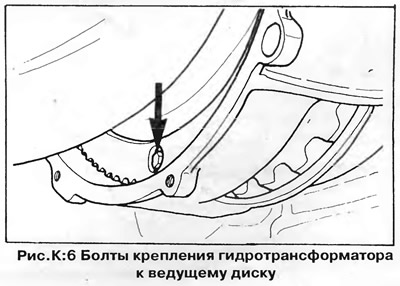
10. Periodically turning the engine, unscrew the bolts securing the torque converter to the drive plate (pic. K:6) - only three bolts.
11. Set the selector handle to position "R", loosen the cable clamp and disconnect the cable from the lever on the transmission (rice. K:2).
12. Disconnect from the corresponding parts of the lever "kickdown" (forced activation of the downshift) throttle and accelerator cables without disturbing their adjustment Remove the cable bracket from the transmission.
13. Turn away bolts of the left support and remove it together with an arm
14. Remove the torque arm (front support) power unit assembly.
15. Remove the lower bolt with nut securing the transmission to the engine.
16. Slightly raise the transmission and turn the left drive shaft up so that it does not interfere.
17. Lower the transmission and pull it off the engine guide pins.
18. Secure the torque converter so it does not fall out of the crankcase and lower the transmission to the ground.
Installation
Installation is carried out in the reverse order of removal. Note the following:
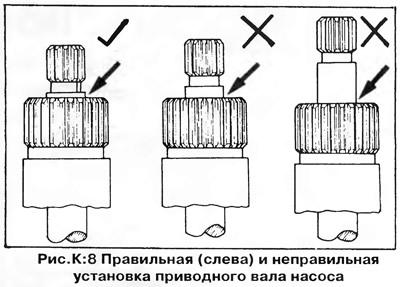
1. Make sure that the oil pump drive shaft is correctly installed if the torque converter was removed from the transmission (pic. K:8). If the ring of the smooth surface of the pump shaft protrudes above the edge of the drive shaft of the gearbox, then the inner end of the shaft is not engaged with the pump. If the pump shaft protrudes excessively, then the shaft is not the right size (shafts are available in different lengths).
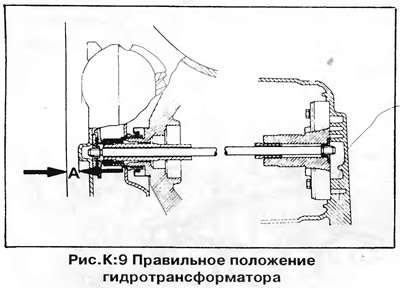
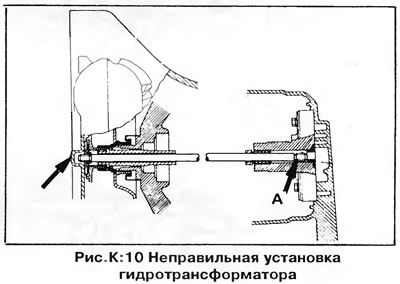
2. Carefully, without tilting the torque converter, put it on the freewheel support. If necessary, carefully turn the torque converter to align it with the splines. After installation, the central projection of the torque converter should be approximately 10 mm below the lip of the crankcase (Ah, fig. K:9), If the torque converter is pushed forward, then the oil pump shaft has come out of the pump drive splines (Ah, fig. K:10), which during operation will lead to the destruction of the drive.
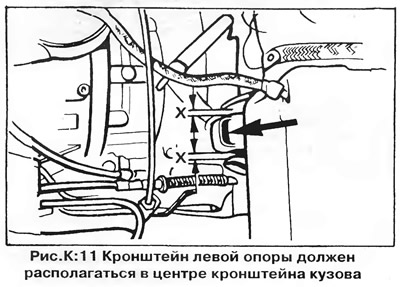
3. Lift the transmission into the engine compartment and place the left drive shaft on top of it. Slide the unit onto the motor mounts and secure with two bolts. Raise the transmission so that the left drive shaft can be inserted into the flange recess, then install the left support bracket (pic. K:11), aligning it with the body bracket. Install the drive shaft.
4. Before tightening and while tightening the bolts of the transmission to the engine, turn the torque converter to prevent it from slipping off the splines and jamming when the bolts are tightened.
5. Before final tightening of the power unit support bolts, ensure that the support brackets are located in the middle of the body brackets (pic. K:11 and K:12).

6. Insert the selector lever cable into the clamp, then attach the cable bracket to the transmission. Connect the accelerator pedal cables and "kickdown" and check their alignment (see chapter "Fuel system").
7. Check the selector cable adjustment as described in the appropriate section.
8. Check the oil level in the transmission and the oil level in the main gear, as described in chapter "Vehicle maintenance work". If the transmission is empty, first add approximately 2.5 liters of oil using a funnel and hose.
Visitor comments