
Throttle cable
The throttle cable and how it is attached varies from engine to engine, so when purchasing a new cable, use the old cable as a reference.
There are three main types of throttle cable attachment to the carburetor (pic. F:5).
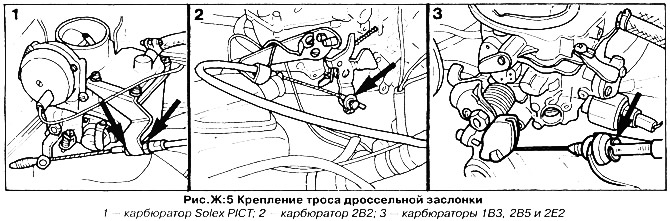
Type 1: On Solex PICT carburetors, the cable is attached to the carburetor throttle lever with two nuts at the end of the cable. Cable adjustment is carried out by changing the position of the two nuts securing the cable sheath to the bracket on the carburetor.
Type 2: On Zenith 2B2 carburetors, the cable is attached to the throttle lever with a clamp bolt. Cable adjustment is made by changing the position of the cable in the clamp of the throttle lever.
Type 3: On Solex PIC, Pierburg/Zemth 1ВЗ, 2В5 and 2Е2 carburetors, the cable has a tide (nipple) at the end, and on the throttle lever there is a guide in the form of a sector in which the end of the cable is fixed. The free play of the cable is adjusted by moving the retaining ring on the cable sheath at the bracket.
In all cases, adjust the cable so that only when the accelerator pedal is fully depressed, the throttle valve opens completely, while there is a gap of no more than 1.0 mm between the throttle lever and its limiter.
The fastening of the cable at the accelerator pedal is similar for all models: the cable is hooked to the upper part of the pedal lever, and the outer sheath of the cable rests against the bulkhead.
Handle the accelerator cable with care, because even with slight kinks, the cable is not serviceable. If a break is visible on the cable, the cable must be replaced immediately.
When installing, make sure that the cable is laid correctly, without kinks, and fixed in the brackets and other attachment points, bend the brackets if necessary.
The above also applies to engines with a fuel injection system. Here the tip of the cable is pressed onto the ball pin of the throttle lever and secured with a clip. The outer sheath of the cable is attached to the bracket on the valve cover, and the adjustment is carried out by changing the position of the locknuts on the sheath of the cable.
Models with automatic transmission
On models with automatic transmission, a throttle * valve actuator with two cables is installed. Accelerator cable runs from pedal to lever "kickdown" (downshift) on the transmission case, and the throttle cable goes from the lever on the transmission to the carburetor (pic. F:6). First of all, adjust the throttle cable.
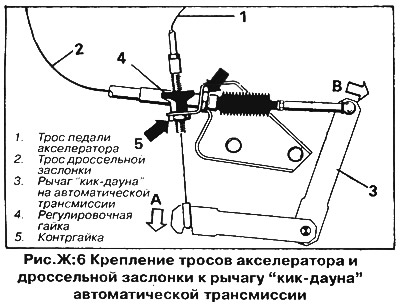
With the choke fully open, close the throttle (the position corresponding to idling). On vehicles with a carburetor type 1VZ, the high idle cam must be set so that the adjusting screw does not touch it. On the transmission, move the lever all the way down (Ah, fig. F:6) to the position corresponding to the closed state of the throttle valve, while the throttle cable must not have any slack. Check the adjustment by releasing the clip and disconnecting the cable end from the ball stud on the transmission. The cable is adjusted correctly when the tip of the cable fits over the ball stud without tension on the cable. Adjust the cable with the two nuts on the bracket on the carburetor.
To check the accelerator cable adjustment, fully depress the accelerator pedal to the low gear position (before triggering "kickdown"). If at the same time the vertical part of the lever on the transmission is completely pressed to the right (B, fig. F:6), then the accelerator cable must not have any slack. If necessary, adjust the cable by loosening the jam nut and turning the knurled nut on the transmission bracket.
Choke cable
For vehicles with 1.1/1.3 l engine (since August 1979) and a Solex PIC carburetor fitted with a manual choke. Adjust the choke cable as follows:
Disconnect the cable from the choke lever on the carburetor (Ah, fig. F:7). Make sure the outer sheath of the cable protrudes from the carburetor mounting bracket by approximately 12mm. Adjust the position of the shell if necessary (pic. F:7). Press in the choke control button, then pull it out until the first click of the latch (The air damper indicator light must not be on). Press the choke lever all the way so that the choke is fully open, and attach the cable to it. The rope must not be bent.
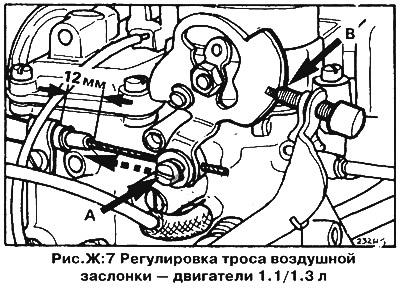
Pull out the choke control button all the way and push it back into the working position - the lock should be clearly felt. The marks on the choke lever must align (or almost match) with the end of the high idle adjusting screw (B, fig. F:7) - If this is not possible, replace the choke cable.
Visitor comments