
English Русский
Български
Беларускі
Український
Српски
Hrvatski
Română
Polski
Slovenský
Magyar
  |  Articles  |  Sitemap  |  Contacts  |    |
Car maintenance Ford Car maintenance Hyundai Car maintenance Chevrolet Car maintenance BMW Car maintenance Audi Car maintenance Opel Car maintenance AvtoVAZ
VWmanual.ru


Main   Passat   Golf   Polo   Touareg   Tiguan   Sharan   Transporter   Others  
Golf 1 (1974-1984, diesel) Golf 1 (1974-1984, petrol) Golf 2 (1984-1993, petrol) Golf 2 (1984-1993) Golf 3 (1991-1997) Golf 4 (1997-2004) Golf 5 (2003-2008)

Fuel injection system (VW Golf 1)

  • Main
  • Golf
  • Golf 1
  • Power unit
  • Fuel system
  • Fuel injection system
            0


Contents: Air flow sensor ↓ Fuel distributor ↓ Injectors ↓
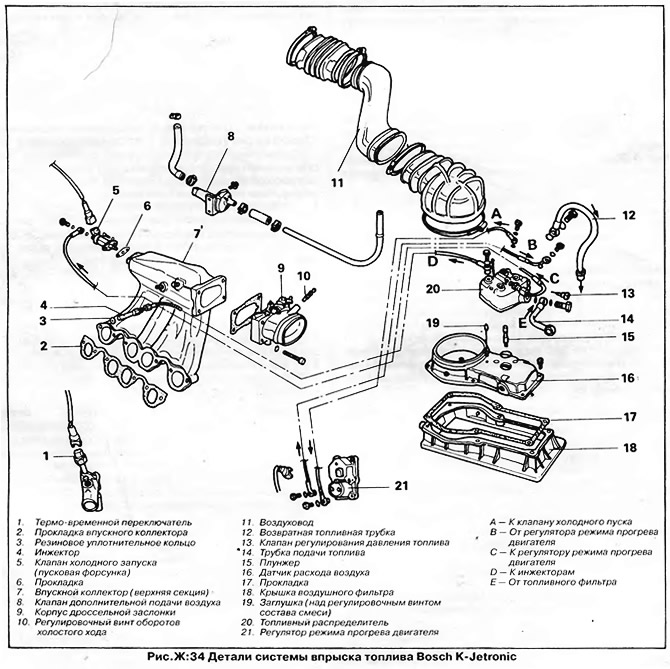
Injection models are equipped with Bosch K-Jetromc fuel injection system. The system operates on the principle of continuous injection, the main details of the system are shown in Figure 1: 34.

Injection models are equipped with Bosch K-Jetromc fuel injection system. The system operates on…


The system does not require maintenance, except for checking the idle speed and periodic replacement of the fuel and air filters. The most basic adjustments are described below, all other work should be left to specialists in injection systems or representatives of the VW company. Adjustment of idle speed and CO content in the exhaust gases is described in Chapter "Engine adjustment".

Air flow sensor


The air flow sensor plate must be positioned concentrically in the housing diffuser. Visually check the position of the plate, if necessary, loosen the central screw and move the plate to the desired position. Tighten the screw.

The operation of the plate lever and the adjusting plunger can be checked as follows:

Turn on the starter for about 10 seconds. Lift the sensor plate with a screwdriver (drawing W:30) — the lever should provide the same resistance throughout its entire travel. When quickly moving the lever down, there should be no resistance, otherwise replace the air flow sensor.
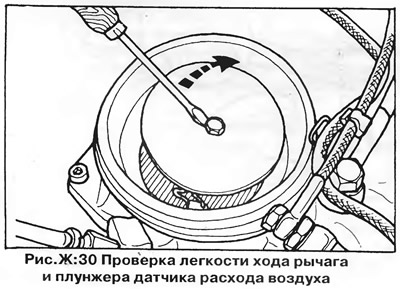


Turn on the starter for about 10 seconds. Lift the sensor plate with a screwdriver (drawing W:30) —…


If the lever moves up with difficulty, this indicates that the control plunger is jammed. Inspect, clean and repair the plunger and sensor, replace them if necessary.

Check the initial position of the air flow sensor plate at normal engine operating temperature after turning on the starter for 10-15 s. The upper edge of the plate should be at the same level, or no more than 0.5 mm below the beginning of the narrow part of the diffuser (drawing W:31). If adjustment is necessary, lift the sensor plate and squeeze or straighten the wire clip under the plate slightly (drawing W:32). Do not bend the flat spring at the plate stop.
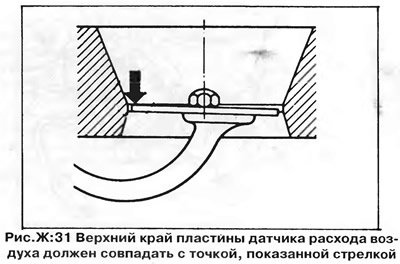
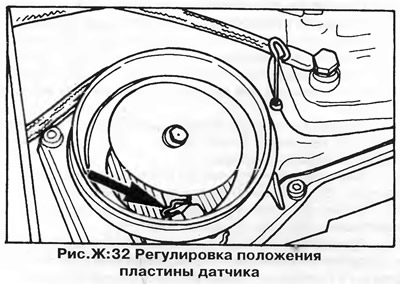
Check the initial position of the air flow sensor plate at normal engine operating temperature…


Check the initial position of the air flow sensor plate at normal engine operating temperature…


Check the idle speed and the CO content in the exhaust gases (see chapter "Engine adjustment").


Fuel distributor


The cause of difficult engine starting may be contamination, corrosion or jamming of the plunger of the pressure control valve in the fuel distributor. To repair the valve, there is a repair kit containing all the necessary seals and parts.

(The original information is posted on the resource: «VWmanual»)

Before removing the valve, relieve pressure in the system by disconnecting the high-pressure line from the engine warm-up regulator on the side of the cylinder block, near the oil dipstick. The high-pressure line has a large coupling. When loosening the bolt, cover the connection with a rag to prevent fuel from splashing.

Unscrew the pressure control valve from the fuel distributor and remove its parts, remembering their relative positions (drawing W:33). Save and reinstall the adjusting washers installed under the valve plug and spring, as their thickness is determined at the factory and should not be changed.
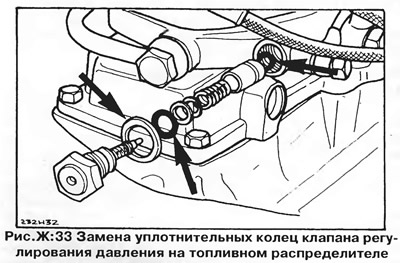
Unscrew the pressure control valve from the fuel distributor and remove its parts, remembering…


Clean the parts and reassemble the unit using new O-rings (shown by arrows in the figure). Tighten the valve plug to the torque specified in the section "Technical data". Connect the high pressure line to the engine warm-up mode regulator.

Injectors


The injectors, one for each cylinder, are tightly inserted into the intake ports from the rear (in relation to the car) sides of the cylinder head.

The K-Jetronic system is a continuous fuel injection system, meaning all four injectors continuously inject fuel into the cylinder head intake ports. To check an injector, remove it from the cylinder head hole, start the engine and run it on three cylinders. The jet of fuel sprayed from the injector nozzle should have a symmetrical conical shape. Otherwise, the needle or the spray spring inside the injector is damaged and the injector must be replaced.

Injectors cannot be disassembled, cleaned or repaired.

Before installing the injector, inspect the rubber sealing ring and replace it if necessary. Wet the seal and the injector with fuel, insert it into the cylinder head and make sure it is completely in the hole.

This article is available at russian, bulgarian, belarusian, ukrainian, serbian, croatian, romanian, polish, slovak, hungarian
The text has been checked: Tarasov Ivan

Share information:

Previous articles
Carburetor Pierburg 2E2
Zenith 2B2/2B5 Carburetors
Carburetors Pierburg/Zenith 1B3
Solex PICT/PIC carburetors
Removal and installation the carburetor
Carburetor drive
Next articles
Removal and installation the fuel tank
Possible malfunctions of the fuel system


Similar articles from other manuals for VW cars:
Possible malfunctions of the K-Jetronic fuel injection system,… Passat B2 (1981-1988)
Fuel injection and ignition control system Polo 3 (1995-2003)
General instructions for the injection system (petrol engine) Touareg 1 (2002-2006)
Fuel injection system Tiguan 1 (2007-2015)
Fuel injection system of the VR6 engine Sharan 1 (1995-2000)
Diagnostics of diesel fuel injection system faults Transporter T4 (1990-2003)
Air and fuel injection system Caddy 3 (2003-2010)
Link to this page in different formats


Visitor comments


No comments yet


How much will 12 + 23 =


Golf 5 
  • General information
  • User manual
  • Maintenance
  • Troubleshooting
  • Power unit
  • Engine repair
  • Cooling and ventilation system
  • Fuel system
  • Ignition system
  • Transmission
  • Clutch
  • Mechanical gearbox
  • Automatic gearbox
  • Chassis
  • Brake system
  • Car suspension
  • Steering
  • Body
  • Interior (internal elements)
  • Exterior (external elements)
  • Doors and covers
  • Electrical equipment
  • Power devices
  • Washers and wipers
  • Lighting and appliances
  • Electrical circuits
Golf 4 
  • General information
  • User manual
  • Weekly checks
  • Maintenance
  • Power unit
  • Petrol engines
  • Diesel engines
  • Cooling system
  • Fuel system (petrol)
  • Control system (petrol)
  • Fuel system (diesel)
  • Exhaust system
  • Transmission
  • Clutch
  • Car gearbox
  • Drive shafts
  • Chassis
  • Car suspension
  • Steering
  • Wheels and tires
  • Brake system
  • Body
  • Exterior (external elements)
  • Interior (internal elements)
  • Ventilation and heating
  • Car doors and sunroof
  • Washers and glass cleaners
  • Electrical equipment
  • Power devices
  • Lighting and appliances
  • Electrical circuits
Golf 3 
  • Petrol engine
  • Engine repair
  • Lubrication system
  • Cooling system
  • Ignition system
  • Diesel engine
  • Engine repair
  • Diesel injection system
  • Pre-glow system
  • Transmission
  • Clutch
  • Gearbox and drive shafts
  • Chassis
  • Steering
  • Wheels and suspension
  • Brake system
  • Electrical equipment
  • Lighting and appliances
  • Electrical circuits
Golf 2 
  • General information
  • Introduction to guide
  • User manual
  • Petrol engines 1.3 l
  • Engine repair
  • Lubrication system
  • Cooling system
  • Carburetors
  • Supply system
  • Ignition system
  • Petrol engines 1.6/1.8 l
  • Engine repair
  • Supply system
  • Ignition system
  • Diesel engines
  • Engine repair
  • Lubrication system
  • Cooling system
  • Power and exhaust system
  • Transmission
  • Clutch
  • 4-speed gearbox 084
  • 5-speed gearbox 085
  • 4-speed gearbox 020/4R
  • 5-speed gearbox 020/4T
  • Automatic gearbox
  • Drive shafts
  • Chassis
  • Steering
  • Car suspension
  • Brake system
  • Body
  • Body elements
  • Doors, locks and windows
  • Electrical equipment
  • Equipment and devices
  • Power devices
Golf 2 (petrol) 
  • General information
  • Characteristics
  • Car care
  • Maintenance
  • Power unit
  • Engine repair
  • Engine 1.05/1.30
  • Engine 1.60/1.80
  • Cooling and lubrication system
  • Power and exhaust system
  • Transmission
  • Clutch
  • Car gearbox
  • Drive shafts
  • Chassis
  • Brake system
  • Steering
  • Suspension
  • Body
  • Body and equipment
  • Electrical equipment
  • Lighting and appliances
  • Electrical circuits
Golf 1 (petrol) 
  • General information
  • Characteristics
  • User manual
  • Maintenance
  • Power unit
  • Engine adjustment
  • Engine 1.1/1.3
  • Engine 1.5/1.6/1.8
  • Engine electrical equipment
  • Cooling system
  • Fuel system
  • Transmission
  • Clutch and manual gearbox
  • Automatic gearbox
  • Chassis
  • Steering
  • Front suspension
  • Rear suspension
  • Brake system
  • Electrical equipment
  • Lighting and appliances
  • Electrical circuits
  • Body
  • Body and equipment
  • Optional equipment
Golf 1 (diesel) 
  • General information
  • Specifications
  • Maintenance
  • Power unit
  • Engine repair
  • Exhaust and turbocharger
  • Cooling system
  • Fuel system
  • Fuel injection system
  • Transmission
  • Clutch and drive shafts
  • Car gearbox
  • Chassis
  • Suspension and wheels
  • Steering
  • Brake system
  • Wheels and tires
  • Body
  • Heating and ventilation
  • Exterior (external elements)
  • Interior (internal elements)
  • Doors and windows
  • Electrical equipment
  • Equipment and devices
  • Lighting system
  • Power devices
  • Electrical circuits
VWmanual.ru © 2016-2026 | Mobile version | News and articles | Sitemap: EN BG BY UA RS HR RO PL SK HU | Write message | Site search
Passat B2 • Passat B3 • Passat B4 • Passat B5 • Passat B6 • Golf 1, diesel • Golf 1, petrol • Golf 2, petrol • Golf 2 • Golf 3 • Golf 4 • Golf 5 • Polo 3 • Polo 4 • Touareg 1 • Tiguan 1 • Sharan 1 • Transporter T3 • Transporter T4 • LT 28 • LT 2D • Beetle • Caddy 3 •
Our website uses cookies to ensure functionality and convenience.