
On carbureted engines, the fuel pump strainer can be removed by unscrewing the central screw in the cover (see "Vehicle maintenance work").
Removal and installation (carbureted engines)
1. Disconnect the wire "masses" from the battery.
2. Disconnect from the pump fuel hoses. The one-piece hose clamps installed at the factory must be cut and replaced during assembly with band clamps with screw clamps.
3. Turn away two bolts of fastening and remove the pump from the engine. The pump is fixed with hexagon socket bolts.
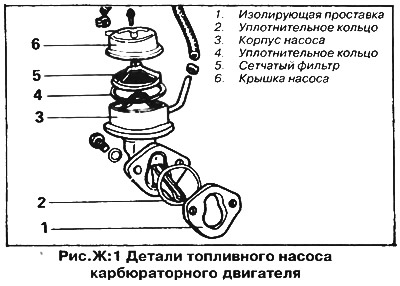
4. On models with a 1.1/1.3L engine, replace the O-ring, on models with a 1.5/1.6 and 1.8L engine, make sure that the insulating spacer and O-ring are installed between the cylinder block and the pump (see fig. F:1), and the pump lever lies on the eccentric of the auxiliary shaft. Tighten the pump mounting bolts to the torque specified in section "Technical data".
5. Attach fuel hoses to the pump, if necessary, replace the clamps.
Start the engine and check for leaks.
Removal and installation (fuel injection engines)
ATTENTION: Be sure to replace a defective pump with a new one, because if the fuel pump does not work properly, the fuel injection system will not be able to work normally.
Raise and support the rear of the vehicle - head "Basic rules for work". Disconnect the wire "masses" from the battery.
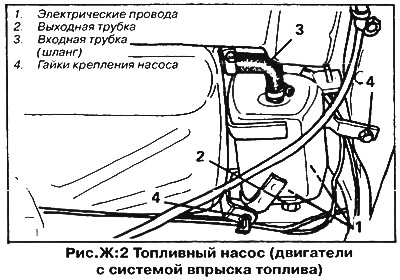
Disconnect the electrical wires (connector or screw connection) from the front pump. Disconnect the fuel outlet pipe from the pump at the front and the inlet hose at the rear (see fig. F:2). Plug the inlet hose so that fuel does not leak from the fuel tank
Loosen the pump mounting nuts and remove the pump.
During this procedure, it is very important to prevent dirt from entering the fuel system.
Installation is carried out in the reverse order of removal.
The pump is lubricated and cooled by fuel, in which the armature and pump brushes are immersed. Don't let work "dry" pump - this can lead to overheating and seizure of the electric motor.
Visitor comments