
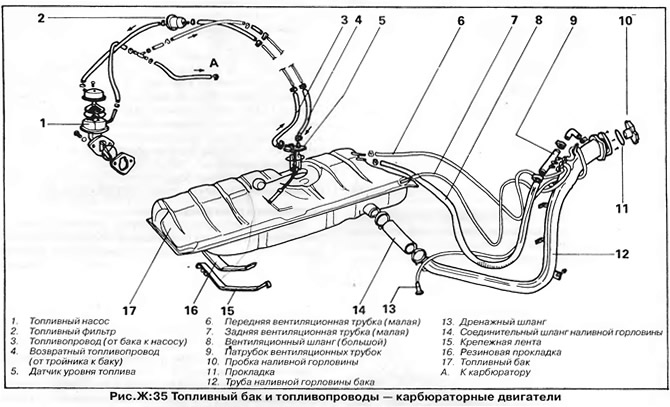
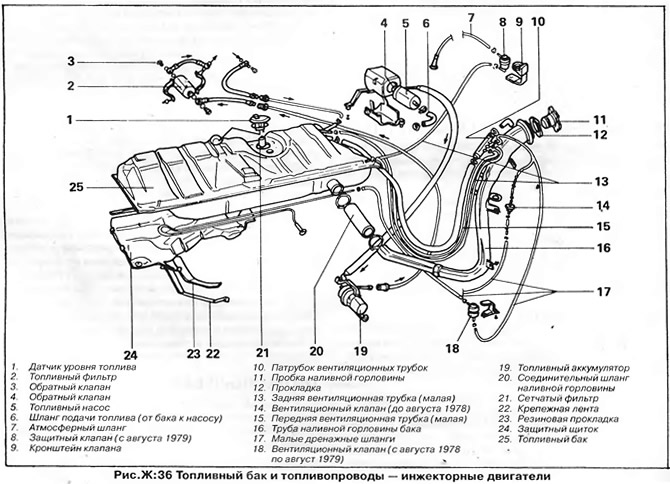
Fuel tank modifications
In January 1976, the location of the fuel level sensor was changed - the sensor was moved from the right side to the upper surface of the tank. In August 1979, instead of thin tank ventilation tubes, thicker ones were installed.
The top-mounted fuel level sensor is accessed through a hole in the vehicle floor under the rear seat. The sensor is secured to the tank with a bayonet retaining ring that is easy to remove. When installing the sensor, make sure that the electrical connector is directed forward, and on injector models - slightly offset to the left.
On injection models, a vent valve is built into the tank vent tube. On cars manufactured before August 1979, the valve has two pipes, and on later models a third was added - an atmospheric pipe. Since August 1979, instead of the vent valve, a protective valve has been installed, which closes by gravity. Since that time, protective valves have been installed on carburetor models. Safety valves are of different types, and the valve can only be replaced by a valve of the same type. The valves are color coded. The safety valve must be installed vertically, marked "CANISTER" up.
The fuel tank cap on cars built prior to August 1979 had a vent, while later models do not have a vent in the plug. Corks are distinguished by the inscription on the reverse side: a cork without a vent has an inscription "ohne Luftung", and the cork with ventilation - "mit Luftung".
Early injection models had fuel tank caps, but these were replaced with bayonet plugs, the same as used on carbureted models from August 1979.
Removing and Installing the Fuel Tank - Golf/Jetta Models
1. Disconnect the wire "masses" from the battery.
2. Pump out the remaining fuel from the tank through the filler neck.
3. If the fuel level sensor is located on top, remove the rear seat and remove the cover to gain access to the sensor. Disconnect the electrical connector from the sensor and (on carbureted models) both fuel lines. Mark one of the tubes with chalk to ensure they are correctly positioned during reassembly.
4. If the fuel level sensor is installed on the side of the tank, access to it opens from under the car.
5. On injection models, disconnect wires and tubes from the fuel pump and remove the fuel pump. Disconnect the fuel supply and return pipes from the fuel tank.
6. Loosen the rear wheel mounting bolts, lift and support the rear of the car on supports (see chapter "Basic rules for work"). Remove rear wheels.
7. To remove the fuel tank, you need to separate the rear axle from the body. Disconnect the brake hoses from the rear axle on both sides (plug pipes and hoses so that brake fluid does not leak), disconnect the rear axle mountings from the body, pivot the axle down and let it hang from the handbrake cable sheaths.
8. Unhook the exhaust hangers.
9. Disconnect the filler hose from the fuel tank and close the hole in the tank.
10. Disconnect two fastening tapes from a body and lower a tank.
11. Remove the ventilation tubes from the tank pipes, then remove the tank from under the car.
Installation is carried out in the reverse order of removal. Install rubber gaskets between the fuel tank and the mounting straps. Use new hose clamps to secure hoses.
Visitor comments