
To separate the pipes connecting them, they usually use a pipe cutter, for example, HAZET 4682. If there is no pipe cutter, then the pipes can be sawn with a hacksaw.
Attention! If the muffler pipe cannot be removed from the clamp, then the connecting pipe can be cut, stepping back about 5 cm from the clamp, and then knock out the rest of the pipe with a hammer and chisel, after sawing it along. If a welding machine is available, then the connecting collar can be heated with a burner, which will allow you to easily remove the muffler pipe.
Attention! When using a welding machine, cover the underside of the car with aluminum sheets. Fire hazard. Keep a fire extinguisher ready!
1. Place the vehicle on jack stands.
Attention! There is a risk of injury when jacking up the vehicle and placing it on jack stands. Read the safety precautions in the chapter «car jacking».
The pipe separation point is marked (see arrows in illustration 3.0). Pipe cutting is carried out at the middle mark (arrow 2). The side marks marked with arrows 1 and 3 are used for orientation in order to properly fix them later in the connecting clamp 4 (see illustration).
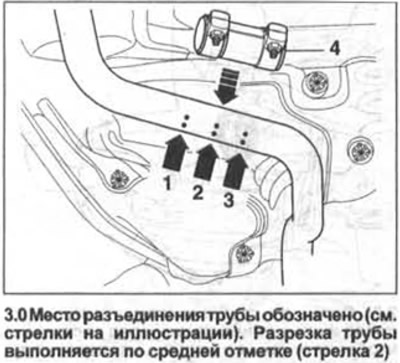
2. Lay the pipe cutter chain on the middle mark (arrow 2 in illustration 3.0) on the pipe and fasten. Check the ease of movement of the chain on the pipe. If the chain is too tight, the pipe cutter may deform the pipe.
3. Release the muffler from the rubber suspension pads and remove it.
Installation
4. Attach the muffler to the rubber suspension pads.
To connect the pipes, a clamp is used, which is supplied as a spare part (see illustration 2.17).
Attention! The old clamp must be replaced with a new one after each dismantling. When purchasing a new clamp, remember that the diameter of the exhaust pipes is not the same for different models. Install the clamp at the junction of pipes as shown in illustrations 2.17. In this case, the end of the bolt rod should not protrude beyond the edge of the clamp (see arrow on illustrations 2.17).
The threaded connection of the clamp must point backwards. On vehicles with a 2.0 liter BDK diesel engine, the clamp screw connection must point to the left when viewed in the direction of travel.
5. Correct the exhaust system.
6. Tighten the clamp bolt nuts.
Tightening torques:
- cars with a gasoline engine - 25 Nm
- vehicles with a diesel engine, M8 bolts - 25 Nm
- vehicles with a diesel engine, M10 bolts - 40 Nm
7. Lower the car on wheels.
Checking the tightness of the exhaust system
8. Start the engine and, with the engine running, plug the exhaust pipe with a rag or a suitable plug.
9. Check by ear the operation of the exhaust system.
If necessary, apply leak detection spray to the cylinder head and exhaust manifold and exhaust manifold and downpipe connections.
Make sure that no air bubbles are formed in the indicated places.
10. Repair any leaks found.
Visitor comments