



Contents: Removal ↓ Installation ↓
Removal
Attention! When performing work, strictly adhere to safety precautions and maintain thorough cleanliness.
1. Jack up the car and place it on jack stands.
Warning! Jacking up a vehicle can pose a risk of injury. Read the safety precautions.
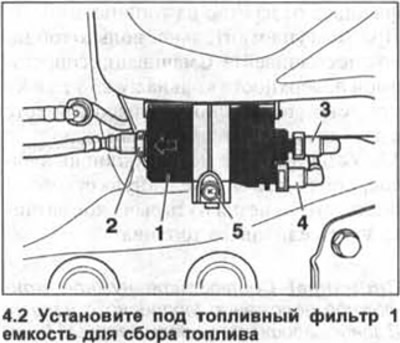
2. Place a container under the fuel filter to collect the fuel (see illustration). The fuel filter is located on the bottom of the car near the fuel tank.
Warning! The fuel system is under pressure. Before disconnecting the fuel system hoses, wrap the hose joint with a rag and only then carefully remove the hose, releasing the pressure. Wear safety glasses.
3. Press the clamp leashes that secure fuel hoses 2, 3 and 4 to the filter and disconnect them (see illustration 4.2).
Attention! In vehicles with a 1.4-/1.6-liter FSI engine, the fuel filter does not have a return fuel line and a pressure-reducing valve. In this case, fuel from the high-pressure fuel pump flows directly into the fuel tank through the return fuel line.
4. Loosen bolt 5 on the fuel filter mounting clamp (see illustration 4.2). There is no need to completely unscrew the bolt.
The original article is available on the website www.VWmanual.ru
5. Remove the fuel filter from the holder and drain the fuel in it into a container.
Installation
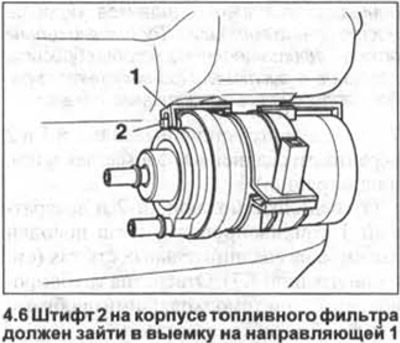
6. Secure the fuel filter in the holder so that the arrow on the filter points in the direction of fuel flow, i.e. from the fuel tank to the engine. In addition, pin 2 on the fuel filter housing should fit into the recess on guide 1 (see illustration).
7. Tighten the clamp bolt on the fuel filter with a torque of 3 Nm.
8. Connect the hoses and secure them. Do not mix up the supply hose 4 black with the outlet hose 3 blue (see illustration 4.2).
Attention! The outlet hose is connected to the pressure reducing valve (see illustration 4.2).
9. Lower the car onto its wheels.
Attention! If the engine does not start after replacing the fuel pump, the fuel system should be bled through the vent hose fitting.
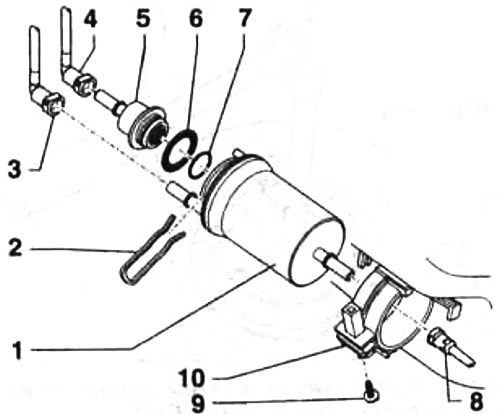
4.0. Fuel filter. Cars with gasoline engine
1 - fuel filter
2 - Reducing valve clamp. Make sure it fits securely
3 - fuel supply line
4 - fuel outlet line
5 - pressure reducing valve 4 bar
6 - sealing ring. To be replaced after each dismantling
7 - O-ring. To be replaced after each dismantling
8 - fuel supply line. To the engine
9 - bolt. Tightening torque 3 Nm
10 - bracket. Attaches to the fuel tank
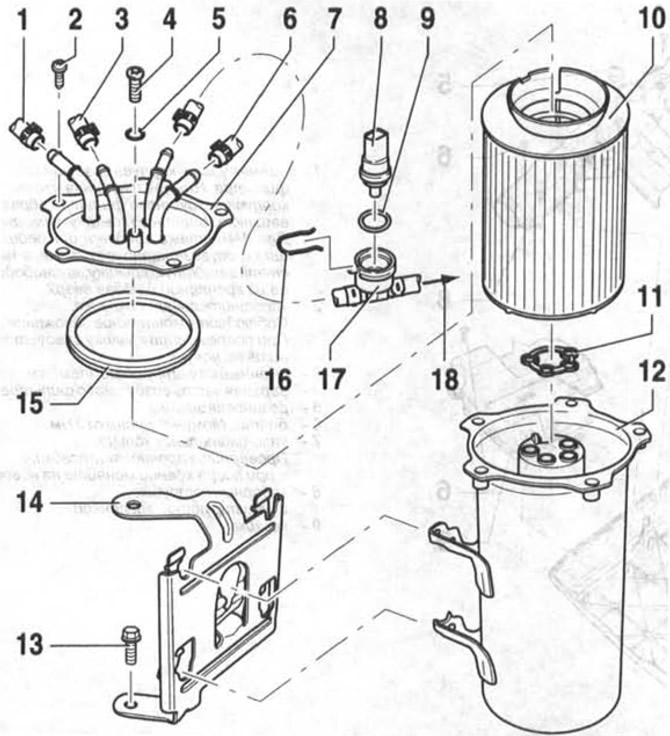
4.0a. Fuel filter. Cars with 1.9 liter diesel engine
1 - Fuel supply line from the fuel tank to the filter. Painted white or marked white. Check the tightness of the fit
2 - bolt. Tightening torque 8 Nm
3 - return fuel line. to the fuel cooling radiator. Painted blue or marked blue. Check the tightness of the fit
4 - threaded plug of the condensate drain hole. Unscrew the plug and drain approximately 100 ml of liquid using a syringe
5 - sealing ring. To be replaced after each dismantling
6 - return fuel line from dual (tandem) fuel pump. Painted blue or marked blue
7 - Upper fuel filter cover
8 - fuel temperature sensor
9 - sealing ring. To be replaced after each dismantling
10 - replaceable filter element
11 - sealing ring. To be replaced after each dismantling
12 - fuel filter housing
13 - Fuel filter bracket mounting bolt. Tightening torque 13 Nm
14 - fuel filter bracket
15 - sealing ring. To be replaced after each dismantling
16 - Clamp. Check the tightness of the fit
17 - fuel supply line with connecting nipple for fuel temperature sensor
18 - to double (tandem) fuel pump
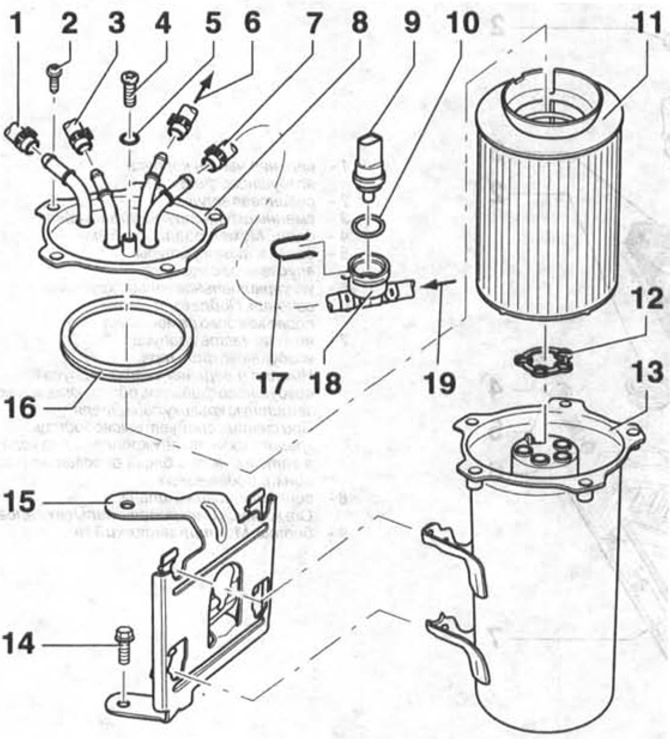
4.0b. Fuel filter. Cars with a 2.0 liter diesel engine
1 - Fuel supply line from the fuel tank to the filter. Painted white or marked white. Check the tightness of the fit
2 - bolt. Tightening torque 5 Nm
3 - return fuel line, to the fuel cooling radiator. Painted blue or marked blue. Check the tightness of the fit
4 - threaded plug of the condensate drain hole
5 - sealing ring. To be replaced after each dismantling
6 - fuel supply line to the dual fuel pump
7 - return fuel line from dual (tandem) fuel pump. Painted blue or marked blue
8 - Upper fuel filter cover
9 - fuel temperature sensor
10 - sealing ring. To be replaced after each dismantling
11 - replaceable filter element
12 - sealing ring. To be replaced after each dismantling
13 - fuel filter housing
14 - Fuel filter bracket mounting bolt. Tightening torque 6 Nm
15 - fuel filter bracket
16 - sealing ring. To be replaced after each dismantling
17 - Clamp. Check the tightness of the fit
18 - connecting nipple for fuel temperature sensor
19 - from double (tandem) fuel pump
Visitor comments