
When the oil is drained, screw in the drain plug (in models 1.6 and 1.8, the o-ring of the drain plug must also be replaced) and fill with oil to the required level. Remember that you must wait about five minutes after filling the oil in order to find out the correct level on the measure.
Replacing the oil filter in 1.1 and 1.3 liter engines
The oil filter is located on the side wall of the engine housing on the same side as the generator. An appropriate reservoir must be placed (tank) under the filter, then, using a special self-tightening wrench, unscrew it and remove it. Then we wipe clean the sealing surface on the cylinder block and cover it with fresh oil. Lubricate the sealing rubber on the new filter with oil and press the filter manually without using a wrench. We lubricate the contact surface with oil so that during the booster the rubber gasket slides along the body. This will ensure its normal installation and proper sealing of the joint. If a smudge appears after starting the engine, you can try to squeeze the filter harder. However, hand screwing is usually sufficient.
Replacing the oil filter in 1.6 and 1.8 liter engines
The oil filter is bolted to a bracket attached to the engine housing, below the ignition distributor. This is the so-called side filter. On fuel injected models, the oil cooler is connected between this bracket and the filter insert. The filter must be replaced every 10,000 km.
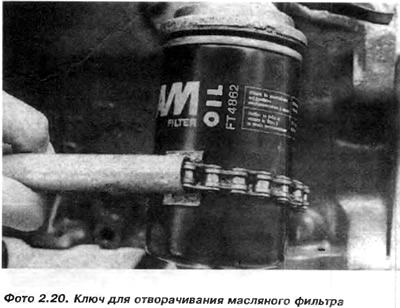
1. Place an appropriate container under the filter, then using the clamp wrench (photo 2.20) unscrew the filter and remove it. To have better access to the filter, either jack up the front of the vehicle or place the vehicle over a groove or in a driveway.
2. Wipe clean the sealing surfaces of the filter and oil cooler bracket.
3. If you need to remove the oil cooler (fuel injected models), it is necessary to drain the liquid from the cooling system and disconnect the elastic pipes of the coolant. The rubber o-ring between the oil cooler and the bracket must be replaced.
4. If the oil filter bracket needs to be removed, disconnect the oil pressure sensor wire, unscrew the fixing bolts and remove the bracket and gasket. The oil pressure sensor can be removed from the top of the bracket if necessary. Remove and replace the rubber o-ring of the sensor.
5. The oil filter is installed in the reverse order of removal. Replace bracket gasket and O-rings if necessary.
6. Distribute engine oil over the sealing rubber of the new filter. If this is not done, the sealing rubber may be warped during compression. Then fasten and tighten the filter by hand (or according to the recommendations given on the filter insert).
7. Top up the engine oil level. Start the engine and check for any oil leaks near the filter bracket. If any smudges appear, it is necessary to squeeze the filter harder or replace the filter seal manually.
Visitor comments