



Contents: Extraction ↓ Examination ↓
Extraction
1. Disconnect the negative battery cable.
2. Drain the liquid from the cooling system.
3. Unscrew the thermal switch on the left side of the radiator and the sealing ring of the o-ring type 15 (figure 2.3).
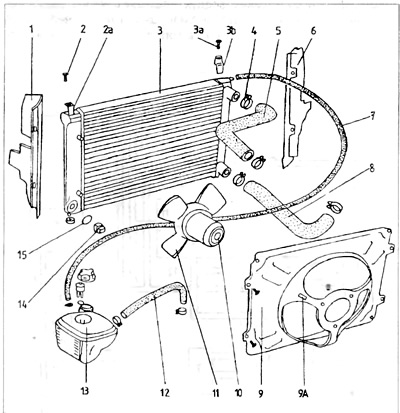
Figure 2.3. Cooling system - 1.6 and 1.8 l engines
1 - left cover; 2 - bolt securing the radiator; 2a - permanent mounting bracket; 3 - radiator, For - fastening bolt; 3b - removable bracket; 4 - pressure belt; 5 - head/radiator pipe; 6 - right cover; 7 - expansion tank/radiator pipe; 8 - Lower radiator/water pump hose; 9 - Fan cover; 9a - fastenings of wires supplying the radiator; 10 - fan motor; 11 - fan blades; 12 - expansion tank pipe/heater pipe; 13 - equalizing tank; 14 - radiator thermal switch; 15 - sealing ring (o-ring).
Examination
4. To test the thermal switch, it is necessary to hang it in such a way that only the part that is usually screwed into the radiator is immersed in a vessel with liquid. Connect the thermal switch with a 12-volt test lamp to the battery in order. Gradually heat the water and measure the temperature with a thermometer. The test lamp should light up at a certain switch-on temperature and go out at a certain switch-off temperature. If the lamp does not light up and does not go out at certain temperatures, it is necessary to replace the thermal switch with a new one.
Switch-on temperature 93-98°C
Shutdown temperature 88-93°C
Installation
Installation is performed in the reverse order of removal. During installation, it is necessary to install a new O-ring sealing ring under the thermal switch and tighten it to a torque of 25 Nm. Fill the cooling system with liquid.
(View the original on the website: VWmanual)
Visitor comments