



1. After draining the coolant, disconnect the upper hose from the radiator. Insert the water hose into the upper fitting. It is necessary to pass water through the radiator until clean water flows through the lower fitting.
2. Disconnect the heater hoses from the return pipe 15 and from the fitting 12 (figure 2.5). Set the heater valve to maximum. Insert the water hose into the heater hose and run water through the heater until clear water comes out of the return hose.
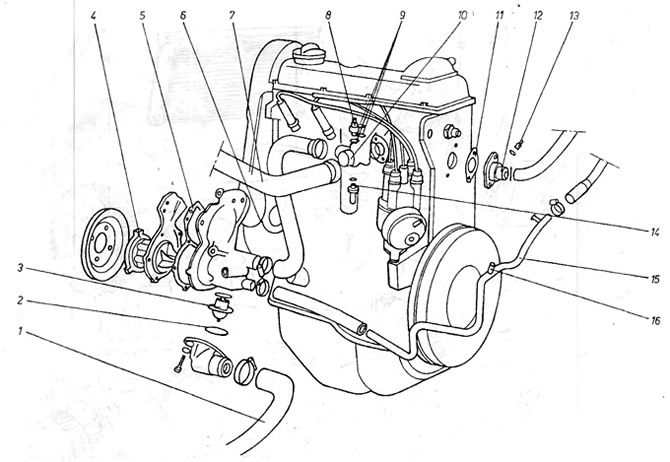
Figure 2.5. Cooling system - 1.6 and 1.8 l engines
1 - radiator/water pump hose; 2 - thermostat cover washer; 3 - thermostat; 4 - front cover with blades; 5 - gasket; 6 - input channel into the engine housing; 7 - head/radiator pipe; 8 - thermal switch; 9 - gasket; 10 - outlet fitting on the radiator; 11 - gasket: 12 - outlet fitting from the head; 13 - temperature sensor; 14 - thermal switch; 15 - return pipe from the heater; 16 - connection point of the pipe from the expansion tank.
3. If the system is heavily contaminated, it is necessary to flush the pipes in the opposite direction. To do this, remove the radiator, turn it and insert a water hose into the outlet fitting 15 (figure 2.2). It is necessary to flush the pipes until clean water flows out of the inlet fitting.
(The original can be viewed on the portal: «vwmanual»)
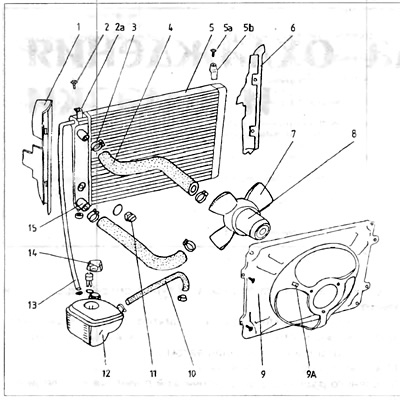
Figure 2.2. Cooling system - 1.1 and 1.3 l engines
1 - left cover; 2 - bolt securing the radiator; 2a - permanent mounting bracket; 3 - pressure belt; 4 - head/radiator pipe; 5 - radiator; 5a - fastening bolt; 5b - removable bracket, 6 - right cover. 7 fan blades 8 - fan motor, 9 - fan cover; 9a - fastening the wires supplying the fan; 10 - expansion tank pipe/heater pipe; 11 - radiator thermal switch; 12 - expansion tank. 13 - expansion tank/radiator pipe; 14 - cork; 15 - outlet fitting.
4 The engine is also flushed in the opposite direction. To do this, it is necessary to disconnect the heater hose from the C branch pipe (figure 2.4), and also unscrew and move the return pipe 12 away from the engine body.
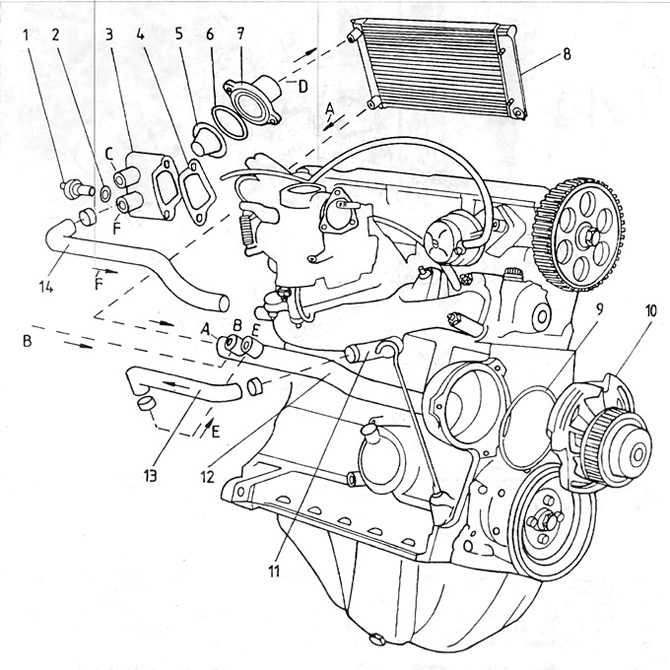
Figure 2.4. Cooling system - 1.1 and 1.3 l engines
1 - thermal switch 2 - gasket; 3 - thermostat housing; 4 - gasket; 5 - thermostat; 6 - cover gasket; 7 - thermostat cover; 8 - radiator; 9 - water pump gasket; 10 - water pump; 11 - manifold outlet fitting; 12 - metal tube; 13 - elastic hose; 14 thermostat housing/head pipe; A - entrance to the metal tube from the lower radiator pipe; B - entrance to the metal tube from the stove; C - output from the thermostat housing; D - output from thermostat to radiator; E - entrance to the metal tube from the drive manifold; F - output from the thermostat housing to the drive manifold.
The return pipe is screwed on two bolts under the carburetor. Insert a water hose into the C branch pipe and flush the engine until clean water comes out of the housing.
5. The use of chemical cleaners is a last resort. Regularly checking the concentration of antifreeze with anti-corrosion additives during the inspection after 15,000 km should prevent contamination of the system.
Visitor comments