
Oil pan and oil pump
Instruction: If a large amount of metal chips and other wear products are found in engine oil during engine repair, this may indicate damage to the connecting rod or main bearings of the crankshaft. In order to avoid subsequent damage, after carrying out repair work, it is necessary to: thoroughly clean the oil channels, replace the oil injection nozzles, replace the oil cooler, replace the oil filter. The oil level must not exceed the mark "max" on the oil dipstick. Otherwise, the catalytic converter may be damaged!
Oil pan and oil pump
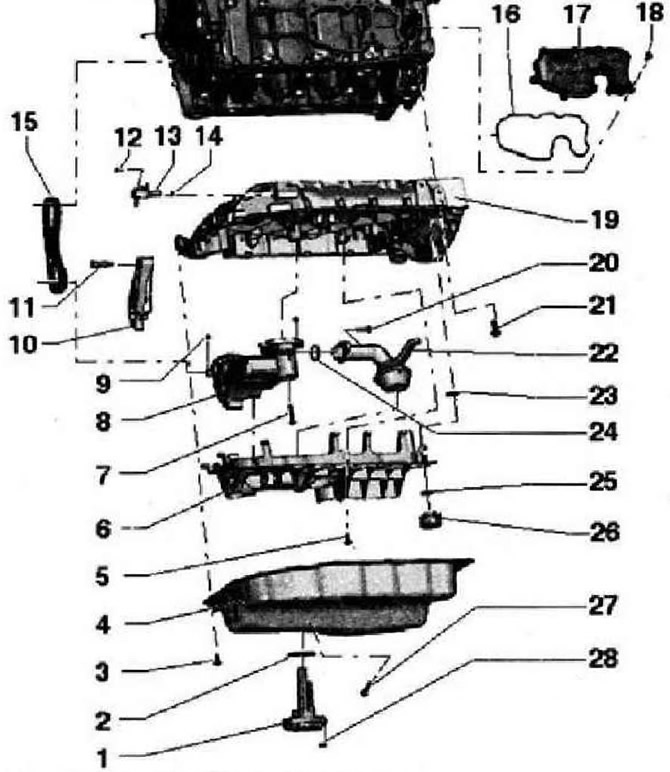
- 1 - Oil level and temperature sender -G266-, not for CSTA, CCTV
- 2 - Gasket, replace
- 3 - Bolt, replace
- 4 - The lower part of the oil sump
- 5 - Bolt, 9 Nm
- 6 - Oil separator, replace
- 7 - Bolt, 9 Nm
- 8 - Oil pump
- 9 - Centering sleeve
- 10 - Chain tensioner 11-Bolt, 9 Nm
- 12 - Bolt, not installed on Tiguan
- 13 - Oil pressure control valve -N428-, not fitted to Tiguan
- 14 - O-ring, not installed on Tiguan
- 15 - Oil pump drive chain, mark direction of travel before removing
- 16 - Gasket, replace
- 17 - Oil separator
- 18 - Bolt
- 19 - Upper part of the oil pan
- 20 - Bolt, 9 Nm
- 21 - Bolt, replace
- 22 - Inlet pipe, if necessary, clean the mesh
- 23 - O-ring, replace
- 24 - O-ring, replace
- 25 - O-ring, replace
- 26 - Check valve
- 27 - Oil drain screw, 30 Nm
- 28 - Nut, 9 Nm
Lower Oil Sump - Tightening Sequence
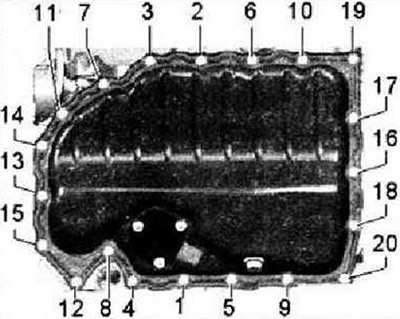
Tighten bolts -1...20- in 3 stages.
- 1 - Tighten the screws by hand.
- 2 - Tighten the bolts to 8 Nm.
- 3 - Tighten the screws by 45°.
Oil Sump Top - Tightening Sequence
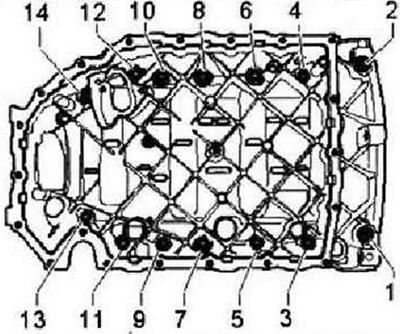
Tighten bolts -1...14- in 3 stages.
- 1 - Tighten the screws by hand.
- 2 - Tighten the bolts to 15 Nm.
- 3 - Tighten the screws by 90°.
Oil separator - tightening torque
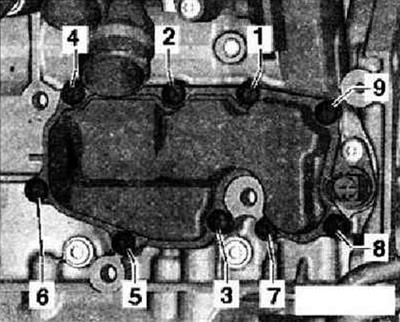
Tighten bolts in sequence -1...9- to 9 Nm.
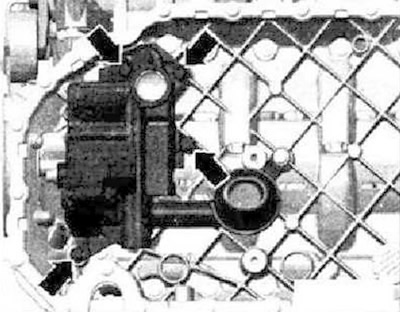
Removal and installation of an oil separator
Remove soundproofing. Unscrew bolts -1...9- and remove oil separator.
Caution: Danger of contamination of the lubrication system. Close the hole with a clean cloth.
Installation
Instructions: Replace gaskets and O-rings. All hose connections must be secured with factory-fitted clamps.
Install in reverse order, paying attention to the following. Tighten bolts in sequence -1...9- to 9 Nm.
Removal and installation of the oil pump
Remove the lower part of the oil sump. Remove oil separator -arrows-.
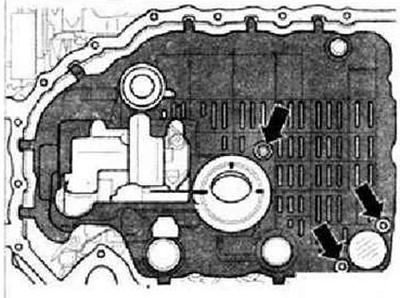
Instructions: The following actions should be carried out in one working step, this requires 2 mechanics.
Remove bolts -arrows- and remove oil pump.
Pull chain tensioner back with assembly tool -T10118- and remove oil pump with second mechanic.

Installation is carried out in the reverse order, while observing the following. Before installing the oil pump, check the mesh in the inlet pipe and the oil channels for contamination. Check that both locating sleeves for centering the oil pump are present. Replace oil separators.
Instructions: There are plastic protrusions on the oil separators, which deform when tightened. This ensures that the oil separator fits snugly and that there is no noise. Therefore, always replace oil separators.
Engine oil
Refueling volumes:
- With oil filter 4.7 l.
- Without oil filter 4.2 l.
Checking the oil level
The oil level must not exceed the maximum mark, otherwise there is a risk of damaging the catalytic converter!
Verification conditions
Engine oil temperature not lower than 60°C. The car is on a flat horizontal surface. Wait a few minutes after stopping the engine for the oil to return to the sump.
Check procedure
Remove the dipstick, wipe it with a clean rag and lower it back into the guide tube until it stops. Remove the dipstick again and check the level.
Marked area on dipstick
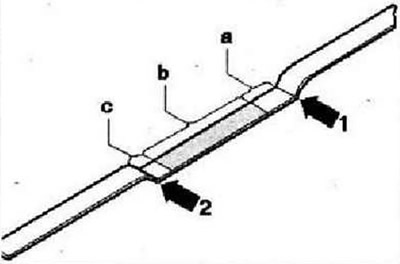
- a - It is forbidden to add oil,
- b - Engine oil can be topped up,
- c - It is necessary to add engine oil.
Instruction: The oil level must not exceed the maximum mark -arrow 1- and be below the minimum mark -arrow 2-.
Visitor comments