



Turn the crankshaft, setting the pistons sequentially to TDC.
Measure the position of the pistons relative to the engine body. All pistons should extend 0.57 - 1.02 mm.
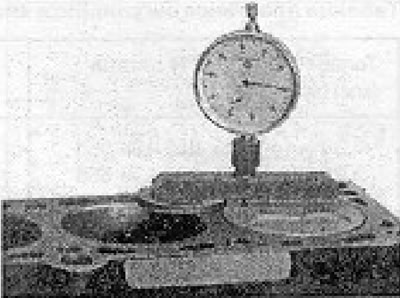
Figure 2.24. Checking the piston position.
- To determine the thickness of the head gasket, take the average value of the piston extension height. The designer has provided three thicknesses of gaskets, which differ in number (1, 2 or 3) cutouts made on the gasket.
Differences in piston extension gaskets
| Piston extension | Number of slots (mm) | Thickness on gasket (mm) |
| 0,67 - 0,80 | 1 | 1,4 |
| 0,81 - 0,90 | 2 | 1,5 |
| 0,91 - 1,02 | 3 | 1,6 |
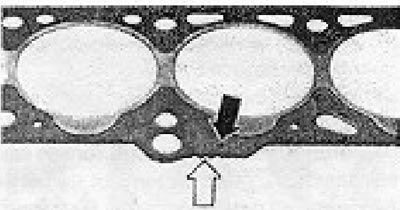
Figure 2.25. Differences in head gaskets. Black arrow: - part number; White arrow: - number of slots; The drawing shows a gasket with three slots, which corresponds to a piston extension of 0.91 - 1.02 mm.
- Place the head gasket on the housing. There is only one installation method possible. If the engine is in the vehicle, it is recommended to take all necessary precautions when installing the head, especially when the camshaft is installed and some valves are open.
- Turn the crankshaft so that none of the pistons are at TDC.
- Install the bolts securing the head (all bolts are the same). Socket head bolts must be replaced every time.
Head mounting bolts
First production engines have hex socket head head mounting bolts. Later, engines used bolts with a polygonal socket head. The diameters of both types of bolts are different and it is not possible to use the old type bolts in new engines.
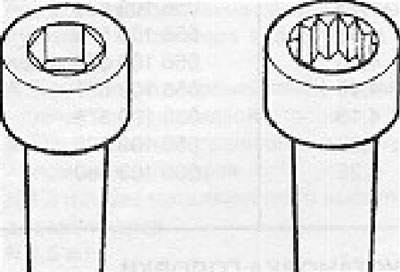
Figure 2.26. Differences in head mounting bolts: Left: Old type - 6-sided socket; Right: New type - polygonal socket.
Tightening the head mounting bolts
- Old type: The engine must be cold.
- Tighten the bolts in 3 stages: 50; 70; 90 Nm
- Warm up the engine (to oil temperature above 50°C)
- Tighten the bolts in the recommended sequence to a torque of 50 Nm without loosening the bolts.
[View the original on this resource: VWmanual.ru]

Figure 2.27. Sequence of unscrewing or tightening the head mounting bolts. New type: The engine must be cold.
After the car has traveled 1000 km:
- Loosen the bolts one by one by 30° in the recommended sequence (you can't unscrew all the bolts at once) and tighten to a torque of 90 Nm.
- Tighten the bolts in 2 stages: 40 and 160 Nm.
- In the following sequence, using the on-board wrench, tighten the bolts by 180° (half a turn). Tightening in two stages of 90° is allowed.
- Warm up the engine (until the oil temperature is above 50°C).
- Using the on-board wrench, tighten the bolts in the recommended sequence by 90°, without first loosening the bolts or loosening them all at once.
After 1000 km:
- Using a side wrench, tighten the bolts 90° at a time without first loosening the cylinder head mounting bolts.
When installing the exhaust manifold of supercharged engines, it is important to ensure that the gaskets are installed correctly (figure 2.28).
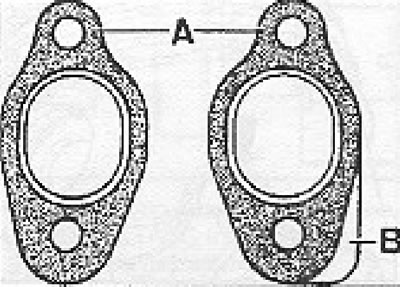
Figure 2.28. Location of exhaust manifold gaskets in a rechargeable engine: A - Narrower side up, metal gasket to head; B - Gasket with metal protrusion for cylinders; no. 1, 2 and 3. without metal protrusion for cylinders; no. 4, 5 and 6.
Attention! After performing head repair (for example, replacing gaskets, camshaft, etc.) be sure to adjust the valve clearance after 1000 km of vehicle mileage.
Visitor comments