



Exhaust system of front-wheel drive vehicles with four- and five-cylinder gasoline engines
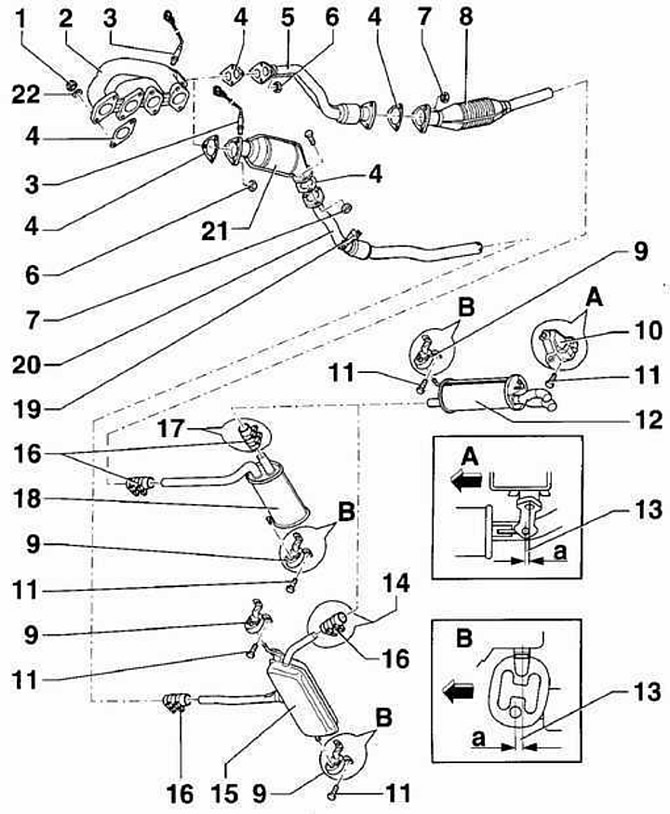
Warning: The figure shows the exhaust system of a car with a 1.8-I ADR engine.
- 1 - nut, 25 Nm,
- 2 - exhaust manifold,
- 3 - oxygen sensor, 50 Nm,
- 4 - gasket,
- 5 - intake exhaust pipe,
- 6 - nut, 30 Nm,
- 7 - nut, 25 Nm,
- 8 - catalyst,
- 9 - clamp,
- 10 - pillow,
- 11 - bolt, 25 Nm,
- 12 - additional muffler,
- 13 - size A = 7–9 mm,
- 14 - junction of the exhaust pipe,
- 15 - central muffler,
- 16 - clamping bracket, 40 Nm,
- 17 - junction of the exhaust pipe,
- 18 - central muffler,
- 19 - suspension,
- 20 - intake exhaust pipe,
- 21 - catalyst,
- 22 - puck
Exhaust system of front-wheel drive vehicles with a diesel engine
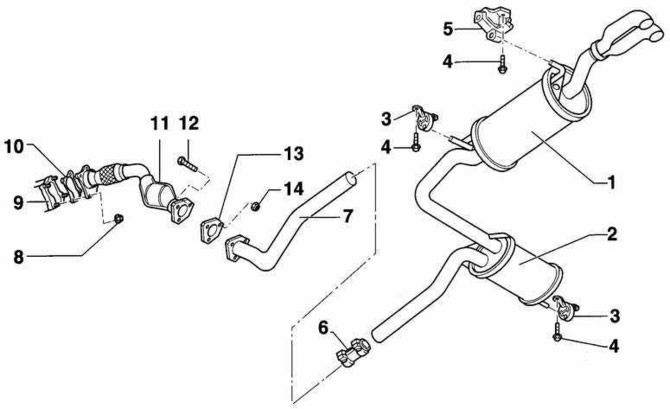
- 1 - additional muffler,
- 2 - central muffler,
- 3 - suspension,
- 4 - bolt, 25 Nm,
- 5 - suspension,
- 6 - clamping bracket, 40 Nm,
- 7 - intermediate pipe,
- 8 - nut, 25 Nm,
- 9 - turbocharger,
- 10 - gasket,
- 11 - catalyst,
- 12 - bolt, 25 Nm,
- 13 - gasket,
- 14 - nut, 25 Nm
Exhaust manifolds and exhaust pipes for vehicles with 6V engines (the rest of the exhaust system is the same as in 4x4 vehicles)
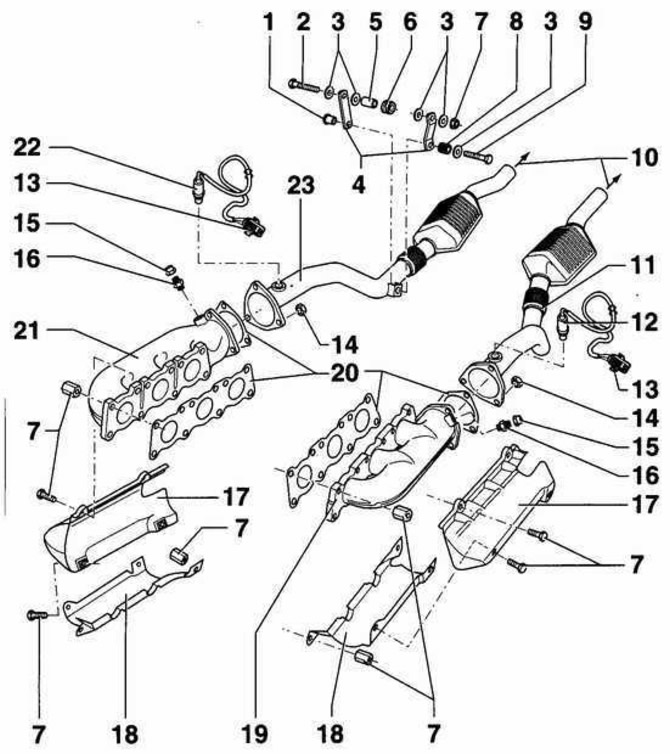
- 1 - bushing,
- 2 - bolt,
- 3 - washer,
- 4 - bracket,
- 5 - bushing,
- 6 - rubber bushing,
- 7 - nut, 25 Nm,
- 8 - spring,
- 9 - bolt, 25 Nm,
- 10 - to the central part of the exhaust system,
- 11 - left exhaust pipe with catalyst,
- 12 - oxygen sensor No. 2, 50 Nm,
- 13 - black four-pin electrical connector,
- 14 - nut, 25 Nm,
- 15 - cap, 10 Nm,
- 16 - branch pipe,
- 17 - upper heat shield,
- 18 - lower heat shield,
- 19 - left exhaust manifold,
- 20 - gasket,
- 21 - right exhaust manifold,
- 22 - oxygen sensor No. 1, 50 Nm,
- 23 - right downpipe with catalyst
Center and rear exhaust system on four-wheel drive vehicles with four- and five-cylinder engines
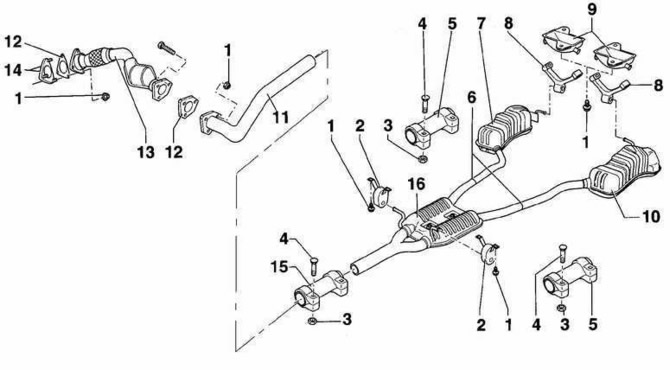
- 1 - bolt, 25 Nm,
- 2 - suspension,
- 3 - nut, 40 Nm,
- 4 - screw with a semicircular head,
- 5 - clamping bracket, 40 Nm,
- 6 - junction of pipes of the exhaust system,
- 7 - right additional muffler,
- 8 - suspension,
- 9 - bracket,
- 10 - left additional muffler,
- 11 - intermediate exhaust pipe,
- 12 - gasket,
- 13 - catalyst,
- 14 - turbocharger,
- 15 - clamping bracket, 40 Nm,
- 16 - central muffler
Bracket elements to support the front exhaust pipe
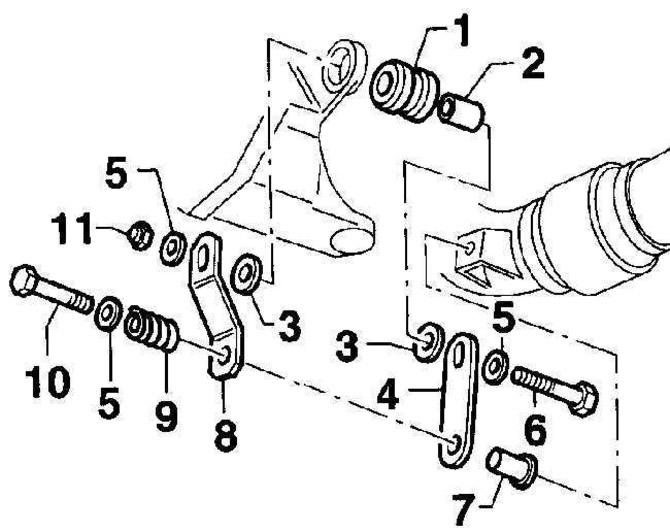
- 1 - buffer,
- 2 - bushing,
- 3 - washer,
- 4 - left pad,
- 5 - washer,
- 6 - bolt,
- 7 - bushing,
- 8 - right pad,
- 9 - spring,
- 10 - bolt,
- 11 - self-locking nut, 25 Nm
Distance (A), to which it is necessary to shift the exhaust system during installation
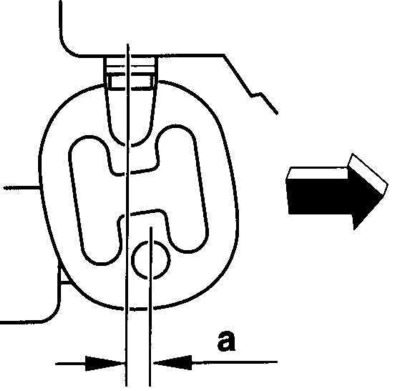
- a = 7 - 9 mm.
The arrow indicates the direction of the vehicle.
The exhaust system consists of an exhaust manifold, a turbocharger, an exhaust pipe, a central silencer and an additional muffler.
Vehicles with V6 engines have two separate exhaust systems.
On vehicles with all-wheel drive, a double rear muffler is installed.
The connection of the elements of the exhaust system is carried out by threaded connections or clamping clamps.
The task of the exhaust system is to remove exhaust gases into the atmosphere so that even a minimal amount of them does not enter the passenger compartment, as well as to reduce engine noise to a low level. In order for the exhaust system to perform its functions, it must be in good condition.
The condition of the exhaust system also affects engine power and fuel consumption.
Removing
The fuel system can be removed both as an assembly and in separate sections.
1. Raise the car and secure it on stands.
2. Remove the lower engine mudguard.
3. Coat the nuts and bolts holding the exhaust system with a rust destroying agent. Wait a while until the rust is completely destroyed.
Gasoline engines
1. Disconnect the oxygen sensor electrical connector. On six-cylinder engines, disconnect the connectors from the two oxygen sensors. The oxygen sensor connectors are located on the bulkhead of the engine compartment.
2. Unscrew fastening of a forward part of a reception exhaust pipe from a final collector. Support the exhaust system with a jack or wire it to the underside of the vehicle.
1.8-I ADR engines and six-cylinder engines
1. Unscrew fastening of a reception exhaust pipe to the arm located on a transmission.
2. Release the exhaust system from the rubber suspensions and remove it from under the car.
Installation
1. To facilitate the subsequent unscrewing of the nuts and bolts securing the exhaust system, lubricate them with Liqui Moly LM-508-ASC high-temperature paste.
2. Before reconnecting the exhaust system components, clean their connection with sandpaper to remove any sealant residue and rust.
1.8-I ADR engine and six-cylinder engine
1. Unscrew the exhaust pipe support bracket from the gearbox, see fig. Bracket elements for supporting the exhaust pipe.
2. Install the exhaust components into the rubber pads, but do not tighten the bolts at this stage.
3. Bolt the catalytic converter with a new gasket to the exhaust pipe, but do not completely tighten the bolts at this stage.
4. If necessary, rotate the sections of the exhaust system so that the entire exhaust system is at least 25 mm from the body.
5. Move the exhaust system so that the exhaust system mount in the rubber pads is moved forward by 7–9 mm (see fig. Distance (A), to which it is necessary to shift the exhaust system during installation). This is necessary so that when the exhaust system heats up and expands thermally, it is installed in the correct position.
6. Finally tighten all nuts and bolts securing the exhaust system (see table Tightening torques).
7. Install the lower engine cover.
8. Connect the electrical connectors of the oxygen sensors.
9. Lower the car to the ground.
10. Start the engine and check the exhaust system for leaks.
Visitor comments