
Instructions: After installation work on the exhaust system, check that it is installed without tension and that the distance between the elements of the exhaust system and the body is sufficient. If necessary, loosen the double clamp and align the muffler and exhaust pipe so that there is a sufficient distance to the body everywhere and that the fasteners have an even load. Self-locking nuts must be replaced.
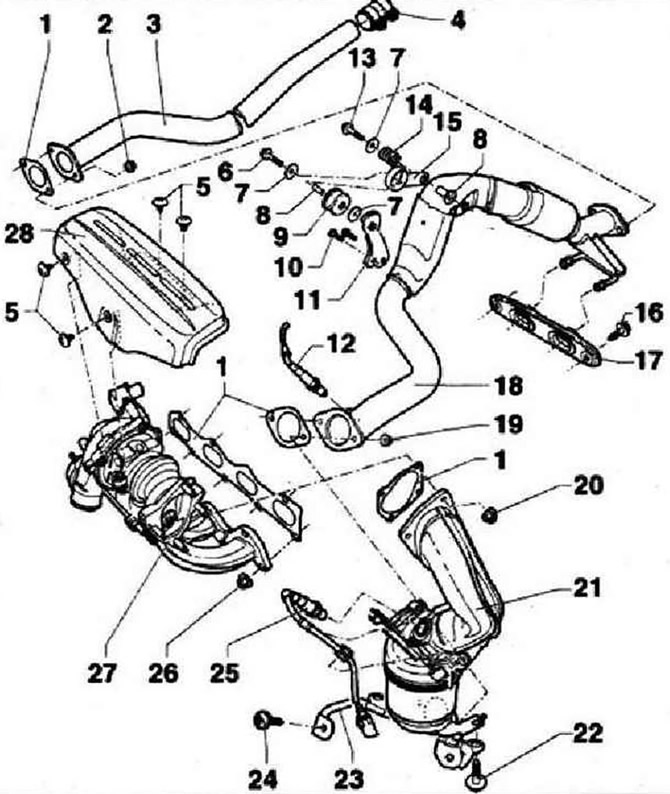
- 1 - Seal, replace
- 2 - 25 Nm, replace
- 3 - Exhaust manifold
- 4 - Double clamp, 25 Nm. For independent replacement of the middle and rear mufflers, tighten the screw connections evenly
- 5 - 10 Nm
- 6 - 25 Nm
- 7 - Washer
- 8 - Bolt
- 9 - Silent block
- 10 - 25 Nm
- 11 - Bracket
- 12 - Lambda probe after catalytic converter -G130-, 50 Nm. Lubricate only threads with grease "G 052 112 AZ"; lubricant "G 052 112 AZ" should not get on the slots of the probe body, if there is no tightness, bite and replace the sealing ring
- 13 - 25 Nm
- 14 - Spring
- 15- Bracket
- 16 - 25 Nm
- 17 - Suspension
- 18 - Exhaust manifold with bellows. The bellows must not be bent more than 10°due to the possibility of damage
- 19 - 25 Nm, replace
- 20 - 40 Nm, replace. Lubricate turbocharger spacer bolts with heat-resistant paste
- 21 - Main catalyst with exhaust pipe
- 22 - 25 Nm
- 23 - Bracket
- 24 - 10 Nm
- 25 - Lambda probe -G39-, 50 Nm. Lubricate only threads with grease "G 052 112 AZ"; lubricant "G 052112 AZ" must not get into the slots of the probe body. Removal and installation using a set of spanners for lambda probes -3337-
- 26 - 20 Nm, replace. Lubricate exhaust manifold spacer bolts with heat-resistant paste
- 27 - Turbocharger. Turbocharger and exhaust manifold must only be replaced together
- 28 - Heat shield
Visitor comments