
English Русский
Български
Беларускі
Український
Српски
Hrvatski
Română
Polski
Slovenský
Magyar
  |  Articles  |  Sitemap  |  Contacts  |    |
Car maintenance Ford Car maintenance Hyundai Car maintenance Chevrolet Car maintenance BMW Car maintenance Audi Car maintenance Opel Car maintenance AvtoVAZ
VWmanual.ru


Main   Passat   Golf   Polo   Touareg   Tiguan   Sharan   Transporter   Others  
Sharan 1 (1995-2000)

Removal and installation of the exhaust system (VW Sharan 1)

  • Main
  • Sharan
  • Sharan 1
  • Petrol engines
  • Engine repair 2.8 l (AAA)
  • Removal and installation of the exhaust system
            0


The service life of the exhaust system generally depends on the conditions in which the vehicle is operated. Frequent short-distance trips result in a significant amount of condensate and aggressive acids inside the muffler, which leads to corrosion of the exhaust system from the inside. Long-distance trips at operating temperature and favorable combustion conditions of the working mixture reduce the content of substances causing corrosion in the exhaust gases. In addition, this results in combustion of foreign bodies that have entered the exhaust system due to the high temperature.

Exhaust system corrosion from the outside is caused by water and salt getting on it. Stone impacts can contribute to this. Loose engine suspension causes engine vibrations that are transmitted to the connection points of the intake pipes and the rest of the exhaust system.

The exhaust system should be checked at every opportunity to detect possible damage in time, prevent it or eliminate it. To do this, do the following:
  • check that the threaded connections on the intake manifold and mounting points are not loose and do not overtighten them;
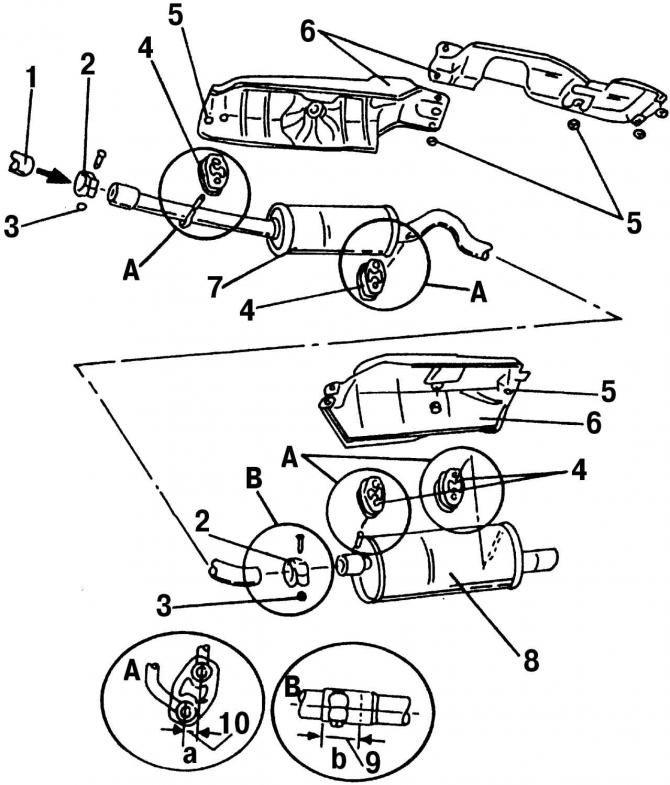
Fig. 102. Elements of the rear part of the exhaust system: 1 - comes from the catalyst (arrow 3 see…

Fig. 102. Elements of the rear part of the exhaust system: 1 - comes from the catalyst (arrow 3 see fig. 101); 2 - mounting clamp; 3 - nut, 40 Nm; 4 - suspension ring, indicates the correct position during installation; 5 - heat shield nut; 6 - thermal protection screen; 7 - front muffler; 8 - rear muffler; 9 - distance b = 50 mm; 10 - distance a = 5 mm


The original article is posted on the website [vwmanual]
  • check the rubber rings 4 (Fig. 102) of the suspension for fragility, cracks and other damage and replace them if necessary;
  • with the engine running, plug the end of the exhaust pipe with a rag. If the engine stalls after a while, the exhaust system is sealed. If a hissing sound is heard, the exhaust system is not sealed;
  • if the exhaust system sounds muffled, then the muffler will have to be replaced soon.

Installing a catalytic converter is not difficult, but please follow these recommendations:
  • tighten the exhaust manifold connection (see p. 2.10.2);
  • secure the engine heat shield with clamp washers;
  • replace damaged rubber rings of the exhaust system suspension;
  • always change the gasket between the downpipe and the catalytic converter;
  • before tightening the clamps, connect the pipes properly. Tighten the nuts to the required tightening torque;
  • when screwing in the lambda probe, if it was unscrewed, apply "G5" lubricant to its thread. Make sure that the lubricant does not get into the slot of the lambda probe body, since in this case the probe may not work properly;
  • when replacing exhaust system components, pay particular attention to the gaps a and b (Fig. 102). The distance a between the suspension holes must be at least 5 mm. This applies to the front and rear silencers. The distance b must be at least 50 mm, i.e. the fastening clamp must be pushed to the pipe connection before it is tightened;
  • always use new nuts, 40 Nm.

This article is available at russian, bulgarian, belarusian, ukrainian, serbian, croatian, romanian, polish, slovak, hungarian
The text has been checked: Tarasov Ivan

Share information:

Previous articles
Removal and installation the exhaust manifold
Additional air supply system
Checking the compression in the engine cylinders
Intermediate shaft — removal and installation
Installing the timing drive
Removal the timing drive components
Next articles


Similar articles from other manuals for VW cars:
Instructions for vehicles with a catalytic converter in the… Passat B3 (1988-1993)
Exhaust system Golf 1 (1974-1984, petrol)
Exhaust gas system Polo 3 (1995-2003)
Exhaust system alignment Touareg 1 (2002-2006)
Catalyst and exhaust system attachments Tiguan 1 (2007-2015)
Engine and exhaust system Transporter T4 (1990-2003)
Exhaust system parts and components (BCA engines) Caddy 3 (2003-2010)
Link to this page in different formats


Visitor comments


No comments yet


How much will 22 + 19 =


Sharan 1 
  • General information
  • Introduction to guide
  • Maintenance
  • Petrol engines
  • Engine repair 2.8 l (AAA)
  • Engine repair 2.0 l (ADY)
  • Lubrication system
  • Cooling system
  • Fuel injection system
  • Ignition system
  • Diesel engines
  • Engine repair
  • Lubrication system
  • Cooling system
  • Supply system
  • Transmission
  • Clutch
  • Manual gearbox and shafts
  • Chassis
  • Steering
  • Car suspension
  • Brake system
  • Electrical equipment
  • Equipment and devices
  • Power devices
  • Electrical circuits
VWmanual.ru © 2016-2026 | Mobile version | News and articles | Sitemap: EN BG BY UA RS HR RO PL SK HU | Write message | Site search
Passat B2 • Passat B3 • Passat B4 • Passat B5 • Passat B6 • Golf 1, diesel • Golf 1, petrol • Golf 2, petrol • Golf 2 • Golf 3 • Golf 4 • Golf 5 • Polo 3 • Polo 4 • Touareg 1 • Tiguan 1 • Sharan 1 • Transporter T3 • Transporter T4 • LT 28 • LT 2D • Beetle • Caddy 3 •
Our website uses cookies to ensure functionality and convenience.