
English Русский
Български
Беларускі
Український
Српски
Hrvatski
Română
Polski
Slovenský
Magyar
  |  Articles  |  Sitemap  |  Contacts  |    |
Car maintenance Ford Car maintenance Hyundai Car maintenance Chevrolet Car maintenance BMW Car maintenance Audi Car maintenance Opel Car maintenance AvtoVAZ
VWmanual.ru


Main   Passat   Golf   Polo   Touareg   Tiguan   Sharan   Transporter   Others  
Passat B2 (1981-1988) Passat B3 (1988-1993) Passat B4 (1988-1996) Passat B5 (1996-2005) Passat B6 (2005-2010)

Removal and installation / checking of Digifant/Simos valve injectors (VW Passat B3)

  • Main
  • Passat
  • Passat B3
  • Power unit
  • Petrol injection system
  • Removal and installation / checking of Digifant/Simos valve injectors
            1


Contents: Checking the supply voltage and…↓ Checking the jet shape and tightness…↓
Note: With the Digifant system, the supply voltage and resistance for all valve injectors are checked at the common connector. With the Simos system, the check is performed for each injector separately. The tightness of the injectors and the shape of the fuel jet are checked in the same way in both cases. Removal of the valve injectors of the Simos system is carried out in accordance with Figure 24-0389 (see below).


Valve injectors do not inject all of the fuel at once, meaning that half of the fuel required to complete the working cycle is injected per revolution of the crankshaft.

The injector injects fuel in a cone-shaped stream and closes tightly after injection. Leaky injectors create difficulties when starting a hot engine. Injector defects cause spontaneous engine operation after the ignition is turned off and lead to its shutdown.

AFT engine: Remove upper intake manifold.

Checking the supply voltage and resistance


Digifant: Disconnect plug "1" of the valve injectors.
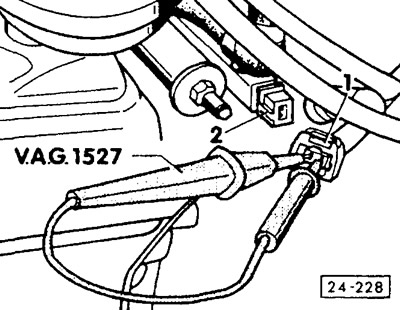
Digifant: Disconnect plug «1» of the valve injectors.


Simos: Disconnect the valve injector plug.


Connect a semiconductor diode test lamp to the plug. Ask an assistant to turn on the starter. The LED should blink.

Note: The ABF engine has a 5-pin plug. Pin 5 (opposite the locking bracket) connected to ground, contacts 1-4 are connected to individual valve injectors. Connect the test lamp in series between contact 5 and contacts 1-4


If the LED does not blink, the cause may be a faulty Hall sensor, a broken wire, or the control unit itself. Perform an electrical test of the injection system, see below.

Turn off the ignition.
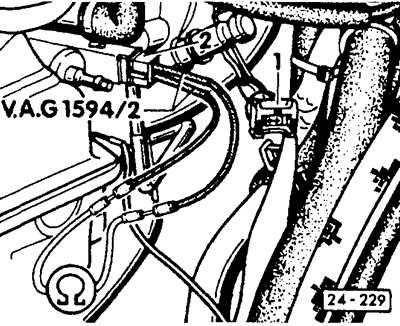
Turn off the ignition.


Digifant: Measure the total resistance of all valve injectors on the plug connector "2". The prescribed resistance value is 3.7-5.0 Ohms.

Note: If the measured value does not correspond to the prescribed value, it is possible to draw a conclusion on how many valve injectors are defective depending on the measured value. If one injector is defective, the measured value should be 5.0-6.7 Ohm: if two injectors are defective, 7.5-10.0 Ohm; if three injectors are defective - 15.0-20.0 Ohm.


ABF Engine: Measure the resistance in series between terminal 5 and terminals 1-4. The prescribed resistance value is 15.0-20.0 ohms.


If the resistance at connector block "2" is greater than 5 ohms, remove the wire guide from the fuel distributor bracket and, as with AFT/ADY/AGG engines, perform an individual check of the valve injectors.

AFT/ADY/AGG engines: connect a test lamp between the contacts of a separate valve injector. The prescribed resistance value is 15.0-20.0 Ohm respectively.

If necessary, replace the valve injector.

Checking the jet shape and tightness (Digifant/Simos)


Disconnect the high-voltage wire from the ignition coil at the ignition distributor and connect it to ground; use an auxiliary wire if necessary.
Disconnect the high-voltage wire from the ignition coil at the ignition distributor and connect it…


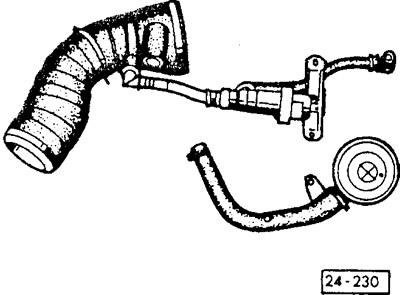
Remove the air intake hose together with the idle speed stabilization valve, as well as the bracket and the crankcase ventilation pressure control valve. First loosen and move the fastening clamps back.
Remove the air intake hose together with the idle speed stabilization valve, as well as the bracket…


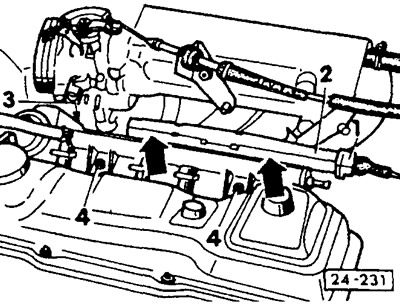
Disconnect plug "1" from the wire guide block.

Disconnect the wire guide "2" from the fuel distributor holders (arrows).

Unscrew bolts "3" and "4" securing the fuel distributor.

Unscrew the throttle valve pipe from the intake manifold by loosening the 4 Allen bolts at the flange.

Pull the valve injectors together with the fuel distributor and wire guide out of the exhaust manifold. The valve injectors are just inserted and can be easily removed.
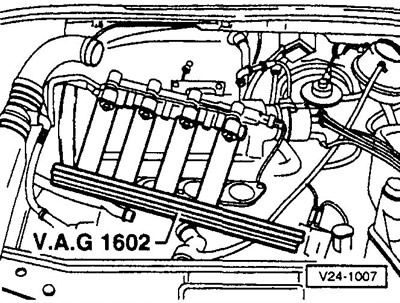
Pull the valve injectors together with the fuel distributor and wire guide out of the exhaust…


Place the valve nozzles into a suitable measuring vessel.

Disconnect the blue temperature sensor plug at the coolant pipe.

Connect a 15 Ohm resistor between the contacts of the temperature sensor plug.

Connect plug "1" of the valve injector to the wire guide block "2".

Ask an assistant to turn on the starter for a few seconds and compare the shape of the fuel jets of the valve injectors. The fuel jets of all injectors should have the same conical shape.

Turn off the ignition.

Disconnect the plugs from the valve injectors.

Turn on the ignition for about 5 seconds, do not turn on the starter. Within one minute, no more than two drops of fuel should come out of the injector nozzles.

Install valve injectors.

Caution: When installing the injectors, ensure that the sealing rings are not damaged.


Check the rings for damage, replace the rings if necessary. Moisten the sealing rings with fuel before installation.

Install the fuel distributor, wire guide and inlet hoses in the reverse order. Secure the hoses with clamps and tightening screws.

Screw the throttle valve pipe to the intake manifold, not forgetting to install the sealing gasket. Tighten the 4 Allen bolts with a torque of 20 Nm using a cross pattern.

Connect the high voltage wire to the ignition coil.

The information is posted on this website [www.VWMANUAL.ru]

AFT Engine: Install upper intake manifold.

This article is available at russian, bulgarian, belarusian, ukrainian, serbian, croatian, romanian, polish, slovak, hungarian
The text has been checked: Medvedeva Elena

Share information:

Previous articles
Checking the forced idle and enrichment switch with the throttle fully open
Checking the Idle Speed Increase Valve Digifant
Checking the regulation of the oxygen sensor Digifant
Checking/adjusting idle speed and CO content Digifant
Injection system Digifant / Simos
Electrical test of the Mono-Jetronic injection system
Next articles
Simos injection system since 10/94
Electrical test of the Digifant injection system
K-Jetronic injection system
KE-Motronic injection system
Checking/adjusting idle speed and CO content K-Jetronic
Checking the stabilization of the engine speed at idle speed K-Jetronic


Similar articles from other manuals for VW cars:
Checking the valve Golf 4 (1997-2004)
Checking the valve guide bushing Polo 3 (1995-2003)
Checking the valve timing Touareg 1 (2002-2006)
Checking the operation of the intake manifold flap Tiguan 1 (2007-2015)
Checking the engine oil level and replacing it Sharan 1 (1995-2000)
Checking the valve guides Transporter T4 (1990-2003)
Checking the valve guides Caddy 3 (2003-2010)
Link to this page in different formats


Visitor comments


алекс wrote 21.06.2017 в 11:15:
как найти утечку воздуха то есть подсос
answer quote


How much will 48 + 10 =


Passat B6 
  • General information
  • User manual
  • Maintenance
  • Petrol engine 1.6L
  • Engine repair
  • Cooling and lubrication system
  • Fuel injection system
  • Petrol engine 2.0L
  • Engine repair
  • Lubrication system
  • Cooling system
  • Fuel and exhaust systems
  • Diesel engine 2.0L
  • Engine repair
  • Cooling and lubrication system
  • Fuel and exhaust systems
  • Transmission
  • Clutch
  • Mechanical gearbox
  • Automatic gearbox
  • Drive shafts
  • Chassis
  • Wheels and tires
  • Car suspension
  • Steering
  • Brake system
  • Body
  • Exterior (external elements)
  • Electrical equipment
  • Power devices
  • Lighting and appliances
  • Electrical circuits
Passat B5 
  • General information
  • User manual
  • Weekly checks
  • Maintenance
  • Power unit
  • Engine repair
  • Cooling system
  • Fuel system (petrol)
  • Fuel system (diesel)
  • Engine management
  • Exhaust system
  • Transmission
  • Clutch
  • Car gearbox
  • Drive shafts
  • Chassis
  • Car suspension
  • Wheels and tires
  • Steering
  • Brake system
  • Body
  • Exterior (external elements)
  • Interior (internal elements)
  • Doors and covers
  • Ventilation and heating
  • Electrical equipment
  • Power devices
  • Lighting and appliances
  • Electrical circuits
Passat B4 
  • General information
  • User manual
  • Maintenance
  • Technical data
  • 8-valve engine
  • Engine repair
  • Cooling and lubrication system
  • Supply system
  • Ignition system
  • Fuel injection «Mono-Jetronic»
  • Control system «Mono-Motronic»
  • Control system «Digifant»
  • Control system «Simos»
  • 16-valve engine
  • Engine repair
  • Cooling and lubrication system
  • Fuel injection «K-Jetronic»
  • Control system «KE-Motronic»
  • Control system «Digifant»
  • Diesel engine
  • Engine repair
  • Cooling and lubrication system
  • Power and control system
  • Turbocharging system
  • Digital control system
  • Transmission
  • Clutch
  • Manual gearbox
  • Hydromechanical gearbox
  • Front wheel drive
  • Chassis
  • Car suspension
  • Steering
  • Brake system
  • Body
  • Body elements
  • Electrical equipment
  • Power devices
  • Lighting and appliances
  • Electrical circuits
Passat B3 
  • General information
  • User manual
  • Driving Tips
  • Maintenance instructions
  • Technical data
  • Power unit
  • Engine repair
  • Ignition system
  • Lubrication system
  • Cooling system
  • Supply system
  • Petrol injection system
  • Diesel engine
  • Exhaust system
  • Transmission
  • Clutch
  • Car gearbox
  • Chassis
  • Suspension
  • Steering
  • Brake system
  • Wheels and tires
  • Body
  • Exterior
  • Interior
  • Heating system
  • Electrical equipment
  • Power devices
  • Lighting system
  • Equipment and devices
  • Wiper system
  • Electrical circuits
Passat B2 
  • General information
  • Introduction to instructions
  • User manual
  • Power unit
  • Engines 4-cylinder FZ
  • Engines 4-cylinder
  • Engines 5-cylinder
  • Transmission
  • Clutch
  • Four-speed gearbox
  • Five-speed gearbox
  • Hydromechanical gearbox
  • Front wheel drive
  • Chassis
  • Front suspension
  • Rear suspension
  • Steering
  • Brake system
  • Body
  • Body elements
  • Electrical equipment
  • Equipment and devices
  • Electrical circuits
VWmanual.ru © 2016-2026 | Mobile version | News and articles | Sitemap: EN BG BY UA RS HR RO PL SK HU | Write message | Site search
Passat B2 • Passat B3 • Passat B4 • Passat B5 • Passat B6 • Golf 1, diesel • Golf 1, petrol • Golf 2, petrol • Golf 2 • Golf 3 • Golf 4 • Golf 5 • Polo 3 • Polo 4 • Touareg 1 • Tiguan 1 • Sharan 1 • Transporter T3 • Transporter T4 • LT 28 • LT 2D • Beetle • Caddy 3 •
Our website uses cookies to ensure functionality and convenience.