
English Русский
Български
Беларускі
Український
Српски
Hrvatski
Română
Polski
Slovenský
Magyar
  |  Articles  |  Sitemap  |  Contacts  |    |
Car maintenance Ford Car maintenance Hyundai Car maintenance Chevrolet Car maintenance BMW Car maintenance Audi Car maintenance Opel Car maintenance AvtoVAZ
VWmanual.ru


Main   Passat   Golf   Polo   Touareg   Tiguan   Sharan   Transporter   Others  
Passat B2 (1981-1988) Passat B3 (1988-1993) Passat B4 (1988-1996) Passat B5 (1996-2005) Passat B6 (2005-2010)

Checking the temperature sensor (VW Passat B3)

  • Main
  • Passat
  • Passat B3
  • Power unit
  • Petrol injection system
  • Checking the temperature sensor
            0


Contents: Mono-Jetronic, Mono-Motronic,…↓ Checking the Intake Air Temperature…↓ Checking the injection system…↓

Mono-Jetronic, Mono-Motronic, Digifant, Motronic


The Mono-Jetronic system, unlike the Digifant system, has 2 different temperature sensors. The intake air temperature sensor is located at the top of the valve injector, see above.

The temperature sensor for the injection system is present in both systems, it is located on top of the cooling system flange and measures the temperature of the coolant. The plug of this sensor is blue.

Checking the Intake Air Temperature Sensor


The resistance of the intake air temperature sensor depends on the temperature of the central injection system. Remove the temperature sensor and heat it up or measure the resistance at different ambient temperatures.

Disconnect plug "4" of the intake air temperature sensor, see above figure 24-281.

Measure the resistance at different temperatures on both outer contacts of the plug. The specified resistance values must correspond to the specified values for the injection temperature sensor, see diagram.

Checking the injection system temperature sensor


Disconnect the blue plug of the injection system temperature sensor, having first pressed the fixing metal bracket. The temperature sensor is located at the flange of the cooling system on the front side of the cylinder head.

Up to 7/91: Measure the resistance between both contacts of the temperature sensor.

From 8/91: The temperature sensor has a 4-pin connector. Measure the resistance between the two left contacts of the temperature sensor, when looking towards the flange. The temperature gauge on the instrument panel is connected to the two right contacts of the sensor.
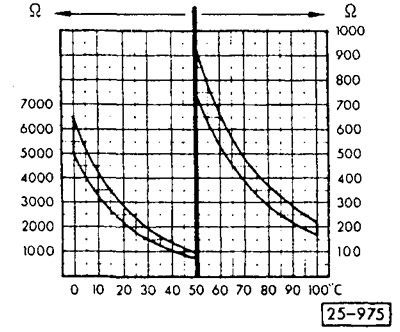


From 8/91: The temperature sensor has a 4-pin connector. Measure the resistance between the two…


Start the engine and warm it up. Measure the resistance at different coolant temperatures and compare the obtained values with the values shown in the diagram. The temperature sensor can also be removed and heated in a bath of water for testing.

If the measured resistance values do not correspond to the prescribed ones, unscrew the temperature sensor and replace it. When installing a new sensor, be sure to install the sealing ring.

Connect the plug connector and secure it with a metal bracket.

If necessary, erase the fault codes from the memory device.

This article is available at russian, bulgarian, belarusian, ukrainian, serbian, croatian, romanian, polish, slovak, hungarian
The text has been checked: Medvedeva Elena

Share information:

Previous articles
Checking the oxygen sensor
Checking the throttle potentiometer
Checking the injector valves / idle switch
Checking idle speed and CO content
Querying the memory device for fault codes
Mono-Jetronic injection system
Next articles
Checking the intake manifold heating system
Electrical test of the Mono-Jetronic injection system
Injection system Digifant / Simos
Checking/adjusting idle speed and CO content Digifant
Checking the regulation of the oxygen sensor Digifant
Checking the Idle Speed Increase Valve Digifant


Similar articles from other manuals for VW cars:
Checking the pre-glow system temperature sensor (all engines) Golf 3 (1991-1997)
Checking the coolant temperature sensor Polo 3 (1995-2003)
Checking the oil pressure sensor (petrol engine) Touareg 1 (2002-2006)
Removal and installation coolant temperature sensor G62 Tiguan 1 (2007-2015)
Checking the temperature sensor of a remote thermometer Sharan 1 (1995-2000)
Temperature sensor resistance value Transporter T4 (1990-2003)
Checking the coolant temperature sensor LT 2D (1996-2003)
Link to this page in different formats


Visitor comments


No comments yet


How much will 36 + 42 =


Passat B6 
  • General information
  • User manual
  • Maintenance
  • Petrol engine 1.6L
  • Engine repair
  • Cooling and lubrication system
  • Fuel injection system
  • Petrol engine 2.0L
  • Engine repair
  • Lubrication system
  • Cooling system
  • Fuel and exhaust systems
  • Diesel engine 2.0L
  • Engine repair
  • Cooling and lubrication system
  • Fuel and exhaust systems
  • Transmission
  • Clutch
  • Mechanical gearbox
  • Automatic gearbox
  • Drive shafts
  • Chassis
  • Wheels and tires
  • Car suspension
  • Steering
  • Brake system
  • Body
  • Exterior (external elements)
  • Electrical equipment
  • Power devices
  • Lighting and appliances
  • Electrical circuits
Passat B5 
  • General information
  • User manual
  • Weekly checks
  • Maintenance
  • Power unit
  • Engine repair
  • Cooling system
  • Fuel system (petrol)
  • Fuel system (diesel)
  • Engine management
  • Exhaust system
  • Transmission
  • Clutch
  • Car gearbox
  • Drive shafts
  • Chassis
  • Car suspension
  • Wheels and tires
  • Steering
  • Brake system
  • Body
  • Exterior (external elements)
  • Interior (internal elements)
  • Doors and covers
  • Ventilation and heating
  • Electrical equipment
  • Power devices
  • Lighting and appliances
  • Electrical circuits
Passat B4 
  • General information
  • User manual
  • Maintenance
  • Technical data
  • 8-valve engine
  • Engine repair
  • Cooling and lubrication system
  • Supply system
  • Ignition system
  • Fuel injection «Mono-Jetronic»
  • Control system «Mono-Motronic»
  • Control system «Digifant»
  • Control system «Simos»
  • 16-valve engine
  • Engine repair
  • Cooling and lubrication system
  • Fuel injection «K-Jetronic»
  • Control system «KE-Motronic»
  • Control system «Digifant»
  • Diesel engine
  • Engine repair
  • Cooling and lubrication system
  • Power and control system
  • Turbocharging system
  • Digital control system
  • Transmission
  • Clutch
  • Manual gearbox
  • Hydromechanical gearbox
  • Front wheel drive
  • Chassis
  • Car suspension
  • Steering
  • Brake system
  • Body
  • Body elements
  • Electrical equipment
  • Power devices
  • Lighting and appliances
  • Electrical circuits
Passat B3 
  • General information
  • User manual
  • Driving Tips
  • Maintenance instructions
  • Technical data
  • Power unit
  • Engine repair
  • Ignition system
  • Lubrication system
  • Cooling system
  • Supply system
  • Petrol injection system
  • Diesel engine
  • Exhaust system
  • Transmission
  • Clutch
  • Car gearbox
  • Chassis
  • Suspension
  • Steering
  • Brake system
  • Wheels and tires
  • Body
  • Exterior
  • Interior
  • Heating system
  • Electrical equipment
  • Power devices
  • Lighting system
  • Equipment and devices
  • Wiper system
  • Electrical circuits
Passat B2 
  • General information
  • Introduction to instructions
  • User manual
  • Power unit
  • Engines 4-cylinder FZ
  • Engines 4-cylinder
  • Engines 5-cylinder
  • Transmission
  • Clutch
  • Four-speed gearbox
  • Five-speed gearbox
  • Hydromechanical gearbox
  • Front wheel drive
  • Chassis
  • Front suspension
  • Rear suspension
  • Steering
  • Brake system
  • Body
  • Body elements
  • Electrical equipment
  • Equipment and devices
  • Electrical circuits
VWmanual.ru © 2016-2026 | Mobile version | News and articles | Sitemap: EN BG BY UA RS HR RO PL SK HU | Write message | Site search
Passat B2 • Passat B3 • Passat B4 • Passat B5 • Passat B6 • Golf 1, diesel • Golf 1, petrol • Golf 2, petrol • Golf 2 • Golf 3 • Golf 4 • Golf 5 • Polo 3 • Polo 4 • Touareg 1 • Tiguan 1 • Sharan 1 • Transporter T3 • Transporter T4 • LT 28 • LT 2D • Beetle • Caddy 3 •
Our website uses cookies to ensure functionality and convenience.