
English Русский
Български
Беларускі
Український
Српски
Hrvatski
Română
Polski
Slovenský
Magyar
  |  Articles  |  Sitemap  |  Contacts  |    |
Car maintenance Ford Car maintenance Hyundai Car maintenance Chevrolet Car maintenance BMW Car maintenance Audi Car maintenance Opel Car maintenance AvtoVAZ
VWmanual.ru


Main   Passat   Golf   Polo   Touareg   Tiguan   Sharan   Transporter   Others  
Passat B2 (1981-1988) Passat B3 (1988-1993) Passat B4 (1988-1996) Passat B5 (1996-2005) Passat B6 (2005-2010)

Spare tire of a car (VW Passat B3)

  • Main
  • Passat
  • Passat B3
  • General information
  • Maintenance instructions
  • Spare tire of a car
            0


Contents: Wheel replacement ↓ Instructions ↓
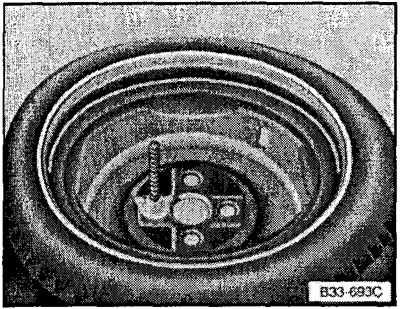
Spare tire of a car


The Volkswagen Passat is equipped with a compact spare tire (in some cases, some models are equipped with a regular spare wheel instead of a small one). The small-sized wheel not only takes up significantly less space in the trunk, but is also much lighter.

The pressure in the small tire (4.2 atm) should be checked regularly so that the spare tire is always ready for use. Access to the valve is provided through the hole in the wheel rim.

The wheel is placed in a niche in the trunk floor (under the floor covering) and secured with a wing nut.

When using a compact spare tire, please consider the following:
  • The compact spare tire is intended for short-term use and should be replaced with a regular tire as soon as possible.
  • After installing a small spare wheel, it is necessary to check the air pressure in the tire, which should be 4.2 atm.
  • Do not drive on the spare tire at speeds higher than 80 km/h! Avoid sudden acceleration, strong braking and sharp turns.
  • A compact spare wheel is significantly smaller than a regular one, so when it is installed, the ground clearance of the corresponding wheel is reduced by approximately 30 mm (the all-wheel drive Volkswagen Passat syncro is equipped with a spare wheel that has approximately the same diameter as the regular one. This is necessary for the normal operation of the all-wheel drive transmission). To avoid damage to the lower parts of the vehicle, do not drive over large obstacles or deep potholes, or onto overpasses or automatic car washes.
  • Some Volkswagen Passat models are equipped with a compact spare tire designed specifically for this type of vehicle. This tire cannot be used on another vehicle.
  • The use of anti-skid chains on a small spare wheel is not permitted for technical reasons.
  • If the use of anti-skid chains is necessary, you can install a small wheel on the rear axle, replacing the defective front wheel with the freed rear one. It is recommended to attach the chains to the wheel before installing the wheel on the car.
  • The rim of the compact spare wheel cannot be fitted with regular or winter tyres.
  • Never fit more than one compact spare tire on your vehicle.


Wheel replacement


If a tire goes flat while driving, it is necessary to move the car off the roadway if possible (to the side of the road). If this is not possible, you must protect yourself, your passengers and your vehicle by turning on the hazard warning lights and installing an emergency stop sign in accordance with the requirements of the rules.

Passengers must exit the vehicle and remain in a safe place off the roadway during repairs (for example, on the side of the road).

(The information is posted on this resource: www.VWManual.ru)

Set the handbrake on the car. Additionally, block the wheel located diagonally from the one being replaced by placing stones or other similar objects under it on both sides.

Remove the tools and spare tire from the trunk.
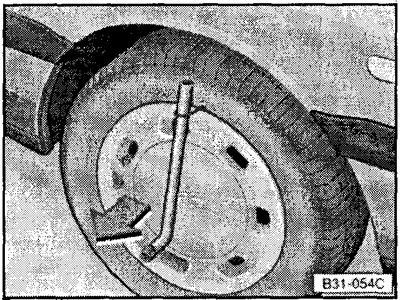
Remove the tools and spare tire from the trunk.


Remove the wheel caps. To do this, use the special clamp (puller) supplied with the tool kit (see fig.). Sometimes alloy wheel disks are fitted with caps that can be pried off with the flat end of a screwdriver.
Remove the wheel caps. To do this, use the special clamp (puller) supplied with the tool kit (see…


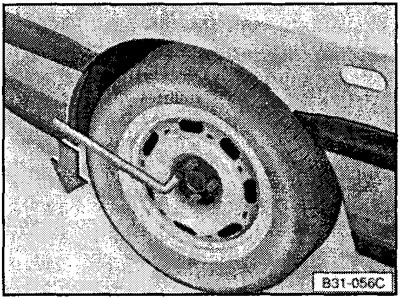
Place the lug wrench firmly on the wheel bolt as shown in Fig. B31-056C and turn the bolt counterclockwise, keeping the wrench as close to the end of the lever as possible.


If the bolts are tight, you can gently press the end of the wrench with your foot while holding onto the car and being careful.

Loosen all wheel bolts by turning them approximately one turn.
Loosen all wheel bolts by turning them approximately one turn.


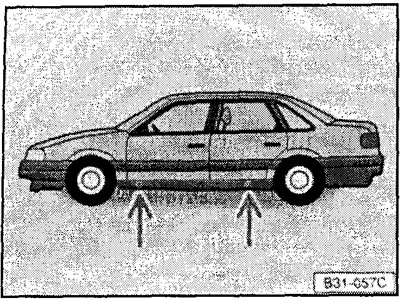
Install the jack: Markings on the body sill at the front and rear indicate the locations of the jack (shown in the figure by arrows), which are located at a distance of approximately 15 and 27 cm from the front and rear wheel arches, respectively.

Installing the jack in other locations may cause damage to the vehicle.
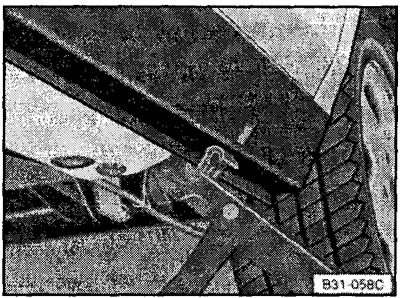
Installing the jack in other locations may cause damage to the vehicle.


Raise the jack arm by turning the handle until it reaches the level of the vehicle.

The paw should be positioned horizontally and rest against the threshold of the body so that when lifting the car the jack cannot slip - see Fig.

If the ground is soft, a reliable pad (board) of the appropriate size should be placed under the jack.
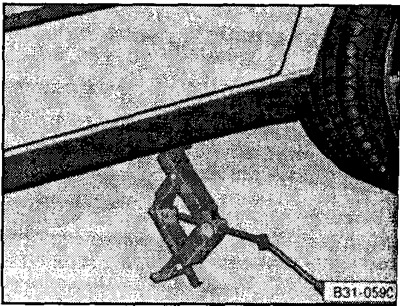
If the ground is soft, a reliable pad (board) of the appropriate size should be placed under the…


Turn the handle to slightly lift the car and make sure the jack is securely installed. Turn the handle further to lift the car so that the defective wheel is off the ground.

Completely unscrew the already loosened wheel mounting bolts (for this purpose, it is convenient to use a screwdriver with replaceable attachments, including an attachment for wheel bolts). Place the bolts on a clean surface (wheel cap, cloth, paper).

Remove the wheel and immediately install the spare in its place. Screw in the wheel mounting bolts and tighten them slightly. The bolts must be clean - do not lubricate them.

Lower the vehicle to the ground and tighten the lug nuts completely with a wheel wrench.

If you are using a regular wheel as a spare, reinstall the hubcap.

Place the defective wheel in the trunk and secure it with a wing nut.

In some models, the spare wheel well is covered and locked.

Instructions


After replacing the wheel, you need to do the following:
  • Be sure to check the air pressure in the tire of the installed wheel.
  • At the earliest opportunity, check the tightening torque of the wheel bolts using a torque wrench - it should be approximately 110 Nm.

If, when installing the spare wheel, you notice that the wheel mounting bolts are rusted and difficult to tighten, they should be replaced before checking the tightening torque.

Until then, please drive at reduced speeds as a precaution.

On vehicles with a compact spare wheel, the defective wheel should be repaired as quickly as possible and reinstalled.

This article is available at russian, bulgarian, belarusian, ukrainian, serbian, croatian, romanian, polish, slovak, hungarian
The text has been checked: Medvedeva Elena

Share information:

Previous articles
Operating a vehicle in other countries
Car wheels and tires
Heater air intake filter
Windscreen wiper blades
Car windshield washers
V-shaped drive belts
Next articles
Fuses for electrical circuits
Lifting a car
Starting the engine from an external battery
Towing a car
Car wash
Paint and varnish care


Similar articles from other manuals for VW cars:
Tire (wheel) care Golf 2 (1984-1993, petrol)
Spare wheel Polo 3 (1995-2003)
On-board tool, spare wheel, tire repair kit, jack Touareg 1 (2002-2006)
Tire Pressure Monitoring Indicator Tiguan 1 (2007-2015)
Checking tire pressure Sharan 1 (1995-2000)
Checking tire valves Transporter T4 (1990-2003)
Tire wear Beetle (1960-1986)
Link to this page in different formats


Visitor comments


No comments yet


How much will 26 + 16 =


Passat B6 
  • General information
  • User manual
  • Maintenance
  • Petrol engine 1.6L
  • Engine repair
  • Cooling and lubrication system
  • Fuel injection system
  • Petrol engine 2.0L
  • Engine repair
  • Lubrication system
  • Cooling system
  • Fuel and exhaust systems
  • Diesel engine 2.0L
  • Engine repair
  • Cooling and lubrication system
  • Fuel and exhaust systems
  • Transmission
  • Clutch
  • Mechanical gearbox
  • Automatic gearbox
  • Drive shafts
  • Chassis
  • Wheels and tires
  • Car suspension
  • Steering
  • Brake system
  • Body
  • Exterior (external elements)
  • Electrical equipment
  • Power devices
  • Lighting and appliances
  • Electrical circuits
Passat B5 
  • General information
  • User manual
  • Weekly checks
  • Maintenance
  • Power unit
  • Engine repair
  • Cooling system
  • Fuel system (petrol)
  • Fuel system (diesel)
  • Engine management
  • Exhaust system
  • Transmission
  • Clutch
  • Car gearbox
  • Drive shafts
  • Chassis
  • Car suspension
  • Wheels and tires
  • Steering
  • Brake system
  • Body
  • Exterior (external elements)
  • Interior (internal elements)
  • Doors and covers
  • Ventilation and heating
  • Electrical equipment
  • Power devices
  • Lighting and appliances
  • Electrical circuits
Passat B4 
  • General information
  • User manual
  • Maintenance
  • Technical data
  • 8-valve engine
  • Engine repair
  • Cooling and lubrication system
  • Supply system
  • Ignition system
  • Fuel injection «Mono-Jetronic»
  • Control system «Mono-Motronic»
  • Control system «Digifant»
  • Control system «Simos»
  • 16-valve engine
  • Engine repair
  • Cooling and lubrication system
  • Fuel injection «K-Jetronic»
  • Control system «KE-Motronic»
  • Control system «Digifant»
  • Diesel engine
  • Engine repair
  • Cooling and lubrication system
  • Power and control system
  • Turbocharging system
  • Digital control system
  • Transmission
  • Clutch
  • Manual gearbox
  • Hydromechanical gearbox
  • Front wheel drive
  • Chassis
  • Car suspension
  • Steering
  • Brake system
  • Body
  • Body elements
  • Electrical equipment
  • Power devices
  • Lighting and appliances
  • Electrical circuits
Passat B3 
  • General information
  • User manual
  • Driving Tips
  • Maintenance instructions
  • Technical data
  • Power unit
  • Engine repair
  • Ignition system
  • Lubrication system
  • Cooling system
  • Supply system
  • Petrol injection system
  • Diesel engine
  • Exhaust system
  • Transmission
  • Clutch
  • Car gearbox
  • Chassis
  • Suspension
  • Steering
  • Brake system
  • Wheels and tires
  • Body
  • Exterior
  • Interior
  • Heating system
  • Electrical equipment
  • Power devices
  • Lighting system
  • Equipment and devices
  • Wiper system
  • Electrical circuits
Passat B2 
  • General information
  • Introduction to instructions
  • User manual
  • Power unit
  • Engines 4-cylinder FZ
  • Engines 4-cylinder
  • Engines 5-cylinder
  • Transmission
  • Clutch
  • Four-speed gearbox
  • Five-speed gearbox
  • Hydromechanical gearbox
  • Front wheel drive
  • Chassis
  • Front suspension
  • Rear suspension
  • Steering
  • Brake system
  • Body
  • Body elements
  • Electrical equipment
  • Equipment and devices
  • Electrical circuits
VWmanual.ru © 2016-2026 | Mobile version | News and articles | Sitemap: EN BG BY UA RS HR RO PL SK HU | Write message | Site search
Passat B2 • Passat B3 • Passat B4 • Passat B5 • Passat B6 • Golf 1, diesel • Golf 1, petrol • Golf 2, petrol • Golf 2 • Golf 3 • Golf 4 • Golf 5 • Polo 3 • Polo 4 • Touareg 1 • Tiguan 1 • Sharan 1 • Transporter T3 • Transporter T4 • LT 28 • LT 2D • Beetle • Caddy 3 •
Our website uses cookies to ensure functionality and convenience.