
English Русский
Български
Беларускі
Український
Српски
Hrvatski
Română
Polski
Slovenský
Magyar
  |  Articles  |  Sitemap  |  Contacts  |    |
Car maintenance Ford Car maintenance Hyundai Car maintenance Chevrolet Car maintenance BMW Car maintenance Audi Car maintenance Opel Car maintenance AvtoVAZ
VWmanual.ru


Main   Passat   Golf   Polo   Touareg   Tiguan   Sharan   Transporter   Others  
Golf 1 (1974-1984, diesel) Golf 1 (1974-1984, petrol) Golf 2 (1984-1993, petrol) Golf 2 (1984-1993) Golf 3 (1991-1997) Golf 4 (1997-2004) Golf 5 (2003-2008)

Removal an automatic transmission (VW Golf 3)

  • Main
  • Golf
  • Golf 3
  • Transmission
  • Gearbox and drive shafts
  • Removal an automatic transmission
            0


Disconnect the housing cable from the battery. If there is a built-in radio installation, you need to know the anti-theft device code

Remove the screws at the top between the engine and the gearbox.

Separate the tachometer drive from the gearbox.

Disconnect and remove the upper starter mounting screw.

Shift the lever to position (P) and separate the cable, lubricating lever and gearbox.

Detach the cable mounting support and remove it.

Remove the engine from the mount by lifting it with a lifting device until it is under tension.

Place the front of the car on jack stands and unscrew the lower shield from under the engine.

[The information is presented on the website: www.vwmanual.ru]

Remove the left suspension bolts and remove the suspension completely.
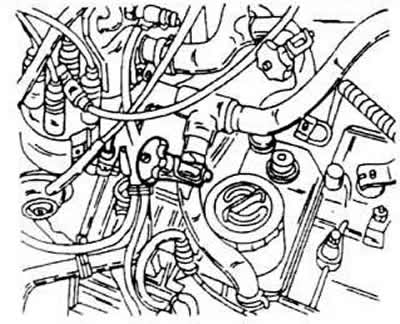
Remove the left suspension bolts and remove the suspension completely.


Clamp the oil supply hoses with suitable compression rings and disconnect the ends of the hoses from the radiator.
Clamp the oil supply hoses with suitable compression rings and disconnect the ends of the hoses…


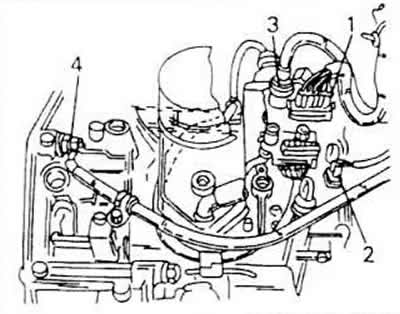
Disconnect the electrical connections shown in the illustration


Unscrew the transmission oil pan protective plate.

Disconnect the front engine mount and remove it completely. Now remove the starter as well.

Flang the primary gearbox halls and tie the right shaft to a convenient place with a piece of wire.

Remove the left primary shaft completely. To do this, loosen the primary shaft nut and unscrew the front wheel. Using a scriber, mark the position in which the wheel bearing housing was installed relative to the shock absorber strut and disconnect the screws shown in the figure. Disengage the wheel bearing housing and rock it to the side until the shaft can disengage from the wheel hub.
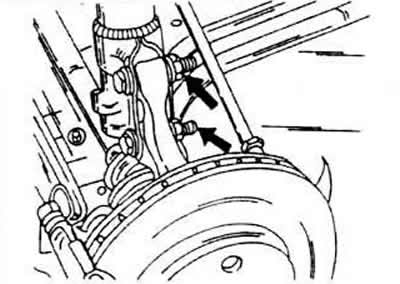
Remove the left primary shaft completely. To do this, loosen the primary shaft nut and unscrew the…


Unscrew the protective cover from under the torque converter.

Through the opened hole, unscrew the screws one by one, located between the drive plate on the crankshaft and the torque converter. To do this, you need to turn the crankshaft until the screws appear one after another.

Place a jack under the gearbox and remove the rubber-metal bearing screws.

Raise the engine slightly higher. This will lower the gearbox and make it easier to remove.

Remove the screws at the bottom between the engine and the gearbox.


Carefully lower the gearbox and disconnect it from the engine. Secure the torque converter to the gearbox so that it cannot fall out. Make sure that the primary shafts and tachometer drive are not damaged. The gearbox is installed in the reverse order of dismantling, taking into account the following aspects.

Tighten the torque converter screws on the drive disc to a tightening torque of 60 Nm.

Tighten the threaded connection between the engine and gearbox to a torque of 80 Nm (M12 screws) or 60 Nm (M10 screws).

Install the front bracket on the hydraulic suspension and tighten it to a torque of 60 Nm.

Install the bracket on the left suspension and tighten the screws to a torque of 60 Nm.

Install the bracket on the left side of the gearbox and tighten the screws to a torque of 25 Nm.

Attach the protective cover to the gearbox. Tighten the screws to a torque of 15 Nm.

Re-engage the left input shaft.

Reassemble the wheel bearing housing, align the applied marking marks and tighten the connecting screws to a torque of 95 Nm.

Tighten the input shaft nut to a torque of 265 Nm after the vehicle wheels are back on the floor.

Tighten the input shaft bolts from the inside to a tightening torque of 45 Nm.

This article is available at russian, bulgarian, belarusian, ukrainian, serbian, croatian, romanian, polish, slovak, hungarian
The text has been checked: Medvedeva Elena

Share information:

Previous articles
Automatic four-speed gearbox. General information
Disassembling the gearbox 02A
Dismantling and installation of box 02A
Gearbox and differential adjustment
Gearbox assembly
Checking gearbox parts
Next articles
Checking the oil and working fluid levels in the automatic transmission and final drive
Front drive shafts
Dismantling and installation of the drive shaft
Repair of the drive shaft
Dismantling and installation of the shock absorber
Restoration of rubber cuffs


Similar articles from other manuals for VW cars:
Automatic transmission oil Passat B3 (1988-1993)
Automatic Transmission: Checking ATF Level Polo 4 (2001-2009)
Automatic transmission Touareg 1 (2002-2006)
Drive shaft with tripod joint type AAR3300I for cars with… Tiguan 1 (2007-2015)
Torque converter drive pulley (for vehicles with automatic… Sharan 1 (1995-2000)
Checking the oil level in an automatic transmission Transporter T4 (1990-2003)
Oil and filter change in the 6-speed dual-clutch transmission 02E Caddy 3 (2003-2010)
Link to this page in different formats


Visitor comments


No comments yet


How much will 16 + 49 =


Golf 5 
  • General information
  • User manual
  • Maintenance
  • Troubleshooting
  • Power unit
  • Engine repair
  • Cooling and ventilation system
  • Fuel system
  • Ignition system
  • Transmission
  • Clutch
  • Mechanical gearbox
  • Automatic gearbox
  • Chassis
  • Brake system
  • Car suspension
  • Steering
  • Body
  • Interior (internal elements)
  • Exterior (external elements)
  • Doors and covers
  • Electrical equipment
  • Power devices
  • Washers and wipers
  • Lighting and appliances
  • Electrical circuits
Golf 4 
  • General information
  • User manual
  • Weekly checks
  • Maintenance
  • Power unit
  • Petrol engines
  • Diesel engines
  • Cooling system
  • Fuel system (petrol)
  • Control system (petrol)
  • Fuel system (diesel)
  • Exhaust system
  • Transmission
  • Clutch
  • Car gearbox
  • Drive shafts
  • Chassis
  • Car suspension
  • Steering
  • Wheels and tires
  • Brake system
  • Body
  • Exterior (external elements)
  • Interior (internal elements)
  • Ventilation and heating
  • Car doors and sunroof
  • Washers and glass cleaners
  • Electrical equipment
  • Power devices
  • Lighting and appliances
  • Electrical circuits
Golf 3 
  • Petrol engine
  • Engine repair
  • Lubrication system
  • Cooling system
  • Ignition system
  • Diesel engine
  • Engine repair
  • Diesel injection system
  • Pre-glow system
  • Transmission
  • Clutch
  • Gearbox and drive shafts
  • Chassis
  • Steering
  • Wheels and suspension
  • Brake system
  • Electrical equipment
  • Lighting and appliances
  • Electrical circuits
Golf 2 
  • General information
  • Introduction to guide
  • User manual
  • Petrol engines 1.3 l
  • Engine repair
  • Lubrication system
  • Cooling system
  • Carburetors
  • Supply system
  • Ignition system
  • Petrol engines 1.6/1.8 l
  • Engine repair
  • Supply system
  • Ignition system
  • Diesel engines
  • Engine repair
  • Lubrication system
  • Cooling system
  • Power and exhaust system
  • Transmission
  • Clutch
  • 4-speed gearbox 084
  • 5-speed gearbox 085
  • 4-speed gearbox 020/4R
  • 5-speed gearbox 020/4T
  • Automatic gearbox
  • Drive shafts
  • Chassis
  • Steering
  • Car suspension
  • Brake system
  • Body
  • Body elements
  • Doors, locks and windows
  • Electrical equipment
  • Equipment and devices
  • Power devices
Golf 2 (petrol) 
  • General information
  • Characteristics
  • Car care
  • Maintenance
  • Power unit
  • Engine repair
  • Engine 1.05/1.30
  • Engine 1.60/1.80
  • Cooling and lubrication system
  • Power and exhaust system
  • Transmission
  • Clutch
  • Car gearbox
  • Drive shafts
  • Chassis
  • Brake system
  • Steering
  • Suspension
  • Body
  • Body and equipment
  • Electrical equipment
  • Lighting and appliances
  • Electrical circuits
Golf 1 (petrol) 
  • General information
  • Characteristics
  • User manual
  • Maintenance
  • Power unit
  • Engine adjustment
  • Engine 1.1/1.3
  • Engine 1.5/1.6/1.8
  • Engine electrical equipment
  • Cooling system
  • Fuel system
  • Transmission
  • Clutch and manual gearbox
  • Automatic gearbox
  • Chassis
  • Steering
  • Front suspension
  • Rear suspension
  • Brake system
  • Electrical equipment
  • Lighting and appliances
  • Electrical circuits
  • Body
  • Body and equipment
  • Optional equipment
Golf 1 (diesel) 
  • General information
  • Specifications
  • Maintenance
  • Power unit
  • Engine repair
  • Exhaust and turbocharger
  • Cooling system
  • Fuel system
  • Fuel injection system
  • Transmission
  • Clutch and drive shafts
  • Car gearbox
  • Chassis
  • Suspension and wheels
  • Steering
  • Brake system
  • Wheels and tires
  • Body
  • Heating and ventilation
  • Exterior (external elements)
  • Interior (internal elements)
  • Doors and windows
  • Electrical equipment
  • Equipment and devices
  • Lighting system
  • Power devices
  • Electrical circuits
VWmanual.ru © 2016-2026 | Mobile version | News and articles | Sitemap: EN BG BY UA RS HR RO PL SK HU | Write message | Site search
Passat B2 • Passat B3 • Passat B4 • Passat B5 • Passat B6 • Golf 1, diesel • Golf 1, petrol • Golf 2, petrol • Golf 2 • Golf 3 • Golf 4 • Golf 5 • Polo 3 • Polo 4 • Touareg 1 • Tiguan 1 • Sharan 1 • Transporter T3 • Transporter T4 • LT 28 • LT 2D • Beetle • Caddy 3 •
Our website uses cookies to ensure functionality and convenience.