



Before we begin disassembling, we would like to point out once again that a number of special tools are required, without which the work can only be carried out with considerable difficulty. The corresponding spare part numbers for these tools are indicated in the appropriate places in the text, but you should first try to find them or rent them.
Before disassembling, drain the gearbox oil. To do this, use a 17mm Allen key to remove the drain plug on the underside of the gearbox housing. Remove any dirt from the outside of the gearbox.
Basic disassembly of the gearbox housing
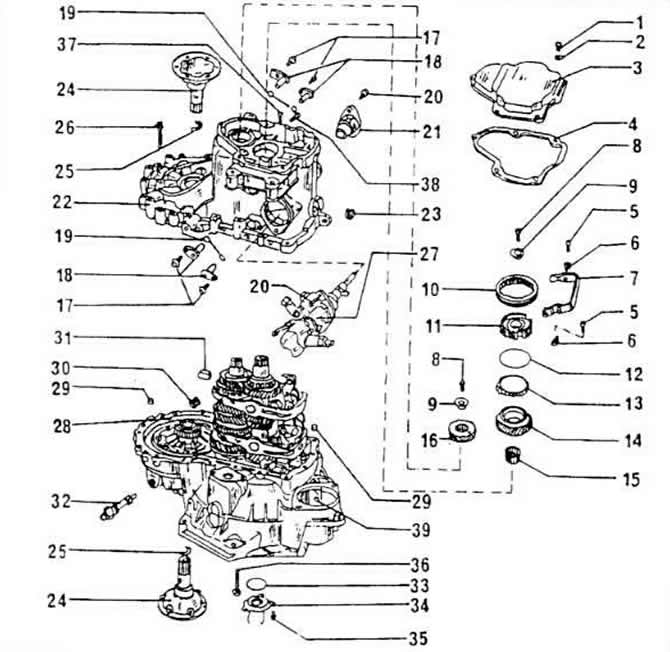
Gearbox assembly diagram
1 - bolt, tightened with a torque of 14 Nm
2 - washer
3 - gearbox cover (changed)
4 - seal
5 - bolt, tightened to 25 Nm
6 - guide pin
7 - gear shift fork, 5th gear
8 - bolt M10, tightened with a torque of 80 Nm
9 - bushing (changed)
10 - gear shift clutch, 5th gear
11 - synchronous shift sleeve, 5th gear
12 - spring
13 - synchronizing ring, 5th gear
14 - gear shift pinion, 5th gear
15 - needle roller bearing
16 - gear shift pinion, 5th gear
17 - bolt, tightened to 25 Nm
18 - guide pin
19 - O-ring seal
20 - bolt, tightened to 25 Nm
21 - bearing shell
22 - gearbox housing
23 - cork
24 - drive flange
25 - locking ring
26 - bolt, tightened to 25 Nm
27 - switching mechanism
28 - clutch housing
29 - bushing
30 - cork
31 - magnet
32 - tachometer drive
33 - O-ring seal
34 - guide bushing with seal
35 - bolt, tightened to 14 Nm
36 - bolt, tightened to 25 Nm
37, 38 - bolts, tightened to 30 Nm
39 - starter motor shaft sleeve
If changes are specified, they must be taken into account if they affect the repair of the gearbox. The following description provides references to the figure
Unscrew the gearbox cover (3) and remove the seal (4). The cover shown in the figure is flat. As a result of modification of the gear pinion mounting for the fifth gear, the cover is now higher. If the gearbox cover (3) is mounted with the gearbox installed, then after installation, check the oil level in the following manner.
The gearbox is filled with oil to the edge of the filler hole and the plug is screwed back in.
Visitor comments