
English Русский
Български
Беларускі
Український
Српски
Hrvatski
Română
Polski
Slovenský
Magyar
  |  Articles  |  Sitemap  |  Contacts  |    |
Car maintenance Ford Car maintenance Hyundai Car maintenance Chevrolet Car maintenance BMW Car maintenance Audi Car maintenance Opel Car maintenance AvtoVAZ
VWmanual.ru


Main   Passat   Golf   Polo   Touareg   Tiguan   Sharan   Transporter   Others  
Golf 1 (1974-1984, diesel) Golf 1 (1974-1984, petrol) Golf 2 (1984-1993, petrol) Golf 2 (1984-1993) Golf 3 (1991-1997) Golf 4 (1997-2004) Golf 5 (2003-2008)

Crankshaft sealing rings (VW Golf 3)

  • Main
  • Golf
  • Golf 3
  • Petrol engine
  • Engine repair
  • Crankshaft sealing rings
            0


Contents: Dismantling ↓ Installation with the engine removed ↓ Installation with the engine…↓
During any operation to remove the crankshaft or O-ring flange, the front and rear O-rings must be replaced. To do this, take special precautions and use the special tools listed below. Both oil seal rings can also be changed when the engine is not disassembled, if a leak can be detected in the vicinity of them. Clutch slippage could, for example, be attributed to a leak in the rear oil seal ring.

Dismantling


When removing the front oil seal ring, it is necessary to dismantle the V-belt, adjusting cover, control belt and belt pulley together with the flywheel. To disconnect the crankshaft flywheel screws, engage fifth gear, firmly tighten the handbrake and disconnect the screw using a socket head.
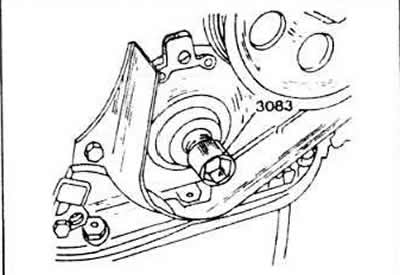
When removing the front oil seal ring, it is necessary to dismantle the V-belt, adjusting cover,…


To remove the front sealing ring, you usually need a tool, but in addition, you need a tool whose Allen screw is screwed as deep as possible into the crankshaft. Then you can use the removal tool. The removal operation is similar to that described for the camshaft sealing ring.

When removing the rear oil seal ring, remove the transmission, flywheel and clutch before the ring can be pressed out.
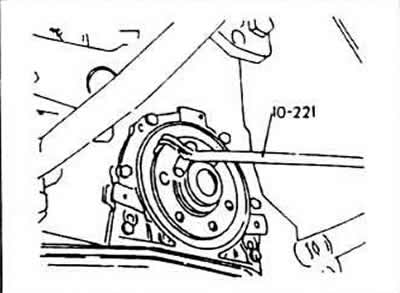


When removing the rear oil seal ring, remove the transmission, flywheel and clutch before the ring…


To remove the ring located at the rear end, use the tool shown in the figure or try to carefully push it out with a screwdriver. Do not damage the crankcase. If the engine is dismantled, unscrew the corresponding flange and remove it together with the seal. Then knock the sealing rings out of the flange (from the inside out).

Installation with the engine removed


Apply grease to the sealing lip and outer perimeter of the O-ring and gently tap it into the flange until the shoulder contacts the outer surface.

Carefully slide the flange with the seal on through the crankshaft, place it against the cylinder block and center it well. Tighten the screws evenly around it.

Installation with the engine installed


A device for tightening the front sealing ring is available for sale.
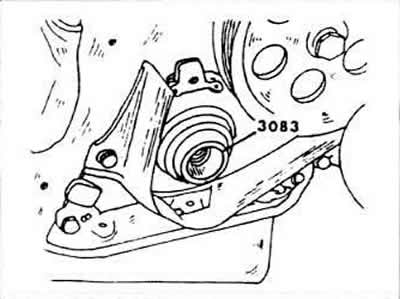
A device for tightening the front sealing ring is available for sale.


Pass the guide sleeve through the crankshaft journal, lubricate the inner and outer sides of the sealing ring with oil and pass the ring through the guide sleeve. Push the pressure sleeve of the tool through the guide sleeve and tighten the bandage until the sealing ring is seated. After this, dismantle the tool parts again.


When replacing the rear seal ring, tap it carefully with a hammer to center it. Be careful not to damage the sealing lip. Now use either the 2003/1 compression ring or make a round plate with a hole in the center for the crankshaft end to be located and use two screws to secure the appropriate tool in the threaded holes for the clutch pressure plate. By tightening both screws evenly, the oil seal ring can be brought into the correct position.
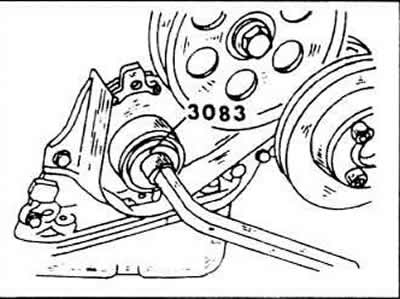
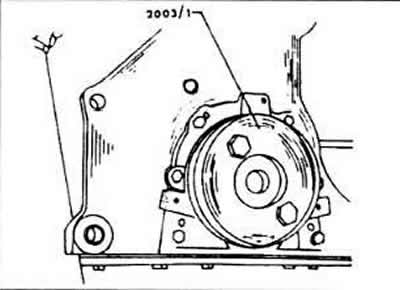
When replacing the rear seal ring, tap it carefully with a hammer to center it. Be careful not to…


When replacing the rear seal ring, tap it carefully with a hammer to center it. Be careful not to…

This article is available at russian, bulgarian, belarusian, ukrainian, serbian, croatian, romanian, polish, slovak, hungarian
The text has been checked: Medvedeva Elena

Share information:

Previous articles
Crankshaft and main bearings
Cylinder block
Pistons and connecting rods
Replacing the camshaft sealing ring
Hydraulic tappets
Cylinder head installation
Next articles
Drive mechanism
Removal the toothed belt
Installation of a toothed belt
Checking and adjusting the installation marks
Intermediate shaft
Compression pressure control


Similar articles from other manuals for VW cars:
Checking and adjusting the crankshaft speed of a cold engine at… Passat B3 (1988-1993)
Cylinder block, sealing flange and flywheel Polo 3 (1995-2003)
Replacing the crankshaft sealing flange on the vibration damper… Touareg 1 (2002-2006)
Removal the crankshaft Sharan 1 (1995-2000)
Sealing of fuel injection pump connecting fittings Transporter T4 (1990-2003)
Removal and installation the front and rear crankshaft covers Caddy 3 (2003-2010)
Link to this page in different formats


Visitor comments


No comments yet


How much will 35 + 31 =


Golf 5 
  • General information
  • User manual
  • Maintenance
  • Troubleshooting
  • Power unit
  • Engine repair
  • Cooling and ventilation system
  • Fuel system
  • Ignition system
  • Transmission
  • Clutch
  • Mechanical gearbox
  • Automatic gearbox
  • Chassis
  • Brake system
  • Car suspension
  • Steering
  • Body
  • Interior (internal elements)
  • Exterior (external elements)
  • Doors and covers
  • Electrical equipment
  • Power devices
  • Washers and wipers
  • Lighting and appliances
  • Electrical circuits
Golf 4 
  • General information
  • User manual
  • Weekly checks
  • Maintenance
  • Power unit
  • Petrol engines
  • Diesel engines
  • Cooling system
  • Fuel system (petrol)
  • Control system (petrol)
  • Fuel system (diesel)
  • Exhaust system
  • Transmission
  • Clutch
  • Car gearbox
  • Drive shafts
  • Chassis
  • Car suspension
  • Steering
  • Wheels and tires
  • Brake system
  • Body
  • Exterior (external elements)
  • Interior (internal elements)
  • Ventilation and heating
  • Car doors and sunroof
  • Washers and glass cleaners
  • Electrical equipment
  • Power devices
  • Lighting and appliances
  • Electrical circuits
Golf 3 
  • Petrol engine
  • Engine repair
  • Lubrication system
  • Cooling system
  • Ignition system
  • Diesel engine
  • Engine repair
  • Diesel injection system
  • Pre-glow system
  • Transmission
  • Clutch
  • Gearbox and drive shafts
  • Chassis
  • Steering
  • Wheels and suspension
  • Brake system
  • Electrical equipment
  • Lighting and appliances
  • Electrical circuits
Golf 2 
  • General information
  • Introduction to guide
  • User manual
  • Petrol engines 1.3 l
  • Engine repair
  • Lubrication system
  • Cooling system
  • Carburetors
  • Supply system
  • Ignition system
  • Petrol engines 1.6/1.8 l
  • Engine repair
  • Supply system
  • Ignition system
  • Diesel engines
  • Engine repair
  • Lubrication system
  • Cooling system
  • Power and exhaust system
  • Transmission
  • Clutch
  • 4-speed gearbox 084
  • 5-speed gearbox 085
  • 4-speed gearbox 020/4R
  • 5-speed gearbox 020/4T
  • Automatic gearbox
  • Drive shafts
  • Chassis
  • Steering
  • Car suspension
  • Brake system
  • Body
  • Body elements
  • Doors, locks and windows
  • Electrical equipment
  • Equipment and devices
  • Power devices
Golf 2 (petrol) 
  • General information
  • Characteristics
  • Car care
  • Maintenance
  • Power unit
  • Engine repair
  • Engine 1.05/1.30
  • Engine 1.60/1.80
  • Cooling and lubrication system
  • Power and exhaust system
  • Transmission
  • Clutch
  • Car gearbox
  • Drive shafts
  • Chassis
  • Brake system
  • Steering
  • Suspension
  • Body
  • Body and equipment
  • Electrical equipment
  • Lighting and appliances
  • Electrical circuits
Golf 1 (petrol) 
  • General information
  • Characteristics
  • User manual
  • Maintenance
  • Power unit
  • Engine adjustment
  • Engine 1.1/1.3
  • Engine 1.5/1.6/1.8
  • Engine electrical equipment
  • Cooling system
  • Fuel system
  • Transmission
  • Clutch and manual gearbox
  • Automatic gearbox
  • Chassis
  • Steering
  • Front suspension
  • Rear suspension
  • Brake system
  • Electrical equipment
  • Lighting and appliances
  • Electrical circuits
  • Body
  • Body and equipment
  • Optional equipment
Golf 1 (diesel) 
  • General information
  • Specifications
  • Maintenance
  • Power unit
  • Engine repair
  • Exhaust and turbocharger
  • Cooling system
  • Fuel system
  • Fuel injection system
  • Transmission
  • Clutch and drive shafts
  • Car gearbox
  • Chassis
  • Suspension and wheels
  • Steering
  • Brake system
  • Wheels and tires
  • Body
  • Heating and ventilation
  • Exterior (external elements)
  • Interior (internal elements)
  • Doors and windows
  • Electrical equipment
  • Equipment and devices
  • Lighting system
  • Power devices
  • Electrical circuits
VWmanual.ru © 2016-2026 | Mobile version | News and articles | Sitemap: EN BG BY UA RS HR RO PL SK HU | Write message | Site search
Passat B2 • Passat B3 • Passat B4 • Passat B5 • Passat B6 • Golf 1, diesel • Golf 1, petrol • Golf 2, petrol • Golf 2 • Golf 3 • Golf 4 • Golf 5 • Polo 3 • Polo 4 • Touareg 1 • Tiguan 1 • Sharan 1 • Transporter T3 • Transporter T4 • LT 28 • LT 2D • Beetle • Caddy 3 •
Our website uses cookies to ensure functionality and convenience.