
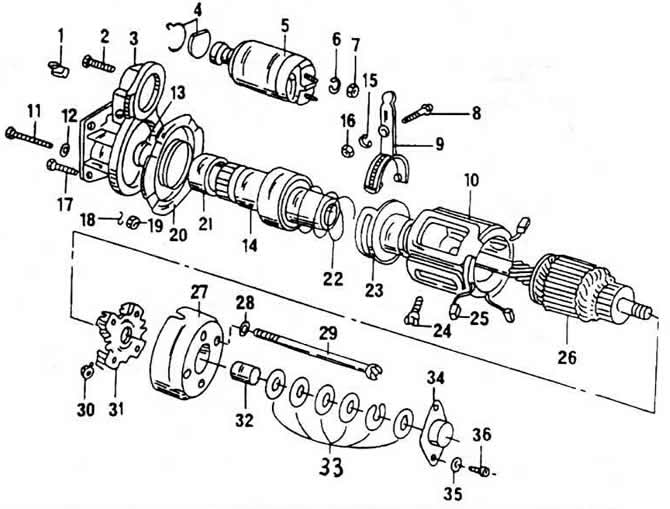
1 - starter bushing
2 - starter screw
3 - drive bearing shield
4 - small parts
5 - switch with solenoid drive
6 - spring washer
7 - nut, 8 Nm
8 - screw
9 - single track lever
10-pole coils
11 - screw, M10
12 - washer
13 - thrust ring
14 - starter drive
15 - spring washer
16 - nut, M6
On the front of the solenoid operated switch, remove the screws and disengage the single track lever to remove the switch.
Unscrew and remove the cap from the back of the starter.
Disconnect the manifold bearing cap screws.
Press out the locking clip located at the end of the armature shaft (screwdriver), remove small parts and remove the cover from the starter. If necessary, pry out with a screwdriver. Save the washers.
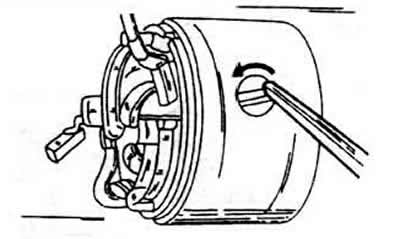
Remove both carbon brushes from the mounting devices and remove the brush traverses.
Pull down the starter housing together with the pole coils.
Remove the bearing bolt and remove the lever.
Remove the seal from the bearing shield, paying attention to the location of the seal.
The brushes of the pole coils are soldered to the coil windings; they can only be replaced together with the entire coil. If this operation is carried out, the following work must be performed.
Disconnect the four screws of the pole piece by prying them out with a brass mandrel.
Remove the pole piece and remove the pole coils together with the brushes from the pole pieces.
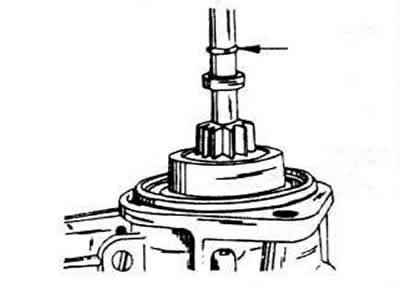
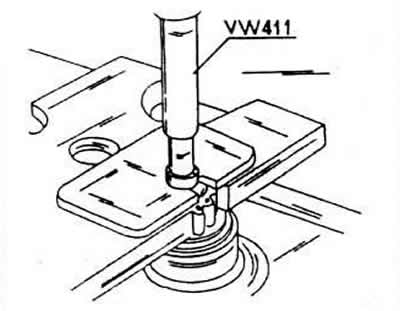
Using a piece of pipe of a suitable diameter, knock down the thrust ring to release the snap ring (arrow).
Pull the circlip out of the groove on the armature shaft.
Remove burrs from the end of the armature shaft.
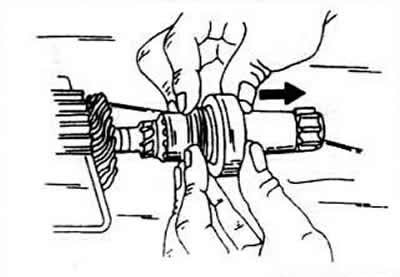
Clamp the armature in a vise and remove the drive gear down from the armature shaft.
Clean and check all details (except for the pole coils in case they are used again). Check for burnt windings in the armature, how smooth the surface of the collector is. Using very fine sandpaper, you can sand the collector, however, if the collector is quite worn, it should be turned on a lathe, and the diameter of the collector should not be below a certain minimum value. Car repair shop "Volkswagen" able to provide this required diameter.
The starter gear must not be disassembled; if damaged, it must be replaced.
The starter is assembled in the reverse order of disassembly. It should also be noted that the minimum length of the carbon brushes is 13 mm. When replacing brushes, crush the old brush with tongs and clean the end of the brush plate (stranded flexible wire). Insert the face into the new brush and fan it out on the other side.
Use tongs to press the face to the underside and solder on the other side.
Pay special attention to the following when working on the starter.
Slide the starter gear onto the shaft. put on the thrust ring and reinforce it with a new retaining ring mounted on the shaft. Place the retaining ring on a support suitable for the pressing operation and press the retaining ring into the thrust ring, applying a pressing force to the armature shaft.
If you need to replace the sleeve in the manifold bearing shield (it can be easily pressed out), a new bushing should be pressed in after preheating the bearing cap in hot oil for 5 minutes.
When placing the switch with solenoid actuators, make sure that the pusher makes perfect contact with the single track lever.
Lubricate the joints of the starter housing with the drive bearing shield with sealing mass «D3».
The axial clearance of the armature should be 0.1-63 mm. It can be adjusted by changing the thickness of the compensation washer located between the end of the sleeve in the header bearing cap and the C-shaped lock washer. For control, assemble the starter, check the axial clearance and, if necessary, correct it.
Visitor comments