
English Русский
Български
Беларускі
Український
Српски
Hrvatski
Română
Polski
Slovenský
Magyar
  |  Articles  |  Sitemap  |  Contacts  |    |
Car maintenance Ford Car maintenance Hyundai Car maintenance Chevrolet Car maintenance BMW Car maintenance Audi Car maintenance Opel Car maintenance AvtoVAZ
VWmanual.ru


Main   Passat   Golf   Polo   Touareg   Tiguan   Sharan   Transporter   Others  
Golf 1 (1974-1984, diesel) Golf 1 (1974-1984, petrol) Golf 2 (1984-1993, petrol) Golf 2 (1984-1993) Golf 3 (1991-1997) Golf 4 (1997-2004) Golf 5 (2003-2008)

Exhaust system maintenance (VW Golf 2)

  • Main
  • Golf
  • Golf 2
  • Power unit
  • Power and exhaust system
  • Exhaust system maintenance
            0


Contents: Method 1 ↓ Method 2 ↓
1. The exhaust system must be checked after 15,000 km of mileage for leaks, damage and reliability of operation. To check the exhaust system, apply the handbrake, start the engine and let it idle. Check the exhaust system for leaks along its entire length, on both sides of the car, while an assistant briefly closes the exhaust pipe outlet with a folded rag. If the leak in any section is very large, it must be replaced with a new one. Check the condition of the rubber clamps and, if necessary, replace these elements with new ones (Fig. 3.55).
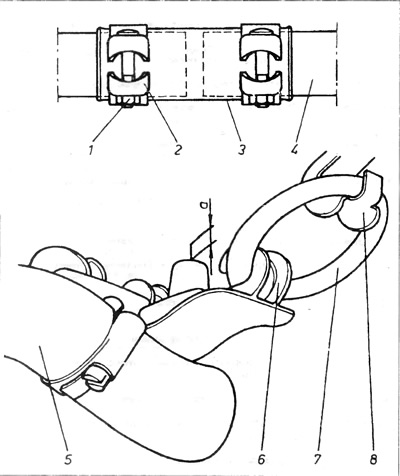
Figure 3.55. Clamps (earrings) of the exhaust system

1 - bolt of the clamping belt; 2 - clamping belt; 3 - connecting sleeve; 4 - end of shock absorber pipe; 5 - shock absorber pipe; 6 - shock absorber pipe ear; 7 - rubber earring; 8 - body ear.


2. In models of cars with 1.6 and 1.8 engines, a hinged mount of the exhaust pipe to the exhaust manifold is used. The cuff of the exhaust pipe 5 is pressed against the cuff of the exhaust manifold using spring clamps 4 (figure 3.56).
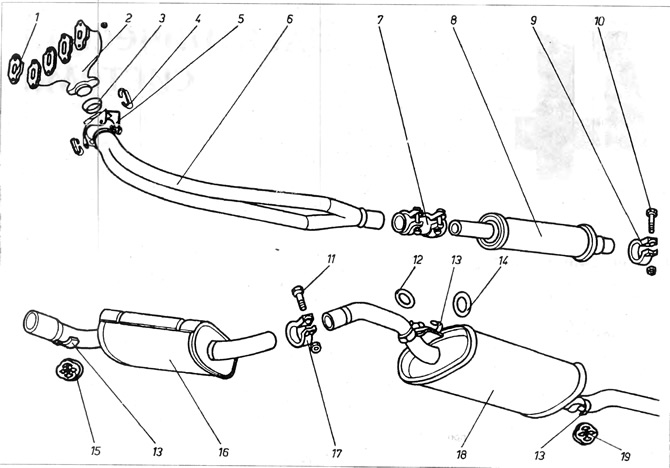
Figure 3.56. Exhaust system elements

1 - gasket; 2 - exhaust manifold, 3 - sealing ring; 4 - spring clamp; 5 - exhaust pipe cuff; 6 - exhaust pipe; 7 - connecting sleeve; 8 - shock absorber; 9 - clamping belt; 10 - clamping belt bolt; 11 - clamping belt bolt; 12 - rubber earring; 13 - shock absorber pipe ear; 14 - rubber earring; 15 - rubber earring; 16 - muffler; 17 - clamping belt; 18 - muffler; 19 - rubber earring.


To remove these clamps, the manufacturer provides a special tool, with which the clamp is bent to the length necessary for removal. As inconvenient as removing the clamp without this tool is, installation may also cause serious difficulties. Below are two ways to install the clamps.


Method 1


The clamp is stretched by successively driving in several wedges, increasing in height. The wedges must be made of 4 mm thick sheet metal with a not very large slope, so that after driving in the wedge does not move back. Therefore, the clamp must be stretched in several stages:

a) Place the clamp horizontally on the vice along the slightly spread jaws.

b) Drive in the first wedge.

c) Turn the clamp and drive in the next wedge, which is 4 mm larger than the previous one. The previous wedge falls out and a space is formed for driving in the next wedge. And so on until the clamp is not widened enough for installation.

Caution: Do not stretch the clamp beyond its limit, as it will lose its spring properties.


d) The same must be done with the second clamp.

d) After laying the wedges on the cuff, it is necessary to knock out the wedges.

Method 2


This method involves tying a steel wire to one side of a clamp. The clamp has two holes, one at each end.

a) A soft steel wire must be pulled through the window from the holes and its ends must be tied. A loop of 0.75 mm in length must be obtained.

b) Place the free end of the clamp on the exhaust manifold cuff and lower the wire down under the car.

c) The assistant must press the exhaust pipe cuff into the manifold socket.

d) Place a wooden beam or board across the car body.

d) Insert the steel tube into the wire loop and, like a lever, pull the wire down, resting the tube on a wooden beam pressed against the body. At this time, the assistant should push the clamp onto the exhaust pipe cuff. If the loop made at the beginning is very long, it is enough to twist the wire to shorten it.


4. Before performing any work on the exhaust system, wait until the system has cooled down, and then coat the mounting bolts and connections with a thin layer of rust remover.

5. When installing the exhaust system, you will need to install new bolts and nuts. It may be easier to cut the old bolts with a hacksaw than to remove them.

6. When removing any part of the exhaust system on models with 1.1 and 1.3L engines, it is usually easier to unscrew the bolts connecting the exhaust manifold and the front exhaust pipe and remove the entire system from the car, then separate it into individual parts or cut out the faulty parts with a hacksaw for metal.

View the original on this resource [VWManual.ru]

7. Assemble the system in sections, starting from the front.

8. Before installing the system, lubricate all its connections with an exhaust system sealant. This will ensure free movement of the parts relative to each other during mutual installation and ensure the tightness of the connections. Leave all bolts loose.

9. Start the engine and wait until the exhaust system reaches normal operating temperature. Then, with the engine idling, tighten all mounting bolts and clamps, starting from the exhaust manifold and moving towards the rear shock absorber. Avoid touching any part of the system with bare hands, as this can cause burns. Wear gloves when performing this work.

10. When tightening bolts and clamps, care must be taken to ensure that no part of the exhaust system is under tension.

This article is available at russian, bulgarian, belarusian, ukrainian, serbian, croatian, romanian, polish, slovak, hungarian
The text has been checked: Semenova Anna

Share information:

Previous articles
Fuel injection system fault table
Exhaust manifold (exhaust)
Suction manifold
Pressure accumulator
Fuel filter
Fuel pump located outside the fuel tank
Next articles


Similar articles from other manuals for VW cars:
Instructions for vehicles with a catalytic converter in the… Passat B3 (1988-1993)
Exhaust gas system Polo 3 (1995-2003)
Exhaust system alignment Touareg 1 (2002-2006)
Catalyst and exhaust system attachments Tiguan 1 (2007-2015)
Removal and installation of the exhaust system Sharan 1 (1995-2000)
Checking the exhaust system by visual inspection Transporter T4 (1990-2003)
Exhaust Gas Afterburning System — description and maintenance LT 28 (1975-1991)
Link to this page in different formats


Visitor comments


No comments yet


How much will 29 + 21 =


Golf 5 
  • General information
  • User manual
  • Maintenance
  • Troubleshooting
  • Power unit
  • Engine repair
  • Cooling and ventilation system
  • Fuel system
  • Ignition system
  • Transmission
  • Clutch
  • Mechanical gearbox
  • Automatic gearbox
  • Chassis
  • Brake system
  • Car suspension
  • Steering
  • Body
  • Interior (internal elements)
  • Exterior (external elements)
  • Doors and covers
  • Electrical equipment
  • Power devices
  • Washers and wipers
  • Lighting and appliances
  • Electrical circuits
Golf 4 
  • General information
  • User manual
  • Weekly checks
  • Maintenance
  • Power unit
  • Petrol engines
  • Diesel engines
  • Cooling system
  • Fuel system (petrol)
  • Control system (petrol)
  • Fuel system (diesel)
  • Exhaust system
  • Transmission
  • Clutch
  • Car gearbox
  • Drive shafts
  • Chassis
  • Car suspension
  • Steering
  • Wheels and tires
  • Brake system
  • Body
  • Exterior (external elements)
  • Interior (internal elements)
  • Ventilation and heating
  • Car doors and sunroof
  • Washers and glass cleaners
  • Electrical equipment
  • Power devices
  • Lighting and appliances
  • Electrical circuits
Golf 3 
  • Petrol engine
  • Engine repair
  • Lubrication system
  • Cooling system
  • Ignition system
  • Diesel engine
  • Engine repair
  • Diesel injection system
  • Pre-glow system
  • Transmission
  • Clutch
  • Gearbox and drive shafts
  • Chassis
  • Steering
  • Wheels and suspension
  • Brake system
  • Electrical equipment
  • Lighting and appliances
  • Electrical circuits
Golf 2 
  • General information
  • Introduction to guide
  • User manual
  • Petrol engines 1.3 l
  • Engine repair
  • Lubrication system
  • Cooling system
  • Carburetors
  • Supply system
  • Ignition system
  • Petrol engines 1.6/1.8 l
  • Engine repair
  • Supply system
  • Ignition system
  • Diesel engines
  • Engine repair
  • Lubrication system
  • Cooling system
  • Power and exhaust system
  • Transmission
  • Clutch
  • 4-speed gearbox 084
  • 5-speed gearbox 085
  • 4-speed gearbox 020/4R
  • 5-speed gearbox 020/4T
  • Automatic gearbox
  • Drive shafts
  • Chassis
  • Steering
  • Car suspension
  • Brake system
  • Body
  • Body elements
  • Doors, locks and windows
  • Electrical equipment
  • Equipment and devices
  • Power devices
Golf 2 (petrol) 
  • General information
  • Characteristics
  • Car care
  • Maintenance
  • Power unit
  • Engine repair
  • Engine 1.05/1.30
  • Engine 1.60/1.80
  • Cooling and lubrication system
  • Power and exhaust system
  • Transmission
  • Clutch
  • Car gearbox
  • Drive shafts
  • Chassis
  • Brake system
  • Steering
  • Suspension
  • Body
  • Body and equipment
  • Electrical equipment
  • Lighting and appliances
  • Electrical circuits
Golf 1 (petrol) 
  • General information
  • Characteristics
  • User manual
  • Maintenance
  • Power unit
  • Engine adjustment
  • Engine 1.1/1.3
  • Engine 1.5/1.6/1.8
  • Engine electrical equipment
  • Cooling system
  • Fuel system
  • Transmission
  • Clutch and manual gearbox
  • Automatic gearbox
  • Chassis
  • Steering
  • Front suspension
  • Rear suspension
  • Brake system
  • Electrical equipment
  • Lighting and appliances
  • Electrical circuits
  • Body
  • Body and equipment
  • Optional equipment
Golf 1 (diesel) 
  • General information
  • Specifications
  • Maintenance
  • Power unit
  • Engine repair
  • Exhaust and turbocharger
  • Cooling system
  • Fuel system
  • Fuel injection system
  • Transmission
  • Clutch and drive shafts
  • Car gearbox
  • Chassis
  • Suspension and wheels
  • Steering
  • Brake system
  • Wheels and tires
  • Body
  • Heating and ventilation
  • Exterior (external elements)
  • Interior (internal elements)
  • Doors and windows
  • Electrical equipment
  • Equipment and devices
  • Lighting system
  • Power devices
  • Electrical circuits
VWmanual.ru © 2016-2026 | Mobile version | News and articles | Sitemap: EN BG BY UA RS HR RO PL SK HU | Write message | Site search
Passat B2 • Passat B3 • Passat B4 • Passat B5 • Passat B6 • Golf 1, diesel • Golf 1, petrol • Golf 2, petrol • Golf 2 • Golf 3 • Golf 4 • Golf 5 • Polo 3 • Polo 4 • Touareg 1 • Tiguan 1 • Sharan 1 • Transporter T3 • Transporter T4 • LT 28 • LT 2D • Beetle • Caddy 3 •
Our website uses cookies to ensure functionality and convenience.