



Contents: Replacing steering rods ↓ Adjustment ↓
Replacing steering rods
1. Remove the steering gear assembly from the vehicle together with the steering rods to avoid damage to the gear wheel and pinion. Details regarding disassembly are specified in paragraph 9. Additionally, it is necessary to disconnect the supply pipes and protect them from contamination.
2. After removal, the steering gear must be cleaned from the outside, then the clamps must be released and the steering rod covers 8 must be removed from the inner hinges (Fig. 9.7).
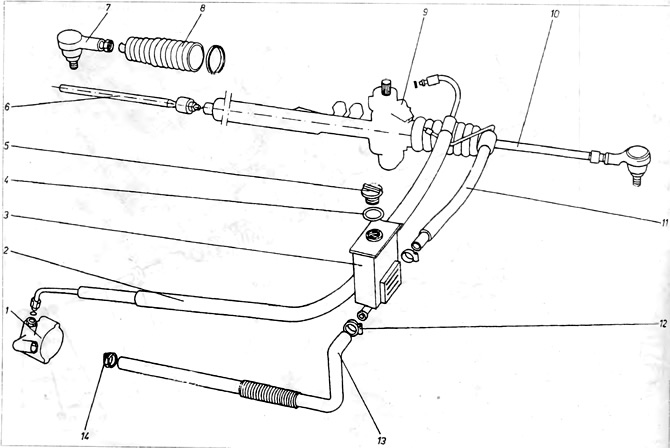
Figure 9.7. Power steering
1 - pump; 2 - pipeline under pressure; 3 - oil tank; 4 - gasket; 5 - oil tank cap; 6 - right steering rod; 7 - outer ball joint; 8 - steering gear casing; 9 - steering gear; 10 - left steering rod; 11 - return pipeline; 12, 14 - clamping belts; 13 - suction pipe.
3. Clamp the steering rack in a vice with soft jaws.
4. The steering rods and outer ball joint can be removed in the same way as in a non-power steering system.
5. Screw the steering rods onto the toothed rack and adjust the specified distances as described
6. Install the steering gear and steering rods as described in point 9.
Adjustment
8. Remove the steering gear.
9. Loosen the adjusting bolt safety nut. Then screw in the adjusting bolt to a position where the rack can still move without jamming or binding. Tighten the safety nut.
10. Install the steering gear into the vehicle.
Checking the oil level
11. The oil level in the power steering system is checked with the front wheels set to drive straight and the engine running. Check whether the oil level in tank 3 is between the MAX and MIN marks. If necessary, raise the level using only ATF oil.
12. If there is a need to constantly top up the oil, it is necessary to check for oil leaks near the pump, at the connections of the pipelines with the tank and the steering gear.
13. To drain the oil from the power steering system, disconnect the suction pipe 13 from the pump 1 and drain the oil into a container. While draining the oil, rotate the steering wheel from one extreme position to the other to remove as much oil as possible.
14. After draining the oil, reconnect the suction pipe to the pump and then fill the tank with new oil. Start the engine and turn it off immediately after it starts working. This must be repeated several times to cause rapid suction of oil into the system.
15. Monitor the oil level and top it up immediately so that the tank never runs empty. When the oil level stops dropping as a result of repeated starting and stopping, the engine should be left to idle.
16. Turn the steering wheel several times from one extreme position to the other. In doing so, it is necessary to pay attention to the fact that the wheels do not stop in the full turn position, as this may cause an increase in pressure in the system.
17. It is necessary to constantly monitor the oil level in the tank and top it up to keep the level near the MAX mark.
18. When the oil level stops falling and no air bubbles appear in the tank, turn off the engine and put on the tank funnel cap. When the engine is turned off, the fluid level will increase slightly.
19. If there is a suspicion that the pump is not working properly, it must be checked at a service station. No inspection or repair of the pump unit is performed. If the pump is faulty, it must be replaced with a new one, as well as the entire unit.
20. To remove the pump assembly, it is necessary to drain the fluid from the system.
21. Disconnect the pressure line from the pump unit.
22. Loosen the pump assembly mounting bolts and rotate the pump to allow the drive belt to be removed from the pulley.
23. Hold the pump, remove the mounting bolts and remove the pump unit.
24. Assembly is performed in the reverse order of disassembly. In this case, it is necessary to tighten the drive belt, fill the system with oil and remove air from it.
Adjusting the drive belt tension
25. To adjust the drive belt tension, the nuts and bolts securing the pump unit must be loosened. Also loosen the lock nut of the tension adjuster bolt on the pump bracket. Turn the tension bolt until the belt cannot be bent by about 10 mm under strong pressure from the thumb at the midpoint between the pump pulleys and the engine crankshaft. When the belt tension is normal, it is necessary to tighten the lock nut of the adjusting bolt. Also tighten the fastening nuts and bolts of the pump.
Visitor comments