
The second important parameter is the so-called disc beat. The runout of the rubbing surfaces of the disk is measured using a clock sensor. If any parameter does not correspond to acceptable values, the disk must be replaced.
When the disc has sufficient thickness, but is only scratched or its runout is slightly higher than the allowable value, it can be sanded.
To remove a disk:
1. Perform the actions described in paragraphs 10.1-10.5.
2. Loosen the screws and remove the clamp bracket.
3. Use a screwdriver to remove the hub cover 6 (pic. 8.9).
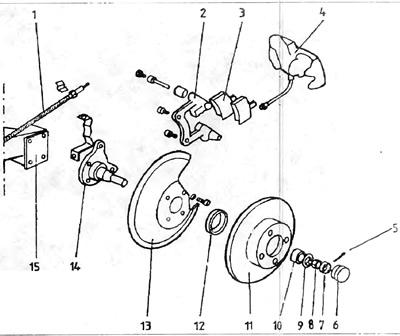
Pic. 8.9. Rear disc brake
1 - hand brake cable; 2 - clamp bracket; 3 - brake pads; 4 brake clamp; 5 - check; 6 - hub cover; 7 - crown protection; 8 - hub trunnion nut; 9 - washer; 10 - bearing; 11 - brake disc; 12 - casing of the seal; 13 - casing of the brake disc; 14 - hub axis; 15 - rear axle beam.
4. Remove nut 5, then remove the crown guard.
5. Unscrew the hub nut 8 and take out the safety washer 9 and the outer conical bearing 10.
6. To remove a disk from a pin of an axis of a nave.
7. Knock out the inner tapered bearing in place with the seal and the ring protecting the seal 12.
8. Knock out the outer races of the bearings from the disc. For disassembly and for the subsequent assembly of the tracks, appropriate metal tubes or punches machined to size are used.
9. If necessary, you can unscrew the casing of the brake disc 13 together with the axle of the wheel hub 14 from the rear axle beam 15.
10. If it is necessary to replace the disk of one of the two rear brakes after a short run, it is enough to replace only the damaged disk. Otherwise, both disks must be replaced.
Installation
11. Mounting begins with screwing the hub axle and disc guard. Torque the bolts to 60 Nm.
12. Check if disc bearing seats are clean. Then drive both tracks with a smaller diameter of the inner holes inward until they stop.
13. Cover the inner bearing with bearing grease and put it into the track, then grease the lip of the hub seal and drive it in line with the face of the hub. Put on the seal cover.
14 Squeeze out such an amount of grease into the hub that the entire space between the rings of the two tracks is filled up to the height of their inner faces. Push the disc onto the hub axle.
15. Lubricate the bearing and put it on the hub axle, moving it towards the track. Then install the safety washer, placing its tooth in the groove on the trunnion, tighten the nut with a torque of 20 Nm. Rotate the disc several times to loosen the bearings Loosen the nut half a turn and then slowly tighten again. When a normal clearance is established between the bearings, and the disk rotates easily, it is necessary to stop tightening the nut. Then you need to install the crown protection on the nut and a new pin.
16. Fill the cap halfway with grease and lightly hammer it into the hub hole.
17. Before installing the clamp bracket, check the guard rings and guide pins for damage. If there is damage, the bracket must be replaced with a new one. The bracket must be tightened with a torque of 65 Nm.
18. Install the brake pads and clamps.
Visitor comments