
1. Disconnect the battery clamp with the sign
2. Disconnect the electrical wires from the cap of the thermos fluid reservoir.
3. Remove the air filter housing.
4. Disconnect the flexible injection pipes from the fastening clips on the inlet channel, and then remove the section of the inlet channel between the fuel economy gauge and the throttle body
5. Under the brake cylinder it is necessary to place a vessel for the fluid that will flow out during disassembly.
6. Suck out the brake fluid from the reservoir using a syringe and pour it into a clean container.
7. To turn away connections and to disconnect brake branch pipes from the cylinder.
If you have difficulty loosening the connections, you can use a penetrating agent, wait 10 minutes and then try again. To unscrew the brake lines, you can use an ordinary ring wrench, preferably a hex key.
8. Unscrew the fixing nuts and disconnect the cylinder from the servo.
9. Disconnect the brake fluid reservoir from the cylinder. Remove it from the rubber sealing rings 4. Then, lifting with a screwdriver, remove the rings from the cylinder body. If the cylinder is damaged, it can only be disassembled into parts, washed thoroughly with denatured alcohol and the gaskets replaced. If this does not help, the cylinder must be replaced with a new one.
Installation
10. Assembly must begin with lubricating the rubber sealing rings with brake fluid and pressing them into the holes in the cylinder body. Then press the fittings of the brake fluid reservoir into the housing gaskets.
11. Perform the rest of the operations in the reverse order of disassembly. A new gasket must be installed between the servo and the cylinder 8. After fixing the cylinder to the servo and before pressing the brake pipelines, fill the fluid into the reservoir and wait until the fluid begins to flow out through the pipe sockets. Then screw the pipe connections into the housing. This will make it easier to bleed the brakes later at the end of the whole operation when the bleed is done. If liquid stains are found on the surface of the car, they must be washed off with water.
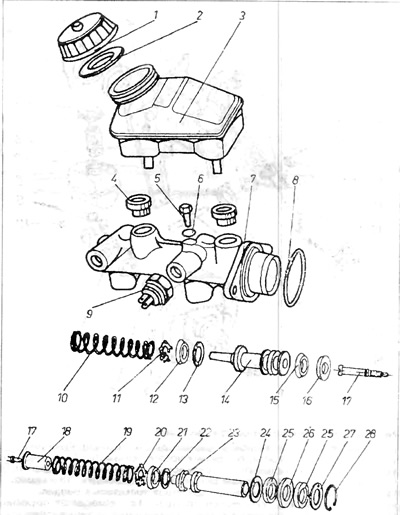
Pic. 8.3. Brake cylinder
1 - stopper of the brake fluid reservoir; 2 - plug gasket; 3 - brake fluid reservoir; 4 - tank gasket; 5 limiting bolt; 6 - gasket; 7 - cylinder body; 8 - body gasket; 9 - stop lights switch; 10 - spring; 11 - spring seat; 12 - rubber sealing ring; 13 - washer; 14 piston; 15 - rubber sealing ring; 16 - washer; 17 - bolt; 16 - bushing; 19 - spring; 20 - spring seat; 21 - rubber sealing ring; 22 - washer 23 piston; 24 - washer; 25 rubber o-ring; 26 - washer; 27 - puck.
Visitor comments