
English Русский
Български
Беларускі
Український
Српски
Hrvatski
Română
Polski
Slovenský
Magyar
  |  Articles  |  Sitemap  |  Contacts  |    |
Car maintenance Ford Car maintenance Hyundai Car maintenance Chevrolet Car maintenance BMW Car maintenance Audi Car maintenance Opel Car maintenance AvtoVAZ
VWmanual.ru


Main   Passat   Golf   Polo   Touareg   Tiguan   Sharan   Transporter   Others  
Golf 1 (1974-1984, diesel) Golf 1 (1974-1984, petrol) Golf 2 (1984-1993, petrol) Golf 2 (1984-1993) Golf 3 (1991-1997) Golf 4 (1997-2004) Golf 5 (2003-2008)

Checking engine systems (VW Golf 1)

  • Main
  • Golf
  • Golf 1
  • General information
  • User manual
  • Checking engine systems
            0


Contents: 1. Checking for spark at the…↓ 2. Checking for spark on spark plugs ↓ 3. Checking the voltage at the…↓ 4. Checking the distributor cap and…↓ 5. Checking the contacts of the…↓ 6. Checking the fuel supply ↓ 7. Checking the battery connections…↓ 8. Checking the electrical…↓

1. Checking for spark at the ignition coil output


Remove the central high-tension wire from the distributor cap socket and hold it approximately 6 mm away from any metal part securely connected to the ground. Ask an assistant to turn the engine with the starter. If the coil is working properly, a strong bright blue spark should jump between the wire and the ground. Warning! This test cannot be performed on cars equipped with an electronic ignition system. To avoid electric shock, hold the wire with pliers with insulated handles or, as a last resort, through a thick dry rag.
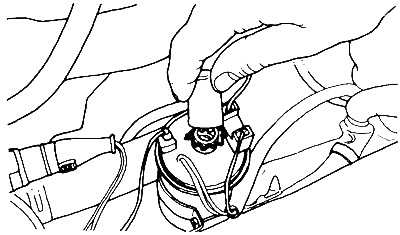
Remove the central high-tension wire from the distributor cap socket and hold it approximately 6 mm…


2. Checking for spark on spark plugs


Disconnect the wire from one of the spark plugs. If you have a spare spark plug, attach the wire disconnected from the working spark plug to it and place the spark plug on an unpainted metal part of the engine. Have an assistant turn the engine over with the starter. A strong spark should appear between the electrodes of the spark plug.


NOTE: To avoid electric shock, hold the wire with insulated pliers or, as a last resort, by the insulated part of the cap through a thick dry cloth.
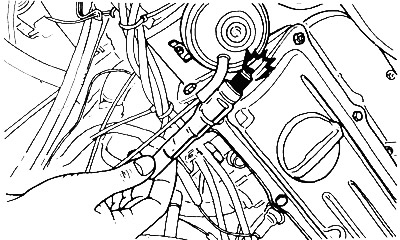

NOTE: To avoid electric shock, hold the wire with insulated pliers or, as a last resort, by the…


3. Checking the voltage at the ignition coil input


To check, you will need a test lamp with two wires with clamps. Connect the lamp between the positive (+) terminal of the ignition coil and the "ground". If the lamp lights when the ignition is on, then voltage is supplied to the coil. Disconnect the lamp wire from the positive terminal and connect it to the negative (-). If the lamp lights, then there is no break in the primary winding of the coil, and the coil should work.
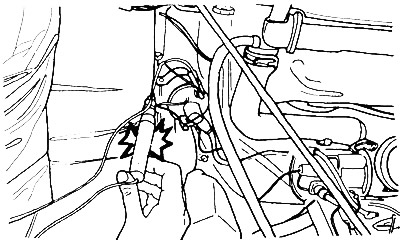
To check, you will need a test lamp with two wires with clamps. Connect the lamp between the…


4. Checking the distributor cap and high voltage wires


Remove the spark plug caps and then the distributor cap together with the high-voltage wires. Wipe the wires, caps and cap inside and out with a dry, clean cloth. In wet weather, it is recommended to treat the cap with a special water-repellent compound. Make sure that the cap, as well as the insulation and caps of the wires, are free of cracks, abrasions and other damage. Check the condition of the carbon brush in the center of the distributor cap and its spring. Inspect the internal contacts of the cap - they should not have excessive erosion.
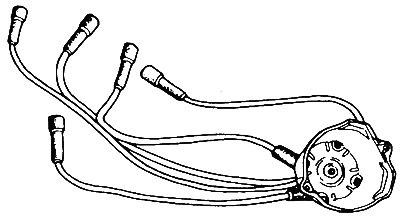

Remove the spark plug caps and then the distributor cap together with the high-voltage wires. Wipe…


5. Checking the contacts of the breaker and the distributor rotor


With the distributor cap removed, rotate the engine, observing the breaker contacts, which should move (close and open).

Remove the rotor and inspect it. The rotor contact should not show any heavy signs of erosion.

Inspect the contact surfaces of the interrupter. In case of strong burning, clean the contacts with a thin file. If the contacts are badly burned or blue from overheating, this may indicate a malfunction of the capacitor. By turning the motor so that the movable contact pad is at the highest point of the cam, adjust the gap between the contacts. Check if the movable contact or its wire is short-circuited to "ground". (Of course, all of the above applies to contact-type motors (not electronic) ignition system. On cars with electronic ignition, there are no breaker contacts)
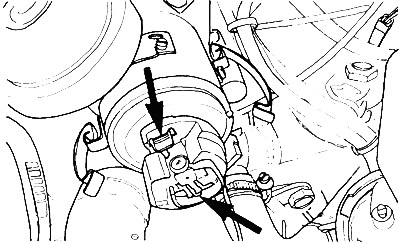
Inspect the contact surfaces of the interrupter. In case of strong burning, clean the contacts with…


6. Checking the fuel supply


Remove the fuel tank cap. If a vacuum is felt under the cap (when you open the cap, air rushes into the tank), then this means that the fuel tank ventilation hoses or plug valves are blocked (pinched), which may well be the reason for the engine stopping. Disconnect the fuel supply hose from the carburetor (or pressure regulator - on injection engines) and direct it into a wide container to avoid fuel spillage. Disconnect the wires from the ignition coil to prevent flashes in the cylinders, and check the fuel supply by turning the engine with the starter (on carburetor engines) or by turning on the ignition (on injection engines). If the fuel supply is satisfactory, reattach the fuel line and remove the air filter. Open the throttle valve and look down into the carburetor to check if fuel is getting into the carburetor diffusers and then into the intake manifold (they should be wet from fuel).

(View the original on this resource: VWManual.ru)
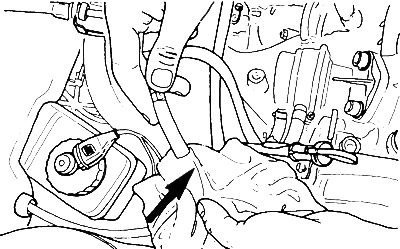
Remove the fuel tank cap. If a vacuum is felt under the cap (when you open the cap, air rushes into…


7. Checking the battery connections and "ground" wires


Make sure the battery terminals are securely tightened and not damaged by corrosion. If any of the terminals have become very hot when the starter is running, you can be sure that there is a poor connection there. Make sure that the negative cable (ground cable) of the battery is securely connected to the body and that the connection point is not covered with corrosion products. If there is rust, clean the contact area to bare metal and tighten the connection securely. Similarly, check both ends of the engine ground cable.
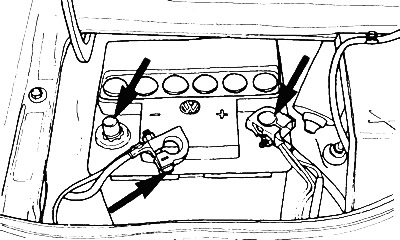
Make sure the battery terminals are securely tightened and not damaged by corrosion. If any of the…


8. Checking the electrical connections of the starter


Make sure all starter connections are clean and tight, including the thick wires that connect the solenoid to the starter motor and to the battery. When the starter is engaged, you should hear a distinctive click from the electromagnetic relay. Check for voltage by connecting a 12-volt test lamp between the thick wire that goes from the battery to the starter and the ground. The lamp should glow brightly. Connect the lamp between the two large (power) terminals of the electromagnetic relay. If the lamp does not glow brightly, this means that the starter is faulty (winding breakage, damage to the commutator or brushes). If the lamp is on, then when the starter is turned on (by turning the ignition key) it should go out. If the lamp does not go out when the starter is turned on, then the electromagnetic relay is faulty (solenoid or contacts).
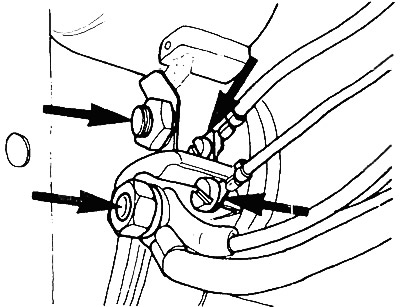
Make sure all starter connections are clean and tight, including the thick wires that connect the…

This article is available at russian, bulgarian, belarusian, ukrainian, serbian, croatian, romanian, polish, slovak, hungarian
The text has been checked: Tarasov Ivan

Share information:

Previous articles
The engine stalled or won't start
Checking a car raised by a lift
Checking a car parked on the ground
Next articles
Safety measures during work
Changing a wheel, jacking up the car and installing supports
Basic tools and equipment
Basic repair operations
Charging the battery
Jump starting the engine from another car's battery


Similar articles from other manuals for VW cars:
Checking the engine oil level Passat B4 (1988-1996)
Checking the engine operating modes Polo 3 (1995-2003)
Checking the belt drive pulleys for misalignment (4.2L petrol… Touareg 1 (2002-2006)
Car engine number Tiguan 1 (2007-2015)
Checking the engine oil level and replacing it Sharan 1 (1995-2000)
Checking the engine oil level Transporter T4 (1990-2003)
Checking the engine oil level Caddy 3 (2003-2010)
Link to this page in different formats


Visitor comments


No comments yet


How much will 39 + 47 =


Golf 5 
  • General information
  • User manual
  • Maintenance
  • Troubleshooting
  • Power unit
  • Engine repair
  • Cooling and ventilation system
  • Fuel system
  • Ignition system
  • Transmission
  • Clutch
  • Mechanical gearbox
  • Automatic gearbox
  • Chassis
  • Brake system
  • Car suspension
  • Steering
  • Body
  • Interior (internal elements)
  • Exterior (external elements)
  • Doors and covers
  • Electrical equipment
  • Power devices
  • Washers and wipers
  • Lighting and appliances
  • Electrical circuits
Golf 4 
  • General information
  • User manual
  • Weekly checks
  • Maintenance
  • Power unit
  • Petrol engines
  • Diesel engines
  • Cooling system
  • Fuel system (petrol)
  • Control system (petrol)
  • Fuel system (diesel)
  • Exhaust system
  • Transmission
  • Clutch
  • Car gearbox
  • Drive shafts
  • Chassis
  • Car suspension
  • Steering
  • Wheels and tires
  • Brake system
  • Body
  • Exterior (external elements)
  • Interior (internal elements)
  • Ventilation and heating
  • Car doors and sunroof
  • Washers and glass cleaners
  • Electrical equipment
  • Power devices
  • Lighting and appliances
  • Electrical circuits
Golf 3 
  • Petrol engine
  • Engine repair
  • Lubrication system
  • Cooling system
  • Ignition system
  • Diesel engine
  • Engine repair
  • Diesel injection system
  • Pre-glow system
  • Transmission
  • Clutch
  • Gearbox and drive shafts
  • Chassis
  • Steering
  • Wheels and suspension
  • Brake system
  • Electrical equipment
  • Lighting and appliances
  • Electrical circuits
Golf 2 
  • General information
  • Introduction to guide
  • User manual
  • Petrol engines 1.3 l
  • Engine repair
  • Lubrication system
  • Cooling system
  • Carburetors
  • Supply system
  • Ignition system
  • Petrol engines 1.6/1.8 l
  • Engine repair
  • Supply system
  • Ignition system
  • Diesel engines
  • Engine repair
  • Lubrication system
  • Cooling system
  • Power and exhaust system
  • Transmission
  • Clutch
  • 4-speed gearbox 084
  • 5-speed gearbox 085
  • 4-speed gearbox 020/4R
  • 5-speed gearbox 020/4T
  • Automatic gearbox
  • Drive shafts
  • Chassis
  • Steering
  • Car suspension
  • Brake system
  • Body
  • Body elements
  • Doors, locks and windows
  • Electrical equipment
  • Equipment and devices
  • Power devices
Golf 2 (petrol) 
  • General information
  • Characteristics
  • Car care
  • Maintenance
  • Power unit
  • Engine repair
  • Engine 1.05/1.30
  • Engine 1.60/1.80
  • Cooling and lubrication system
  • Power and exhaust system
  • Transmission
  • Clutch
  • Car gearbox
  • Drive shafts
  • Chassis
  • Brake system
  • Steering
  • Suspension
  • Body
  • Body and equipment
  • Electrical equipment
  • Lighting and appliances
  • Electrical circuits
Golf 1 (petrol) 
  • General information
  • Characteristics
  • User manual
  • Maintenance
  • Power unit
  • Engine adjustment
  • Engine 1.1/1.3
  • Engine 1.5/1.6/1.8
  • Engine electrical equipment
  • Cooling system
  • Fuel system
  • Transmission
  • Clutch and manual gearbox
  • Automatic gearbox
  • Chassis
  • Steering
  • Front suspension
  • Rear suspension
  • Brake system
  • Electrical equipment
  • Lighting and appliances
  • Electrical circuits
  • Body
  • Body and equipment
  • Optional equipment
Golf 1 (diesel) 
  • General information
  • Specifications
  • Maintenance
  • Power unit
  • Engine repair
  • Exhaust and turbocharger
  • Cooling system
  • Fuel system
  • Fuel injection system
  • Transmission
  • Clutch and drive shafts
  • Car gearbox
  • Chassis
  • Suspension and wheels
  • Steering
  • Brake system
  • Wheels and tires
  • Body
  • Heating and ventilation
  • Exterior (external elements)
  • Interior (internal elements)
  • Doors and windows
  • Electrical equipment
  • Equipment and devices
  • Lighting system
  • Power devices
  • Electrical circuits
VWmanual.ru © 2016-2026 | Mobile version | News and articles | Sitemap: EN BG BY UA RS HR RO PL SK HU | Write message | Site search
Passat B2 • Passat B3 • Passat B4 • Passat B5 • Passat B6 • Golf 1, diesel • Golf 1, petrol • Golf 2, petrol • Golf 2 • Golf 3 • Golf 4 • Golf 5 • Polo 3 • Polo 4 • Touareg 1 • Tiguan 1 • Sharan 1 • Transporter T3 • Transporter T4 • LT 28 • LT 2D • Beetle • Caddy 3 •
Our website uses cookies to ensure functionality and convenience.