
English Русский
Български
Беларускі
Український
Српски
Hrvatski
Română
Polski
Slovenský
Magyar
  |  Articles  |  Sitemap  |  Contacts  |    |
Car maintenance Ford Car maintenance Hyundai Car maintenance Chevrolet Car maintenance BMW Car maintenance Audi Car maintenance Opel Car maintenance AvtoVAZ
VWmanual.ru


Main   Passat   Golf   Polo   Touareg   Tiguan   Sharan   Transporter   Others  
Passat B2 (1981-1988) Passat B3 (1988-1993) Passat B4 (1988-1996) Passat B5 (1996-2005) Passat B6 (2005-2010)

Disassembly and repair of the cylinder head (VW Passat B4)

  • Main
  • Passat
  • Passat B4
  • 16-valve engine
  • Engine repair
  • Disassembly and repair of the cylinder head
            0


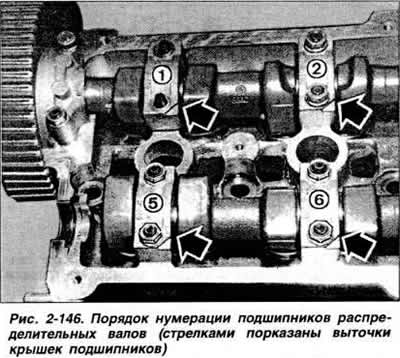
To disassemble, remove the intake manifold, exhaust manifold, unscrew the spark plugs. Remove the toothed pulley of the exhaust camshaft and the ignition distributor. Remove the bearing caps No.5 and 7 (fig. 2-146) and the cover of the outer bearing of the intake camshaft on the drive side. Alternately crosswise unscrew the nuts of the fastening studs and remove the covers of bearings No.6 and 8. Remove the covers of bearings No.1 and 3 and the cover of the outer bearing of the exhaust camshaft on the drive side.

To disassemble, remove the intake manifold, exhaust manifold, unscrew the spark plugs. Remove the…


Alternately, unscrew the nuts of the mounting studs crosswise and remove the caps of bearings No.2 and 4. Remove both camshafts from the cylinder head supports at the same time. Remove the valve tappets from the cylinder head holes, having first marked them so that they can be put back in their original places during assembly. Using the VW 2037 device, remove the crackers, plates, and support washers of the valve springs. Remove the valves, remove the valve oil deflector caps from the guide bushings, having first marked the parts with installation marks in case of their reuse.


When carrying out repairs, use a straightedge and a set of feeler gauges to check the flatness of the mating surface of the cylinder head with the cylinder block, which should not exceed 0.1 mm (for the "ABF" engine - 0.05 mm).

If necessary, grind the mating surface of the cylinder head, observing the permissible limits. After grinding the mating surface of the cylinder head, the valve seats should also be ground to ensure the minimum distance "a" (fig. 2-143) between the end of the valve stem and the upper plane of the cylinder head, which should be equal to 34.4 mm for intake valves and 34.7 mm for exhaust valves. Compliance with this dimension is necessary to ensure normal operation of the hydraulic tappets and to prevent contact between the valve heads and the piston crown.
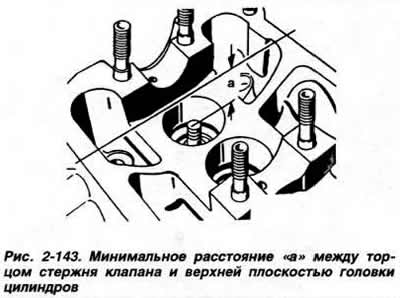
If necessary, grind the mating surface of the cylinder head, observing the permissible limits.…


Check the condition of the valves and valve springs. Check the condition of the valve seats and grind them if necessary. Using a special tool and observing the maximum dimensions specified in the subsection "Design and specifications". Grind the working chamfers of the inlet valves if necessary. The working chamfers of the exhaust valves cannot be ground. Only lapping is allowed. In other cases, they must be replaced. Thoroughly clean the cylinder head before assembly and after grinding and lapping the seats and valves. Check the degree of wear of the valve guide bushing seats and the gap between the bushings and the valve stems. To do this, insert a new valve into the guide bushing and determine the gap between the end of the stem and the edge of the guide bushing using the VW 387 device with an indicator (fig. 2-144). Replace the guide bushings if the indicator reading exceeds 1 mm for intake valve bushings and 1.3 mm for exhaust valve bushings.
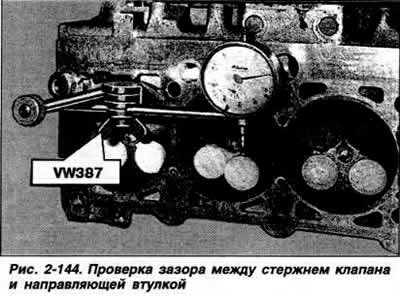

Check the condition of the valves and valve springs. Check the condition of the valve seats and…


Install the camshafts in the bearings, install the bearing caps and tighten the nuts of the bearing cap studs to a torque of 1.5 kgf·m.

Using the VW 387 device with an indicator, check the axial movement of the camshafts, which should not exceed 0.15 mm (fig. 2-145). Determine the clearance between the camshaft journals and the bearing caps. To do this, remove the bearing caps, place a piece of calibrated plastic wire on each camshaft journal, install the bearing caps and tighten the stud nuts to a torque of 1.5 kgf·m. Loosen the stud nuts, carefully remove the bearing caps and determine the clearance by flattening the wire using the scale on the wire packaging. The clearance should not exceed 0.1 mm.
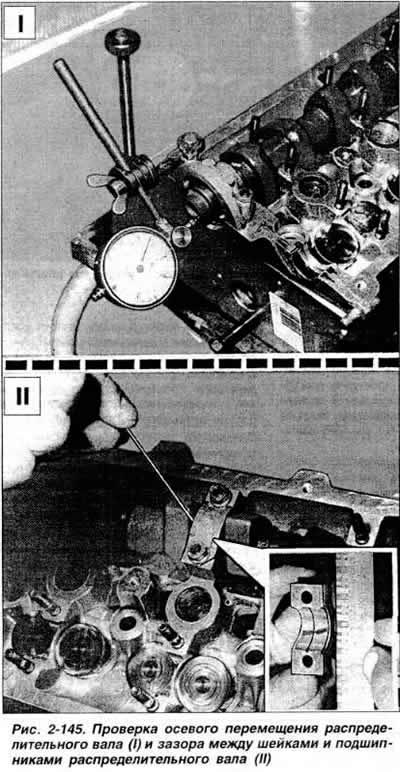
Using the VW 387 device with an indicator, check the axial movement of the camshafts, which should…


To assemble, insert the valves, having previously lubricated their stems with engine oil. Put the protective cap on the valve stem. Using the VW 10204 mandrel, press a new oil deflector cap onto the valve guide sleeve. Install the valve spring support washers in the cylinder head. Put the device for installing oil deflector caps on the valve stem, having previously put the cap on the end of the stem, and put the cap on until it stops, pressing hard on the device. Remove the device and make sure that the oil deflector cap is installed correctly.

Install the valve spring plates, valve springs and crackers. Insert the valve tappets into the head holes, having previously lubricated them with engine oil. Pay special attention to the fact that the tappets are installed in their original places. Place the camshafts in the head supports so that the marks on their sprockets are located opposite each other (fig. 2-148). Install the camshaft bearing caps in the reverse order of removal, making sure that the recesses on the caps are located on the exhaust camshaft side (fig. 2-144). Tighten the bearing cap stud nuts to a torque of 1.5 kgf·m. Using a suitable mandrel, press in the exhaust camshaft oil seal.
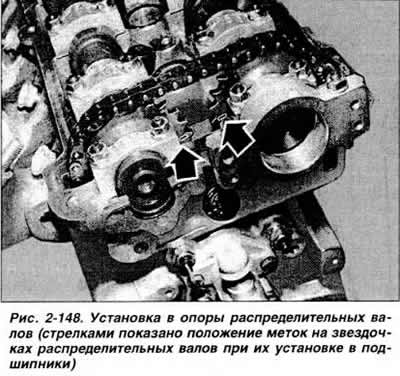
Install the valve spring plates, valve springs and crackers. Insert the valve tappets into the head…


Install the toothed pulley of the exhaust camshaft and tighten the pulley mounting bolt to a torque of 6.5 kgf·m. Install the intake manifold and exhaust manifold.
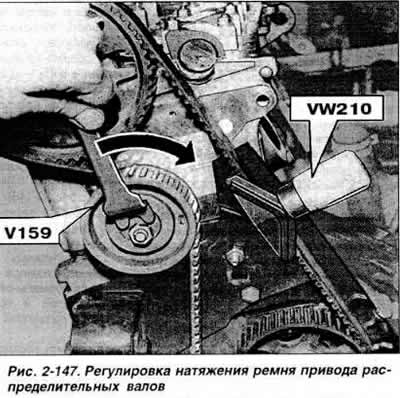
Install the toothed pulley of the exhaust camshaft and tighten the pulley mounting bolt to a torque…


The original article is posted on the website: vwmanual.ru

This article is available at russian, bulgarian, belarusian, ukrainian, serbian, croatian, romanian, polish, slovak, hungarian
The text has been checked: Kolesnikov Artem

Share information:

Previous articles
Removal and installation the cylinder head
Features of the cylinder head design
Features of the gas distribution mechanism
Crank mechanism
Features of the design of 16-valve gasoline engines
Next articles
Removal and installation the camshaft drive belt
Main technical data of the «AAA» engine
Features of repair of the cylinder head of the engine «AAA»


Similar articles from other manuals for VW cars:
Cylinder head repair Golf 2 (1984-1993)
Repair of spark plug threads in cylinder head Polo 4 (2001-2009)
Cylinder head repair Touareg 1 (2002-2006)
Cylinder head Tiguan 1 (2007-2015)
Cylinder head repair Sharan 1 (1995-2000)
Removal and installation the cylinder head (petrol 4-cylinder) Transporter T4 (1990-2003)
Processing of the cylinder head seating surface Caddy 3 (2003-2010)
Link to this page in different formats


Visitor comments


No comments yet


How much will 11 + 34 =


Passat B6 
  • General information
  • User manual
  • Maintenance
  • Petrol engine 1.6L
  • Engine repair
  • Cooling and lubrication system
  • Fuel injection system
  • Petrol engine 2.0L
  • Engine repair
  • Lubrication system
  • Cooling system
  • Fuel and exhaust systems
  • Diesel engine 2.0L
  • Engine repair
  • Cooling and lubrication system
  • Fuel and exhaust systems
  • Transmission
  • Clutch
  • Mechanical gearbox
  • Automatic gearbox
  • Drive shafts
  • Chassis
  • Wheels and tires
  • Car suspension
  • Steering
  • Brake system
  • Body
  • Exterior (external elements)
  • Electrical equipment
  • Power devices
  • Lighting and appliances
  • Electrical circuits
Passat B5 
  • General information
  • User manual
  • Weekly checks
  • Maintenance
  • Power unit
  • Engine repair
  • Cooling system
  • Fuel system (petrol)
  • Fuel system (diesel)
  • Engine management
  • Exhaust system
  • Transmission
  • Clutch
  • Car gearbox
  • Drive shafts
  • Chassis
  • Car suspension
  • Wheels and tires
  • Steering
  • Brake system
  • Body
  • Exterior (external elements)
  • Interior (internal elements)
  • Doors and covers
  • Ventilation and heating
  • Electrical equipment
  • Power devices
  • Lighting and appliances
  • Electrical circuits
Passat B4 
  • General information
  • User manual
  • Maintenance
  • Technical data
  • 8-valve engine
  • Engine repair
  • Cooling and lubrication system
  • Supply system
  • Ignition system
  • Fuel injection «Mono-Jetronic»
  • Control system «Mono-Motronic»
  • Control system «Digifant»
  • Control system «Simos»
  • 16-valve engine
  • Engine repair
  • Cooling and lubrication system
  • Fuel injection «K-Jetronic»
  • Control system «KE-Motronic»
  • Control system «Digifant»
  • Diesel engine
  • Engine repair
  • Cooling and lubrication system
  • Power and control system
  • Turbocharging system
  • Digital control system
  • Transmission
  • Clutch
  • Manual gearbox
  • Hydromechanical gearbox
  • Front wheel drive
  • Chassis
  • Car suspension
  • Steering
  • Brake system
  • Body
  • Body elements
  • Electrical equipment
  • Power devices
  • Lighting and appliances
  • Electrical circuits
Passat B3 
  • General information
  • User manual
  • Driving Tips
  • Maintenance instructions
  • Technical data
  • Power unit
  • Engine repair
  • Ignition system
  • Lubrication system
  • Cooling system
  • Supply system
  • Petrol injection system
  • Diesel engine
  • Exhaust system
  • Transmission
  • Clutch
  • Car gearbox
  • Chassis
  • Suspension
  • Steering
  • Brake system
  • Wheels and tires
  • Body
  • Exterior
  • Interior
  • Heating system
  • Electrical equipment
  • Power devices
  • Lighting system
  • Equipment and devices
  • Wiper system
  • Electrical circuits
Passat B2 
  • General information
  • Introduction to instructions
  • User manual
  • Power unit
  • Engines 4-cylinder FZ
  • Engines 4-cylinder
  • Engines 5-cylinder
  • Transmission
  • Clutch
  • Four-speed gearbox
  • Five-speed gearbox
  • Hydromechanical gearbox
  • Front wheel drive
  • Chassis
  • Front suspension
  • Rear suspension
  • Steering
  • Brake system
  • Body
  • Body elements
  • Electrical equipment
  • Equipment and devices
  • Electrical circuits
VWmanual.ru © 2016-2026 | Mobile version | News and articles | Sitemap: EN BG BY UA RS HR RO PL SK HU | Write message | Site search
Passat B2 • Passat B3 • Passat B4 • Passat B5 • Passat B6 • Golf 1, diesel • Golf 1, petrol • Golf 2, petrol • Golf 2 • Golf 3 • Golf 4 • Golf 5 • Polo 3 • Polo 4 • Touareg 1 • Tiguan 1 • Sharan 1 • Transporter T3 • Transporter T4 • LT 28 • LT 2D • Beetle • Caddy 3 •
Our website uses cookies to ensure functionality and convenience.