



Contents: Checking the steering rod joint dust…↓ Checking the steering wheel free play ↓ Checking the oil level in the power…↓ Tensioning/replacing the V-belt of…↓
Checking the steering rod joint dust caps
Raise the car from the front.
Illuminate the protective caps with a lamp and check for damage, paying attention to the presence of traces of grease on the cuffs and associated parts.
If the dust cap is damaged, replace the corresponding joint for safety reasons, as dirt is guaranteed to destroy it.
Check the strength of the hinge nut fastening, but do not turn the nut. Replace loose nuts.
Checking the steering wheel free play
Place the steering wheel in the middle position.
Turn the steering wheel to the right and left through the open window, watching the front wheels. The wheels should turn immediately after the steering wheel. Otherwise, adjust the steering.
Strongly swing the transverse steering rods by hand. The ball joints should not have any gaps, otherwise the joints or rods must be replaced.
Checking the oil level in the power steering reservoir
The oil level in the power steering reservoir must be checked every 30,000 km.
Start the engine and let it idle.
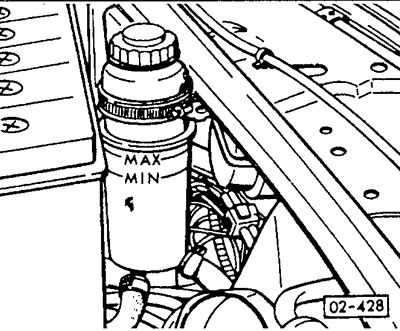
Check the oil level with the wheels in a straight-line position. The oil level should be between the "MIN" and "MAX" marks.
If the oil level has dropped to the "MIN" mark, top up the level with hydraulic fluid G 002000. Be sure to top up only with new fluid, as even the slightest contamination can lead to a malfunction of the hydraulic system.
Note: The oil of the specified specification can be mixed with the automatic transmission fluid (ATF) used up to 1/89. In any case, use oil G 002000 to top up the level.
With the engine running, turn the steering wheel several times from one stop to the other; this will remove air from the hydraulic drive of the power steering mechanism.
If oil was added, check the hydraulic drive for leaks.
Tensioning/replacing the V-belt of the power steering pump
4-cylinder engine
As part of maintenance, the V-belt should be checked for excessive wear (fringing of the side surfaces, transverse cracks), and also the absence of traces of oil. If necessary, the V-belt should be replaced with a new one.
To replace the V-belt, loosen it completely and replace it. Tighten the new belt.
The V-belt is tensioned correctly if it bends by approximately 5 mm in the middle between both pulleys when pressed with your thumb.
Tension, car models up to 9/93
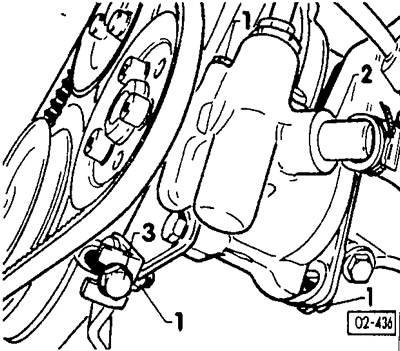
Loosen bolts/nuts "1" and "2" at least 1 turn. Bolt "2" is not visible in the picture. It is located inside the console.
Adjust the correct belt tension by turning the tension nut "3".
After this, tighten the mounting bolts/nuts.
Tension, car models from 10/93
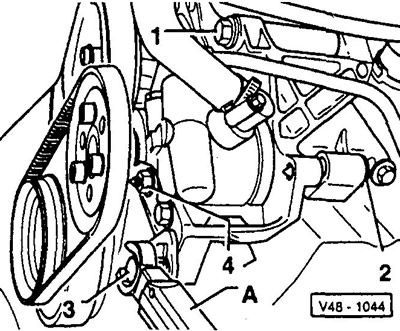
Bolts "1" and "2", lock bolt "3" and nut "4" for fastening the tension bracket (if installed) release at least 1 turn.
Tighten the V-belt by turning the tension nut with a torque wrench. The torque of turning the nut is 4 Nm, for a new V-belt - 7 Nm. Tighten the locking bolt "3" of the tension nut with a torque of 25 Nm.
After this, tighten the mounting bolts/nuts "2" and "4" to a torque of 25 Nm.
Note: Nut "4" is only available for petrol engines.
Visitor comments