
English Русский
Български
Беларускі
Український
Српски
Hrvatski
Română
Polski
Slovenský
Magyar
  |  Articles  |  Sitemap  |  Contacts  |    |
Car maintenance Ford Car maintenance Hyundai Car maintenance Chevrolet Car maintenance BMW Car maintenance Audi Car maintenance Opel Car maintenance AvtoVAZ
VWmanual.ru


Main   Passat   Golf   Polo   Touareg   Tiguan   Sharan   Transporter   Others  
Golf 1 (1974-1984, diesel) Golf 1 (1974-1984, petrol) Golf 2 (1984-1993, petrol) Golf 2 (1984-1993) Golf 3 (1991-1997) Golf 4 (1997-2004) Golf 5 (2003-2008)

Coolant temperature gauge (VW Golf 1)

  • Main
  • Golf
  • Golf 1
  • Electrical equipment
  • Equipment and devices
  • Coolant temperature gauge
            0


Contents: Possible malfunctions ↓ Instructions for checking devices ↓
The coolant temperature gauge works similarly to the fuel gauge. When the ignition is on, the device receives this. The connection "to ground" is created by a sensor in the thermostat housing or at the cylinder head. The sensor is a variable resistance; when heated, the resistance opens the way for electric current: the bimetallic part in the device heats up more strongly, the device's pointer deflects. After August 1979, an additional red flickering LED was installed in the device to signal that the coolant temperature was too high.

Possible malfunctions


Incorrect reading of coolant temperature and simultaneously inaccurate reading of fuel level may indicate damage to the voltage stabilizer.

If there are no readings, then there is a defect in the sensor or device.

Instructions for checking devices


Checking the temperature sensor: remove the yellow-blue or yellow-red wire from the sensor and securely connect it to the ground (housing).

Turn on the ignition briefly. If the arrow moves into the red area and the LED in the device flickers, this means that the temperature sensor is defective.

Checking the indicator: remove the instrument panel.

The arrow on the scale has tolerance fields: three white lines mark the neutral and final positions of the arrow.

Check: In neutral position, is the arrow within the tolerance range?

For further testing of the indicator, a charged 9V battery is best as this is the working voltage.


Keep the battery terminals close to the pins located at the back.

(The original text is available on the portal: «VWmanual»)

The arrow should deflect: if not, then the poles need to be changed.

When the reading is correct, the arrow moves along the scale to the opposite tolerance area.
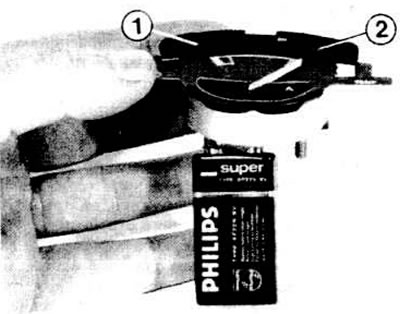
In the neutral position, the instrument pointer should be within the left tolerance field (1). At…

In the neutral position, the instrument pointer should be within the left tolerance field (1). At full operating voltage (9-9.5 V), the pointer moves to the right area (2)


If, despite the prescribed correct battery voltage, the final position of the arrow is not reached, the pointer must be replaced.

For further inspection, remove the central connector.

Connect the contact of the black wire (terminal 15) in the central connector to the pole of the 12 V battery.

Connect the purple-black wire contact to the minus (fuel gauge) or yellow-blue, or yellow-red cable (temperature indicator).

If the arrow does not move, then the circuit in the board is open.

If the arrow moves to its extreme position, then there is a defect in the power supply wire.

LED test: press the negative terminal of the 9V battery to the middle clamp behind the indicator light; plus connect to the side contact.


The LED should now be flickering.

If the LED does not work when checking the temperature sensor (but at the moment it is flickering), this means there is a defect in the board.

The red flashing LED in the temperature gauge does not change, only with the device.

This article is available at russian, bulgarian, belarusian, ukrainian, serbian, croatian, romanian, polish, slovak, hungarian
The text has been checked: Medvedeva Elena

Share information:

Previous articles
Fuel level sensor — check
Voltage stabilizer — check and replacement
Disassembling the instrument panel
Replacing the lamps that illuminate the devices
Removal the instrument panel
Checking control instruments and bulbs
Next articles
Shift indicator
Speedometer (speed indicator)
Removal the flexible shaft of the speedometer drive
Clock and direction indicator control
Brake, high beam and battery warning lights
Oil pressure warning light


Similar articles from other manuals for VW cars:
Checking the coolant temperature sensor Passat B4 (1988-1996)
Fuel level, coolant level and temperature gauge (since 11.1995) Polo 3 (1995-2003)
Draining and filling coolant (petrol engine) Touareg 1 (2002-2006)
Fuel gauge, temperature and coolant level monitoring system Tiguan 1 (2007-2015)
Checking the coolant level Sharan 1 (1995-2000)
Removal and installation the coolant temperature gauge sensor Transporter T3 (1979-1992)
Coolant Temperature Gauge and Sensor — general information LT 28 (1975-1991)
Link to this page in different formats


Visitor comments


No comments yet


How much will 21 + 43 =


Golf 5 
  • General information
  • User manual
  • Maintenance
  • Troubleshooting
  • Power unit
  • Engine repair
  • Cooling and ventilation system
  • Fuel system
  • Ignition system
  • Transmission
  • Clutch
  • Mechanical gearbox
  • Automatic gearbox
  • Chassis
  • Brake system
  • Car suspension
  • Steering
  • Body
  • Interior (internal elements)
  • Exterior (external elements)
  • Doors and covers
  • Electrical equipment
  • Power devices
  • Washers and wipers
  • Lighting and appliances
  • Electrical circuits
Golf 4 
  • General information
  • User manual
  • Weekly checks
  • Maintenance
  • Power unit
  • Petrol engines
  • Diesel engines
  • Cooling system
  • Fuel system (petrol)
  • Control system (petrol)
  • Fuel system (diesel)
  • Exhaust system
  • Transmission
  • Clutch
  • Car gearbox
  • Drive shafts
  • Chassis
  • Car suspension
  • Steering
  • Wheels and tires
  • Brake system
  • Body
  • Exterior (external elements)
  • Interior (internal elements)
  • Ventilation and heating
  • Car doors and sunroof
  • Washers and glass cleaners
  • Electrical equipment
  • Power devices
  • Lighting and appliances
  • Electrical circuits
Golf 3 
  • Petrol engine
  • Engine repair
  • Lubrication system
  • Cooling system
  • Ignition system
  • Diesel engine
  • Engine repair
  • Diesel injection system
  • Pre-glow system
  • Transmission
  • Clutch
  • Gearbox and drive shafts
  • Chassis
  • Steering
  • Wheels and suspension
  • Brake system
  • Electrical equipment
  • Lighting and appliances
  • Electrical circuits
Golf 2 
  • General information
  • Introduction to guide
  • User manual
  • Petrol engines 1.3 l
  • Engine repair
  • Lubrication system
  • Cooling system
  • Carburetors
  • Supply system
  • Ignition system
  • Petrol engines 1.6/1.8 l
  • Engine repair
  • Supply system
  • Ignition system
  • Diesel engines
  • Engine repair
  • Lubrication system
  • Cooling system
  • Power and exhaust system
  • Transmission
  • Clutch
  • 4-speed gearbox 084
  • 5-speed gearbox 085
  • 4-speed gearbox 020/4R
  • 5-speed gearbox 020/4T
  • Automatic gearbox
  • Drive shafts
  • Chassis
  • Steering
  • Car suspension
  • Brake system
  • Body
  • Body elements
  • Doors, locks and windows
  • Electrical equipment
  • Equipment and devices
  • Power devices
Golf 2 (petrol) 
  • General information
  • Characteristics
  • Car care
  • Maintenance
  • Power unit
  • Engine repair
  • Engine 1.05/1.30
  • Engine 1.60/1.80
  • Cooling and lubrication system
  • Power and exhaust system
  • Transmission
  • Clutch
  • Car gearbox
  • Drive shafts
  • Chassis
  • Brake system
  • Steering
  • Suspension
  • Body
  • Body and equipment
  • Electrical equipment
  • Lighting and appliances
  • Electrical circuits
Golf 1 (petrol) 
  • General information
  • Characteristics
  • User manual
  • Maintenance
  • Power unit
  • Engine adjustment
  • Engine 1.1/1.3
  • Engine 1.5/1.6/1.8
  • Engine electrical equipment
  • Cooling system
  • Fuel system
  • Transmission
  • Clutch and manual gearbox
  • Automatic gearbox
  • Chassis
  • Steering
  • Front suspension
  • Rear suspension
  • Brake system
  • Electrical equipment
  • Lighting and appliances
  • Electrical circuits
  • Body
  • Body and equipment
  • Optional equipment
Golf 1 (diesel) 
  • General information
  • Specifications
  • Maintenance
  • Power unit
  • Engine repair
  • Exhaust and turbocharger
  • Cooling system
  • Fuel system
  • Fuel injection system
  • Transmission
  • Clutch and drive shafts
  • Car gearbox
  • Chassis
  • Suspension and wheels
  • Steering
  • Brake system
  • Wheels and tires
  • Body
  • Heating and ventilation
  • Exterior (external elements)
  • Interior (internal elements)
  • Doors and windows
  • Electrical equipment
  • Equipment and devices
  • Lighting system
  • Power devices
  • Electrical circuits
VWmanual.ru © 2016-2026 | Mobile version | News and articles | Sitemap: EN BG BY UA RS HR RO PL SK HU | Write message | Site search
Passat B2 • Passat B3 • Passat B4 • Passat B5 • Passat B6 • Golf 1, diesel • Golf 1, petrol • Golf 2, petrol • Golf 2 • Golf 3 • Golf 4 • Golf 5 • Polo 3 • Polo 4 • Touareg 1 • Tiguan 1 • Sharan 1 • Transporter T3 • Transporter T4 • LT 28 • LT 2D • Beetle • Caddy 3 •
Our website uses cookies to ensure functionality and convenience.