
English Русский
Български
Беларускі
Український
Српски
Hrvatski
Română
Polski
Slovenský
Magyar
  |  Articles  |  Sitemap  |  Contacts  |    |
Car maintenance Ford Car maintenance Hyundai Car maintenance Chevrolet Car maintenance BMW Car maintenance Audi Car maintenance Opel Car maintenance AvtoVAZ
VWmanual.ru


Main   Passat   Golf   Polo   Touareg   Tiguan   Sharan   Transporter   Others  
Passat B2 (1981-1988) Passat B3 (1988-1993) Passat B4 (1988-1996) Passat B5 (1996-2005) Passat B6 (2005-2010)

Checking the outer CV joint (VW Passat B6)

  • Main
  • Passat
  • Passat B6
  • Transmission
  • Drive shafts
  • Checking the outer CV joint
            0


Contents: Removal ↓ Installation ↓
The joint must be disassembled to replace the lubricant if it is heavily contaminated, and to inspect the surfaces that contact the balls for wear and pitting.

Removal


Before disassembling, mark the position of the inner race in relation to the separator and body with an engraving machine or a whetstone.
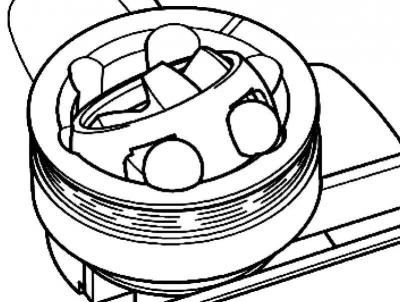
Fig. 3.101. Cage and separator

Fig. 3.101. Cage and separator


Turn the clip and separator (fig. 3.101).

Remove the balls one by one.
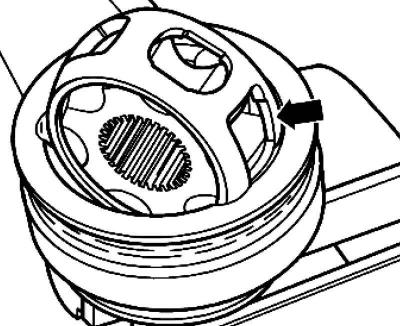
Fig. 3.102. Separator installation position

Fig. 3.102. Separator installation position


Install the separator with the cage so that the two rectangular cutouts of the separator coincide with the protrusions on the outer cage of the CV joint (in the hole of the hinge housing) (fig. 3.102).

Remove the clip and separator.
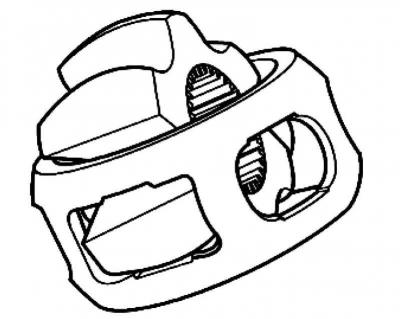


Fig. 3.103. Mounting position of the clip

Fig. 3.103. Mounting position of the clip


Rotate the collar so that its protruding segment enters the rectangular cutout of the separator (fig. 3.103).

Remove the clip from the separator.

All 6 balls in each joint are of the same nominal size and tolerance. Check splines, cage, cage and balls for pitting and signs of heavy wear. Increased play in the joint is indicated by a knocking noise when cornering. In such cases, the joint must be replaced. Matting of the ball surfaces and the presence of ball tracks are not a reason to replace the joint.

Installation


Place half of the total amount of grease (40 g) into the hinge housing.

Insert the collar and separator into the hinge housing.

Install the balls crosswise. When assembling, install the cage in relation to the separator in accordance with the marks applied.

Install a new retaining ring into the splined hole of the inner race.

Spread the remaining grease over the inner surface of the boot.

Checking the functionality of the CV joint

If the hinge is assembled correctly, the collar in the housing can be freely rotated in any direction at an angle corresponding to the angle of rotation of the hinge.

The information is available on the website www.VWManual.ru

This article is available at russian, bulgarian, belarusian, ukrainian, serbian, croatian, romanian, polish, slovak, hungarian
The text has been checked: Orlov Dmitry

Share information:

Previous articles
Removal the outer CV joint
Removal and installation the drive shaft
Installing a shaft seal ring with a flange
Removal the shaft seal ring with flange
Next articles
Checking the inner CV joint
Checking the functionality of the CV joint
Drive shaft with tipoid joint AAR3300i for 6-speed automatic transmission 09M (all-wheel drive)


Similar articles from other manuals for VW cars:
Installing the outer joint on the axle shaft Golf 2 (1984-1993, petrol)
Checking the outer CV joint Polo 3 (1995-2003)
Checking the condition of the poly V-belt Touareg 1 (2002-2006)
Checking the condition of the ball joint Tiguan 1 (2007-2015)
Checking the engine oil level and replacing it Sharan 1 (1995-2000)
Windshield Washer Water Pump — Checking and Replacing Transporter T4 (1990-2003)
Checking the electrolyte level in the battery Caddy 3 (2003-2010)
Link to this page in different formats


Visitor comments


No comments yet


How much will 28 + 34 =


Passat B6 
  • General information
  • User manual
  • Maintenance
  • Petrol engine 1.6L
  • Engine repair
  • Cooling and lubrication system
  • Fuel injection system
  • Petrol engine 2.0L
  • Engine repair
  • Lubrication system
  • Cooling system
  • Fuel and exhaust systems
  • Diesel engine 2.0L
  • Engine repair
  • Cooling and lubrication system
  • Fuel and exhaust systems
  • Transmission
  • Clutch
  • Mechanical gearbox
  • Automatic gearbox
  • Drive shafts
  • Chassis
  • Wheels and tires
  • Car suspension
  • Steering
  • Brake system
  • Body
  • Exterior (external elements)
  • Electrical equipment
  • Power devices
  • Lighting and appliances
  • Electrical circuits
Passat B5 
  • General information
  • User manual
  • Weekly checks
  • Maintenance
  • Power unit
  • Engine repair
  • Cooling system
  • Fuel system (petrol)
  • Fuel system (diesel)
  • Engine management
  • Exhaust system
  • Transmission
  • Clutch
  • Car gearbox
  • Drive shafts
  • Chassis
  • Car suspension
  • Wheels and tires
  • Steering
  • Brake system
  • Body
  • Exterior (external elements)
  • Interior (internal elements)
  • Doors and covers
  • Ventilation and heating
  • Electrical equipment
  • Power devices
  • Lighting and appliances
  • Electrical circuits
Passat B4 
  • General information
  • User manual
  • Maintenance
  • Technical data
  • 8-valve engine
  • Engine repair
  • Cooling and lubrication system
  • Supply system
  • Ignition system
  • Fuel injection «Mono-Jetronic»
  • Control system «Mono-Motronic»
  • Control system «Digifant»
  • Control system «Simos»
  • 16-valve engine
  • Engine repair
  • Cooling and lubrication system
  • Fuel injection «K-Jetronic»
  • Control system «KE-Motronic»
  • Control system «Digifant»
  • Diesel engine
  • Engine repair
  • Cooling and lubrication system
  • Power and control system
  • Turbocharging system
  • Digital control system
  • Transmission
  • Clutch
  • Manual gearbox
  • Hydromechanical gearbox
  • Front wheel drive
  • Chassis
  • Car suspension
  • Steering
  • Brake system
  • Body
  • Body elements
  • Electrical equipment
  • Power devices
  • Lighting and appliances
  • Electrical circuits
Passat B3 
  • General information
  • User manual
  • Driving Tips
  • Maintenance instructions
  • Technical data
  • Power unit
  • Engine repair
  • Ignition system
  • Lubrication system
  • Cooling system
  • Supply system
  • Petrol injection system
  • Diesel engine
  • Exhaust system
  • Transmission
  • Clutch
  • Car gearbox
  • Chassis
  • Suspension
  • Steering
  • Brake system
  • Wheels and tires
  • Body
  • Exterior
  • Interior
  • Heating system
  • Electrical equipment
  • Power devices
  • Lighting system
  • Equipment and devices
  • Wiper system
  • Electrical circuits
Passat B2 
  • General information
  • Introduction to instructions
  • User manual
  • Power unit
  • Engines 4-cylinder FZ
  • Engines 4-cylinder
  • Engines 5-cylinder
  • Transmission
  • Clutch
  • Four-speed gearbox
  • Five-speed gearbox
  • Hydromechanical gearbox
  • Front wheel drive
  • Chassis
  • Front suspension
  • Rear suspension
  • Steering
  • Brake system
  • Body
  • Body elements
  • Electrical equipment
  • Equipment and devices
  • Electrical circuits
VWmanual.ru © 2016-2026 | Mobile version | News and articles | Sitemap: EN BG BY UA RS HR RO PL SK HU | Write message | Site search
Passat B2 • Passat B3 • Passat B4 • Passat B5 • Passat B6 • Golf 1, diesel • Golf 1, petrol • Golf 2, petrol • Golf 2 • Golf 3 • Golf 4 • Golf 5 • Polo 3 • Polo 4 • Touareg 1 • Tiguan 1 • Sharan 1 • Transporter T3 • Transporter T4 • LT 28 • LT 2D • Beetle • Caddy 3 •
Our website uses cookies to ensure functionality and convenience.