
English Русский
Български
Беларускі
Український
Српски
Hrvatski
Română
Polski
Slovenský
Magyar
  |  Articles  |  Sitemap  |  Contacts  |    |
Car maintenance Ford Car maintenance Hyundai Car maintenance Chevrolet Car maintenance BMW Car maintenance Audi Car maintenance Opel Car maintenance AvtoVAZ
VWmanual.ru


Main   Passat   Golf   Polo   Touareg   Tiguan   Sharan   Transporter   Others  
Passat B2 (1981-1988) Passat B3 (1988-1993) Passat B4 (1988-1996) Passat B5 (1996-2005) Passat B6 (2005-2010)

General instructions for repairing car electrical systems (VW Passat B6)

  • Main
  • Passat
  • Passat B6
  • Electrical equipment
  • Lighting and appliances
  • General instructions for repairing car electrical systems
            0


Attention: When disconnecting and connecting the battery, be sure to follow the sequence of actions described in the repair manual.


Caution: Some tools have a safety loop that should be placed on the working part of the tool after use to protect the tool from damage and the worker from injury.


For any repairs, please observe the current instructions in the relevant repair manuals.

Follow the rules in force in the country.

Before working with electrical equipment, disconnect the ground wire from the battery.

Unscrew the ground wire from the battery (cessation of current in a circuit), make work on electrical equipment safe. The positive terminal should only be unscrewed to remove the battery.

Before starting repairs, it is necessary to first eliminate the cause of the damage, for example, body parts with sharp edges, a faulty electrical consumer, corrosion.

When repairing the on-board electrical system wiring, welding work is prohibited.

Repairs to the wiring and plugs of the on-board network may only be carried out using a cable repair kit.

When repairing cables, use only yellow wires.

Repaired areas of wires must not be re-wrapped with standard automotive electrical tape; these areas must be marked with yellow electrical tape.

Yellow wires and areas marked with yellow electrical tape indicate that repairs have been made there previously.

Crimping sleeves must not be repaired. If possible, run a new wire parallel to the damaged one.

After crimping, the crimping sleeve must be seated to prevent moisture from getting inside it.


Be sure to follow the additional instructions for repairing wiring in the airbag and seat belt tensioner systems, fibre optic cables, CAN bus cables, antenna cables and cables with a cross-section of up to 0.35 mm².

After each repair, it is necessary to test the operation of the repaired element. If necessary, it is necessary to read the fault memory, clear it and/or return the system to its original position.

If possible, do not unscrew the ground wires from the body (danger of corrosion).

Repair of wires in airbag and seat belt tensioner systems

In addition to general wiring repairs, the following guidelines must be followed when repairing wiring in the airbag and seat belt pretensioner systems:

Caution: The airbag and seat belt pretensioner systems may be damaged.


Caution: Failure to follow the instructions when repairing the pretensioner and airbag wiring harnesses may result in failure of these passive safety systems.


Caution: When repairing airbag and seat belt tensioner wires, only use designated contacts, plugs and wires.


Note: Airbag and seat belt tensioner wires may only be repaired using a cable repair kit.


Note: Follow the instructions on the stickers on the vehicle parts regarding high-voltage components. Residual pressure must be released during repair work.
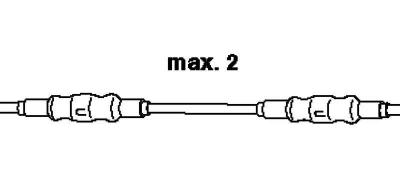

Fig. 7.124. Airbag wire

Fig. 7.124. Airbag wire


The airbag or seat belt tensioner wire may be repaired in no more than two places (fig. 7.124).

Places where repairs have been carried out increase electrical resistance and can thus cause failures in the system's self-diagnosis.

When repairing the airbag module and seat belt pretensioner wiring harnesses, the crimp connectors must be seated to prevent corrosion.

When repairing cables, use only yellow wires.

Do not wrap the repaired area with standard electrical tape, but mark it with yellow electrical tape.
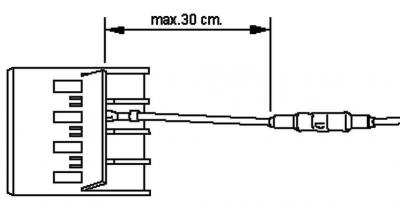
Fig. 7.125. Distance from connector body

Fig. 7.125. Distance from connector body


The repaired area in the airbag and seat belt tensioner area must be no further than 30 cm from the next connector housing (fig. 7.125).

Together with the yellow insulating tape marking, this provides an easy overview of the repair work carried out.

Wires to pyropatrons (airbags) in serial production, they have a twist with a pitch of 20 mm ±5. Such a twist pitch is designated in serial production by the numbers of standard parts for pairs of wires, therefore, when repairing, it is necessary to observe the pitch of the twisted wires.
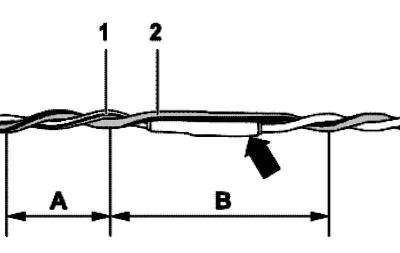
Fig. 7.126. Twist pitch

Fig. 7.126. Twist pitch


When repairing the wire to the pyropatrons (airbags) must be of the same length. When twisting wires 1 and 2, the twist pitch A=20 mm ±must be maintained (fig. 7.126).

In this case, a section of wire should not be formed, for example, in the area of the weld contacts longer than B=100 mm without twisting the wires.

This article is available at russian, bulgarian, belarusian, ukrainian, serbian, croatian, romanian, polish, slovak, hungarian
The text has been checked: Orlov Dmitry

Share information:

Previous articles
Removal and installation the relay block on the left side of the front panel
Removal and installation the junction box in the left side of the engine compartment
Removal and installation the main fuse box
Removal and installation center console switches
Replacing the front interior light
Removal and installation the SAFE function indicator lamp of the central lock
Next articles
Repair of CAN bus wires
Wire break with repairs in two places
Repair of contacts in connector housings
Mechanical locking of the connector housing
Round contacts
Flat contacts with asymmetrical locking tabs


Similar articles from other manuals for VW cars:
General information about the engine electrical equipment Golf 1 (1974-1984, petrol)
Safety instructions for handling electrical seat belt tensioners Polo 4 (2001-2009)
General instructions about the gearbox Touareg 1 (2002-2006)
General instructions regarding the anti-lock braking system Tiguan 1 (2007-2015)
General information about on-board electrical equipment Sharan 1 (1995-2000)
Electrical Equipment System — General Information Transporter T4 (1990-2003)
General description of on-board electrical equipment Beetle (1960-1986)
Link to this page in different formats


Visitor comments


No comments yet


How much will 33 + 47 =


Passat B6 
  • General information
  • User manual
  • Maintenance
  • Petrol engine 1.6L
  • Engine repair
  • Cooling and lubrication system
  • Fuel injection system
  • Petrol engine 2.0L
  • Engine repair
  • Lubrication system
  • Cooling system
  • Fuel and exhaust systems
  • Diesel engine 2.0L
  • Engine repair
  • Cooling and lubrication system
  • Fuel and exhaust systems
  • Transmission
  • Clutch
  • Mechanical gearbox
  • Automatic gearbox
  • Drive shafts
  • Chassis
  • Wheels and tires
  • Car suspension
  • Steering
  • Brake system
  • Body
  • Exterior (external elements)
  • Electrical equipment
  • Power devices
  • Lighting and appliances
  • Electrical circuits
Passat B5 
  • General information
  • User manual
  • Weekly checks
  • Maintenance
  • Power unit
  • Engine repair
  • Cooling system
  • Fuel system (petrol)
  • Fuel system (diesel)
  • Engine management
  • Exhaust system
  • Transmission
  • Clutch
  • Car gearbox
  • Drive shafts
  • Chassis
  • Car suspension
  • Wheels and tires
  • Steering
  • Brake system
  • Body
  • Exterior (external elements)
  • Interior (internal elements)
  • Doors and covers
  • Ventilation and heating
  • Electrical equipment
  • Power devices
  • Lighting and appliances
  • Electrical circuits
Passat B4 
  • General information
  • User manual
  • Maintenance
  • Technical data
  • 8-valve engine
  • Engine repair
  • Cooling and lubrication system
  • Supply system
  • Ignition system
  • Fuel injection «Mono-Jetronic»
  • Control system «Mono-Motronic»
  • Control system «Digifant»
  • Control system «Simos»
  • 16-valve engine
  • Engine repair
  • Cooling and lubrication system
  • Fuel injection «K-Jetronic»
  • Control system «KE-Motronic»
  • Control system «Digifant»
  • Diesel engine
  • Engine repair
  • Cooling and lubrication system
  • Power and control system
  • Turbocharging system
  • Digital control system
  • Transmission
  • Clutch
  • Manual gearbox
  • Hydromechanical gearbox
  • Front wheel drive
  • Chassis
  • Car suspension
  • Steering
  • Brake system
  • Body
  • Body elements
  • Electrical equipment
  • Power devices
  • Lighting and appliances
  • Electrical circuits
Passat B3 
  • General information
  • User manual
  • Driving Tips
  • Maintenance instructions
  • Technical data
  • Power unit
  • Engine repair
  • Ignition system
  • Lubrication system
  • Cooling system
  • Supply system
  • Petrol injection system
  • Diesel engine
  • Exhaust system
  • Transmission
  • Clutch
  • Car gearbox
  • Chassis
  • Suspension
  • Steering
  • Brake system
  • Wheels and tires
  • Body
  • Exterior
  • Interior
  • Heating system
  • Electrical equipment
  • Power devices
  • Lighting system
  • Equipment and devices
  • Wiper system
  • Electrical circuits
Passat B2 
  • General information
  • Introduction to instructions
  • User manual
  • Power unit
  • Engines 4-cylinder FZ
  • Engines 4-cylinder
  • Engines 5-cylinder
  • Transmission
  • Clutch
  • Four-speed gearbox
  • Five-speed gearbox
  • Hydromechanical gearbox
  • Front wheel drive
  • Chassis
  • Front suspension
  • Rear suspension
  • Steering
  • Brake system
  • Body
  • Body elements
  • Electrical equipment
  • Equipment and devices
  • Electrical circuits
VWmanual.ru © 2016-2026 | Mobile version | News and articles | Sitemap: EN BG BY UA RS HR RO PL SK HU | Write message | Site search
Passat B2 • Passat B3 • Passat B4 • Passat B5 • Passat B6 • Golf 1, diesel • Golf 1, petrol • Golf 2, petrol • Golf 2 • Golf 3 • Golf 4 • Golf 5 • Polo 3 • Polo 4 • Touareg 1 • Tiguan 1 • Sharan 1 • Transporter T3 • Transporter T4 • LT 28 • LT 2D • Beetle • Caddy 3 •
Our website uses cookies to ensure functionality and convenience.