
English Русский
Български
Беларускі
Український
Српски
Hrvatski
Română
Polski
Slovenský
Magyar
  |  Articles  |  Sitemap  |  Contacts  |    |
Car maintenance Ford Car maintenance Hyundai Car maintenance Chevrolet Car maintenance BMW Car maintenance Audi Car maintenance Opel Car maintenance AvtoVAZ
VWmanual.ru


Main   Passat   Golf   Polo   Touareg   Tiguan   Sharan   Transporter   Others  
Passat B2 (1981-1988) Passat B3 (1988-1993) Passat B4 (1988-1996) Passat B5 (1996-2005) Passat B6 (2005-2010)

Wire break with repairs in two places (VW Passat B6)

  • Main
  • Passat
  • Passat B6
  • Electrical equipment
  • Lighting and appliances
  • Wire break with repairs in two places
            0


Release the wire that needs to be repaired in two places (approximately 20 cm on both sides of the corresponding repair site).

If necessary, remove the wiring harness wrap with a pocket knife.

Place the yellow repair wire next to the damaged wire and use wire strippers to cut the repair wire to the required length.

Cut out the damaged section of wire.
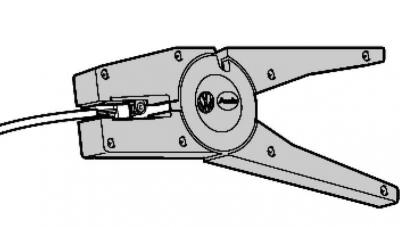
Fig. 7.132. Stripping the wire

Fig. 7.132. Stripping the wire


Strip 6-7 mm of insulation from the ends of the wire using wire strippers (fig. 7.132).

Place the crimping sleeve on one side of the wire in the car, and on the other side of the repair wire.
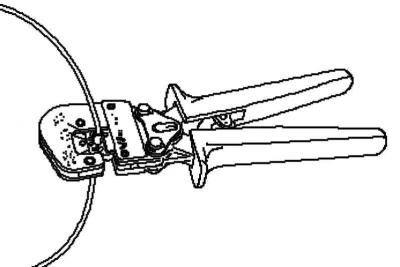
Fig. 7.133. Crimping of a crimping sleeve

Fig. 7.133. Crimping of a crimping sleeve


Crimp the crimping sleeve with crimping pliers to both ends of the wires (fig. 7.133).

[The original article is available at VWManual]


Repeat the same on the other end of the repair wire.

Note: Make sure to use the correct tip for the used crimping sleeve.


Note: Wire insulation must not be crimped.


After crimping, the crimping sleeve must be seated to prevent moisture from getting inside it.

Attach the attachment to an industrial hair dryer, 220 V/50 Hz.
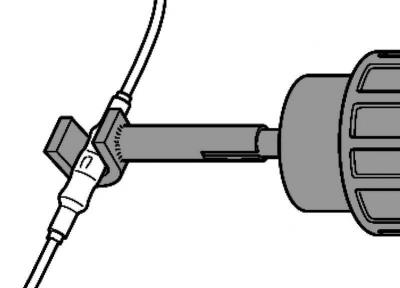
Fig. 7.134. Heating the crimping sleeve

Fig. 7.134. Heating the crimping sleeve


Heat the crimping sleeve with a hair dryer in the longitudinal direction from the middle to the edges until it is completely compressed and glue appears at the ends (fig. 7.134).

Caution: When shrinking crimp connections, be careful not to damage other wires, plastic parts or insulation with the hot nozzle of the hair dryer.


Follow the instructions in the hair dryer manual.

Note: If it is necessary to repair several wires, a certain distance must be maintained between the crimping sleeves. To prevent the wire bundle from being too thick in circumference after repair, install the crimping sleeves with some offset relative to each other.


Note: If the repaired area was initially wrapped with electrical tape, then after the repair it should be wrapped with yellow electrical tape.


Note: After repairing the wiring harness, if necessary, secure it with a wire tie to avoid any extraneous noise while driving.

This article is available at russian, bulgarian, belarusian, ukrainian, serbian, croatian, romanian, polish, slovak, hungarian
The text has been checked: Orlov Dmitry

Share information:

Previous articles
Repair of CAN bus wires
General instructions for repairing car electrical systems
Removal and installation the relay block on the left side of the front panel
Removal and installation the junction box in the left side of the engine compartment
Removal and installation the main fuse box
Removal and installation center console switches
Next articles
Repair of contacts in connector housings
Mechanical locking of the connector housing
Round contacts
Flat contacts with asymmetrical locking tabs


Similar articles from other manuals for VW cars:
Set of tools for minor repairs Golf 2 (1984-1993, petrol)
Ignition switch, wire distributor for terminal 30 (since 10.1999) Polo 3 (1995-2003)
Places of installation of electrical/electronic units and… Tiguan 1 (2007-2015)
Link to this page in different formats


Visitor comments


No comments yet


How much will 13 + 35 =


Passat B6 
  • General information
  • User manual
  • Maintenance
  • Petrol engine 1.6L
  • Engine repair
  • Cooling and lubrication system
  • Fuel injection system
  • Petrol engine 2.0L
  • Engine repair
  • Lubrication system
  • Cooling system
  • Fuel and exhaust systems
  • Diesel engine 2.0L
  • Engine repair
  • Cooling and lubrication system
  • Fuel and exhaust systems
  • Transmission
  • Clutch
  • Mechanical gearbox
  • Automatic gearbox
  • Drive shafts
  • Chassis
  • Wheels and tires
  • Car suspension
  • Steering
  • Brake system
  • Body
  • Exterior (external elements)
  • Electrical equipment
  • Power devices
  • Lighting and appliances
  • Electrical circuits
Passat B5 
  • General information
  • User manual
  • Weekly checks
  • Maintenance
  • Power unit
  • Engine repair
  • Cooling system
  • Fuel system (petrol)
  • Fuel system (diesel)
  • Engine management
  • Exhaust system
  • Transmission
  • Clutch
  • Car gearbox
  • Drive shafts
  • Chassis
  • Car suspension
  • Wheels and tires
  • Steering
  • Brake system
  • Body
  • Exterior (external elements)
  • Interior (internal elements)
  • Doors and covers
  • Ventilation and heating
  • Electrical equipment
  • Power devices
  • Lighting and appliances
  • Electrical circuits
Passat B4 
  • General information
  • User manual
  • Maintenance
  • Technical data
  • 8-valve engine
  • Engine repair
  • Cooling and lubrication system
  • Supply system
  • Ignition system
  • Fuel injection «Mono-Jetronic»
  • Control system «Mono-Motronic»
  • Control system «Digifant»
  • Control system «Simos»
  • 16-valve engine
  • Engine repair
  • Cooling and lubrication system
  • Fuel injection «K-Jetronic»
  • Control system «KE-Motronic»
  • Control system «Digifant»
  • Diesel engine
  • Engine repair
  • Cooling and lubrication system
  • Power and control system
  • Turbocharging system
  • Digital control system
  • Transmission
  • Clutch
  • Manual gearbox
  • Hydromechanical gearbox
  • Front wheel drive
  • Chassis
  • Car suspension
  • Steering
  • Brake system
  • Body
  • Body elements
  • Electrical equipment
  • Power devices
  • Lighting and appliances
  • Electrical circuits
Passat B3 
  • General information
  • User manual
  • Driving Tips
  • Maintenance instructions
  • Technical data
  • Power unit
  • Engine repair
  • Ignition system
  • Lubrication system
  • Cooling system
  • Supply system
  • Petrol injection system
  • Diesel engine
  • Exhaust system
  • Transmission
  • Clutch
  • Car gearbox
  • Chassis
  • Suspension
  • Steering
  • Brake system
  • Wheels and tires
  • Body
  • Exterior
  • Interior
  • Heating system
  • Electrical equipment
  • Power devices
  • Lighting system
  • Equipment and devices
  • Wiper system
  • Electrical circuits
Passat B2 
  • General information
  • Introduction to instructions
  • User manual
  • Power unit
  • Engines 4-cylinder FZ
  • Engines 4-cylinder
  • Engines 5-cylinder
  • Transmission
  • Clutch
  • Four-speed gearbox
  • Five-speed gearbox
  • Hydromechanical gearbox
  • Front wheel drive
  • Chassis
  • Front suspension
  • Rear suspension
  • Steering
  • Brake system
  • Body
  • Body elements
  • Electrical equipment
  • Equipment and devices
  • Electrical circuits
VWmanual.ru © 2016-2026 | Mobile version | News and articles | Sitemap: EN BG BY UA RS HR RO PL SK HU | Write message | Site search
Passat B2 • Passat B3 • Passat B4 • Passat B5 • Passat B6 • Golf 1, diesel • Golf 1, petrol • Golf 2, petrol • Golf 2 • Golf 3 • Golf 4 • Golf 5 • Polo 3 • Polo 4 • Touareg 1 • Tiguan 1 • Sharan 1 • Transporter T3 • Transporter T4 • LT 28 • LT 2D • Beetle • Caddy 3 •
Our website uses cookies to ensure functionality and convenience.