
Remove all sun visors.
Remove the interior rear view mirror.
Remove the headlining.
Lower the headlining so that the windshield can be cut out without damaging the headlining.
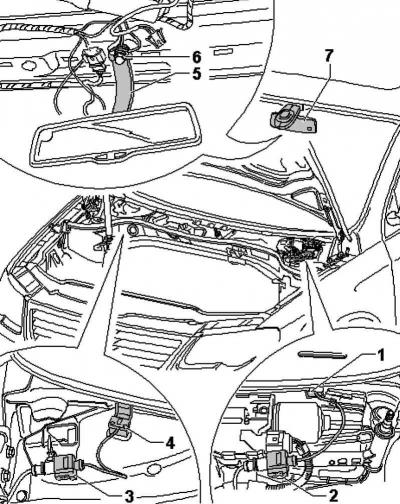
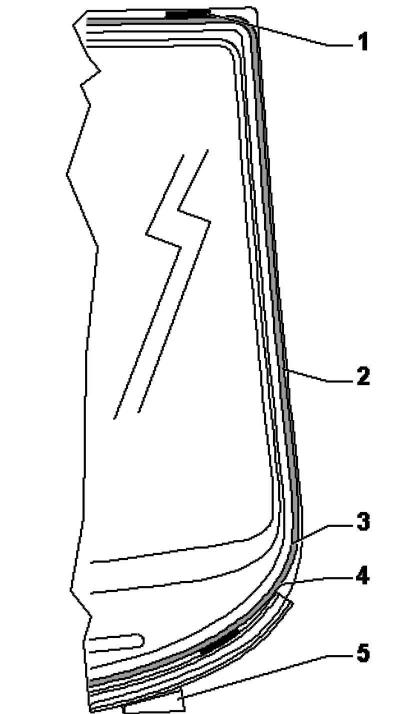
Pic. 8.33. Removable elements before dismantling the windshield
Remove the water protection strip on the left and right from the hood, starting from the mounting pads on the A-pillars (pic. 8.33).
Disconnect the negative wire 5 from the fixing screw 6 and fix the Kapton wire on the glass with adhesive tape.
Then disconnect connectors 2 and 3 in the plenum box and unlock from the holder. Fix Kapton wires 1 and 4 on the glass with adhesive tape.
Note: When cutting the windshield, be careful not to damage the wires. If one of the wires is damaged, the glass must be replaced.
Insert the film between the windshield and the front panel.
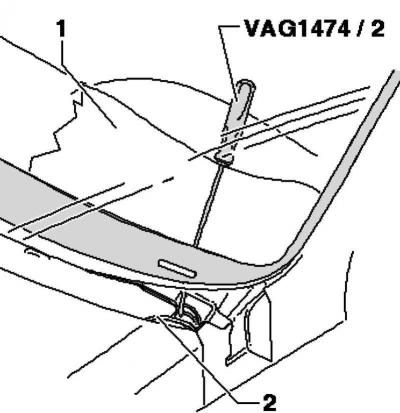
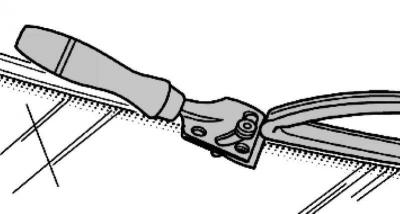
Pic. 8.34. Thread pull for cutting
Pull one end of cutting thread 2 with an awl through the adhesive sealant into the interior (pic. 8.34).
Secure the end of the cutting thread in the box with the handle.
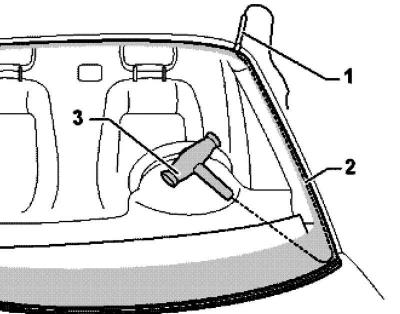
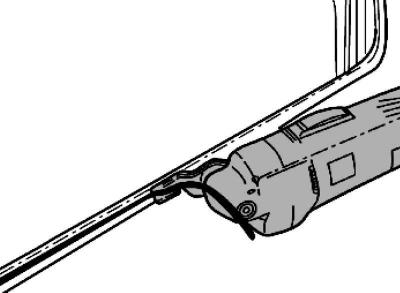
Pic. 8.35. Securing the thread for cutting
Insert cutting thread 2 with tube 1 into the edge of the glass (pic. 8.35).
Run the cutting thread around the glass.
Make sure that the thread for cutting at the corners is routed under the glass.
Attach the other end of the thread to the spool.
Set the coil to «position I».
Cut out the glass by moving the spool accordingly.
Pic. 8.36. Removing the windshield
While cutting, press the filament against the glass with a plastic wedge to provide clearance at the edge of the glass and front panel.
Windshield installation instructions
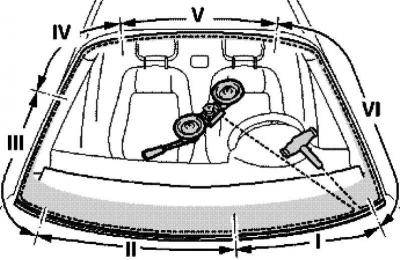
Pic. 8.37. Installed windshield components
Check if there are vertical stops 1 (pic. 8.37).
There are no marks on the windshield for applying the adhesive bead 2. The adhesive bead is applied between points 3 and 4. On the upper edge of the glass, starting from the vertical stop 1 inwards. On the side edge of the glass, starting from the inner edge of the primer layer 3 outwards. The lower edge of the glass, starting from the framing profile 4 inwards.
Joint width and height dimensions for windshield.
While the adhesive is curing, fix the windshield with clamps (443 845 631 A) 5.
Install the plenum box lining in strict accordance with the description on the page.
Preparing undamaged glass for installation
Pic. 8.38. Cutting off residual adhesive sealant
Note: When reinstalling undamaged glass shortly before bonding it. Cut off the remaining adhesive-sealant to a thickness of 1...2 mm without damaging the primer layer and the ceramic layer (pic. 8.38).
The remaining layer serves as a reactive primer for applying a new layer of adhesive-sealant.
Attention: Do not treat the adhesive joint surface with primer and cleaner. The bonding surface must be clean and free of grease.
Exception: if the glass is not to be bonded immediately after cutting off the remaining adhesive sealant, activate the remaining layer with activator D 181 801 A1.
Preparing to install new glass without pre-coating
All glasses supplied as spare parts are not pre-coated.
Note: The surface to apply the adhesive bead is uncoated and unprimed.
Clean the edge of the glass around the perimeter to a width of 20 mm. cleaner D 009 401 04.
Then rub the edge of the glass dry with a lint-free cloth.
Attention: Ceramic coating on glass is not a primer. Be sure to treat the surface with a primer before applying the adhesive-sealant. Use only primer D 009 200 02.

Pic. 8.39. Primer application
Apply primer 2 with applicator D 009 500 25 1 evenly in one step (pic. 8.39).
Drying time is about 10 minutes.
Preparing the edges of the body for glass installation
Pic. 8.40. Trimming excess primer
Cut off the remaining adhesive sealant at the edges of the body with a U-shaped knife, in no case completely remove the adhesive sealant (pic. 8.40).
Note: The remaining layer serves as a reactive primer for applying a new layer of sealant. The bonding surface must be clean and free of grease.
Attention: Do not allow the activator to come into contact with the paintwork - this will damage the paintwork.
Exception:if the glass is not to be bonded immediately after cutting off the remaining adhesive sealant, activate the remaining layer with activator D 181 801 A1.
If body edges have been reworked or partially refurbished, the affected area must be cleaned again and primed after refinishing.
Minimum hardening time
Attention: Special requirements must be observed when replacing glued panes. So, for example, a new glued windshield must comply with the safety requirements in case of an accident after the set curing time of the adhesive-sealant.
The minimum hardening time of the two-component adhesive DA 004 600 A2 when installing any glass is 3 hours.
The minimum hardening time is the period from the moment the glass is glued to the continued operation of the vehicle. During this time, the vehicle must be parked on a level surface at room temperature (at least 15°C).
Attention: The safe operation of the vehicle is only guaranteed after the minimum curing time of the adhesive has elapsed.
Repair of damaged paintwork
On visible damaged areas of the paintwork and larger damaged areas that are invisible when the glass is installed, it is necessary to restore the structure of the paintwork.
For minor damage to the paintwork in closed areas, the following repair method is suitable: double application in opposite directions («wet on wet») primer for glass and varnish D 009 200 02.
Apply primer to damaged area once.
Let dry for 10 min.
Apply the primer a second time in the opposite direction from the first time.
Visitor comments