
Note: The vehicle must be on the ground to adjust the trunk lid.
Note: Lid lock 3 is bolted directly to trunk lid 1. Its fastening is not slotted and therefore cannot be adjusted.
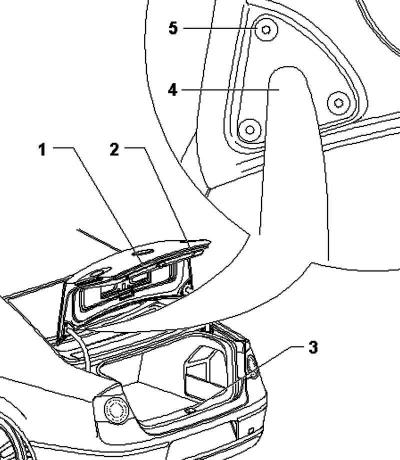
Pic. 8.29. Trunk lid adjustment
Adjustable left and right stops 2 do not serve to adjust the cover. The task is to balance the trunk lid 1 and ensure the absorption of vibrations (pic. 8.29).
The boot lid is correctly adjusted when the gaps are even on all sides when closed, and if it does not protrude forward or backward and is flush with the rest of the bodywork.
The trunk lid should snap into the lock bracket 3 without much effort (pic. 8.29).
In conclusion, a description of the adjustment of the trunk lid in several stages is given.
Use a special tool to adjust and control the gaps.
By loosening the screws 5, it is possible to adjust the trunk lid 1 in the holes on the hinge 4, which have a margin.
It is possible to slightly adjust the hinge 4 using the fixing screws; for this, it is necessary to remove the rear shelf.
After adjustment, it is necessary to take measures for anti-corrosion protection of the hinge and screws.
Adjust the trunk lid 1 on the lock bracket 3 (pic. 8.29).
Adjust stops 2 on the left and right.
Visitor comments