
Note: To adjust the hood 5, the vehicle must be on the ground.
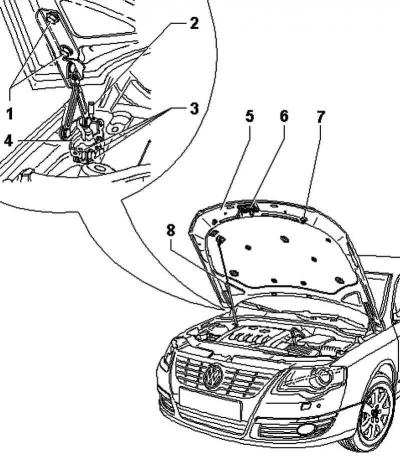
Pic. 8.24. Hood adjustment
Adjustable left and right stops 7 do not serve to adjust the hood. The task is to balance the bonnet 5 and ensure the absorption of vibrations (pic. 8.24).
The hood 5 is correctly adjusted if, when closed, there are equal gaps on all sides, and it does not protrude either forward or backward and is flush with the wings.
The hood 5 should snap into the lock without much effort.
Remove hook 6.
Remove the gas stop 8 from the hood 5 (pic. 8.24).
Loosening, but not unscrewing, bolts 1 and bolts 3 on the left and right sides on the hinges of the hood 4, the hood 5 can be centered between the wings.
At the rear, the hood 5 can be adjusted in height relative to the front fenders using the adjusting screws 2 on the right and left.
Keep the gaps even.
After adjustment, measures should be taken for anti-corrosion protection of hinge 4, bolts 1 and 3 (pic. 8.24).
After adjusting the hood 5, reinstall and adjust the lock hook 6.
Using the lock, the front part of the hood 5 can be adjusted in height relative to the wings
Adjust stops 7.
Visitor comments