
English Русский
Български
Беларускі
Український
Српски
Hrvatski
Română
Polski
Slovenský
Magyar
  |  Articles  |  Sitemap  |  Contacts  |    |
Car maintenance Ford Car maintenance Hyundai Car maintenance Chevrolet Car maintenance BMW Car maintenance Audi Car maintenance Opel Car maintenance AvtoVAZ
VWmanual.ru


Main   Passat   Golf   Polo   Touareg   Tiguan   Sharan   Transporter   Others  
Passat B2 (1981-1988) Passat B3 (1988-1993) Passat B4 (1988-1996) Passat B5 (1996-2005) Passat B6 (2005-2010)

Removal and installation of fuel injection pump (VW Passat B4)

  • Main
  • Passat
  • Passat B4
  • Diesel engine
  • Power and control system
  • Removal and installation of fuel injection pump
            0


To remove, disconnect the wire from the negative terminal of the storage battery. Remove the hatch cover in the upper part of the clutch housing. Turn the crankshaft until the mark on the flywheel aligns with the installation protrusion in the clutch housing hatch (Fig. 3-18), which corresponds to the TDC of the compression stroke of the piston of the 1st cylinder, counted from the drive side of the camshaft. Remove the cylinder head cover. Using the VW 20 65A lock, which can also be made according to the dimensions shown in Fig. 3-19, lock the camshaft as follows:
  • insert the edge of the retainer into the groove of the rear flange of the camshaft;
  • turn the camshaft until one end of the retainer touches the surface of the cylinder head;
  • measure the gap between the cylinder head surface and the other end of the retainer;
  • place a shim under both ends of the retainer that is half the thickness of the measured gap between the cylinder head surface and the end of the retainer. The total thickness of the two shims should be equal to the measured gap.

Remove the upper front toothed belt cover, loosen the toothed belt tension and remove it from the camshaft and injection pump toothed pulleys. Loosen the injection pump drive toothed pulley fastening nut.

Install the puller on the toothed pulley of the fuel injection pump drive (Fig. 3-36). Press the pulley off the fuel injection pump drive shaft by hitting the pulley with a hammer with an aluminum striker. Remove the puller. Remove the pulley mounting nut, then remove the pulley. Disconnect the wires from the electromagnetic shut-off valve. Disconnect the fuel supply and starting device control cables from the fuel injection pump. On engines "RA", "SB", "AAZ" disconnect the vacuum hose from the boost pressure corrector. Disconnect the high-pressure fuel lines from the injectors and the high-pressure fuel pump. Plug the holes in the fuel lines and the high-pressure fuel pump. Loosen the bolts securing the high-pressure fuel pump to the bracket and remove the high-pressure fuel pump. To install, place the high-pressure fuel pump on the bracket, aligning the timing marks on the high-pressure fuel pump body and the rear protective cover of the toothed belt. Tighten the high-pressure fuel pump mounting bolts. Make sure that the key is in the groove of the high-pressure fuel pump drive shaft, install the high-pressure fuel pump drive toothed pulley, screw on the mounting nut and turn the pulley until the marks on the pulley and the high-pressure fuel pump body are aligned (Fig. 3-20). Lock the high-pressure fuel pump drive toothed pulley with the VW 20 64 lock (Fig. 3-37) and tighten the pulley mounting nut. Loosen the camshaft toothed pulley mounting bolt by half a turn and separate the pulley from the cone using blows from a hammer with a rubber striker (engines "1Y", "RA", "SB") or by striking a drift inserted into the hole in the rear protective cover of the toothed belt (engine "AAZ"). Make sure that the mark on the flywheel corresponding to the TDC of piston No.1 cylinder is precisely aligned with the mark on the clutch housing. Put the toothed belt on the pulleys, remove the retainer and adjust the toothed belt tension using the VW 210 tool, as indicated in the subsection "Removing and installing the camshaft drive belt". Tighten the camshaft toothed pulley mounting bolt to a torque of 4.5 kgf·m. Turn the crankshaft two turns and check the toothed belt tension again. Adjust the fuel injection advance angle as indicated below. Connect the fuel lines to the injectors and the high-pressure fuel pump.
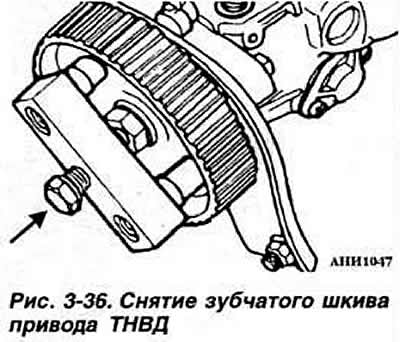
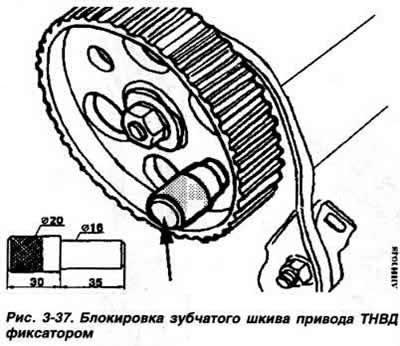

Install the puller on the toothed pulley of the fuel injection pump drive (Fig. 3-36). Press the…


Install the puller on the toothed pulley of the fuel injection pump drive (Fig. 3-36). Press the…


Warning. The fittings for fastening the supply and drain fuel lines to the high-pressure fuel pump are the same size, but it is prohibited to swap them, since the fitting of the drain fuel line marked "OUT" (Fig. 3-38) has a ball check valve.
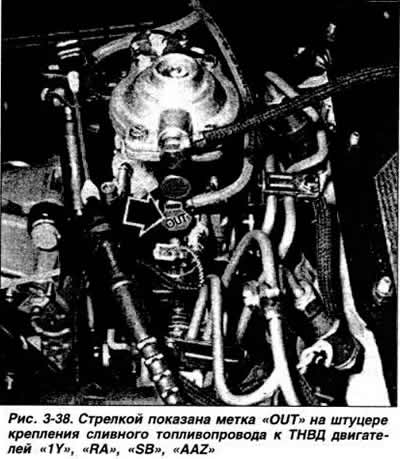
Warning. The fittings for fastening the supply and drain fuel lines to the high-pressure fuel pump…


The original text can be found on the portal (vwmanual.ru)

Connect the solenoid stop valve connector.


Connect the fuel supply and starting device control cables to the high-pressure fuel pump. On engines "RA", "SB", "AAZ" connect the vacuum hose to the boost pressure corrector. Install the front timing belt cover. Remove the camshaft retainer. Install the cylinder head cover.

Connect the wire to the negative terminal of the battery.

This article is available at russian, bulgarian, belarusian, ukrainian, serbian, croatian, romanian, polish, slovak, hungarian
The text has been checked: Kolesnikov Artem

Share information:

Previous articles
Power supply system with mechanical drive of engines «1Y», «RA», «SB», «AAZ»
Features of the power supply system of engines «1Y», «RA», «SB», «AAZ»
Next articles
Adjusting the fuel injection advance angle
Diesel Idle Speed Adjustment
Adjusting the fast idle speed of the diesel engine «AAZ»
Adjusting the maximum engine speed without load
Adjusting the residual fuel supply
Removal and installation injectors


Similar articles from other manuals for VW cars:
Fuel pump — gasoline injection engines Golf 2 (1984-1993, petrol)
Removal and installation of fuel injection pump Polo 3 (1995-2003)
Fuel tank filler flap Touareg 1 (2002-2006)
High pressure fuel pump Tiguan 1 (2007-2015)
Electric Fuel Pump — General Information Sharan 1 (1995-2000)
Sealing of fuel injection pump connecting fittings Transporter T4 (1990-2003)
Injection system and fuel pump LT 28 (1975-1991)
Link to this page in different formats


Visitor comments


No comments yet


How much will 31 + 46 =


Passat B6 
  • General information
  • User manual
  • Maintenance
  • Petrol engine 1.6L
  • Engine repair
  • Cooling and lubrication system
  • Fuel injection system
  • Petrol engine 2.0L
  • Engine repair
  • Lubrication system
  • Cooling system
  • Fuel and exhaust systems
  • Diesel engine 2.0L
  • Engine repair
  • Cooling and lubrication system
  • Fuel and exhaust systems
  • Transmission
  • Clutch
  • Mechanical gearbox
  • Automatic gearbox
  • Drive shafts
  • Chassis
  • Wheels and tires
  • Car suspension
  • Steering
  • Brake system
  • Body
  • Exterior (external elements)
  • Electrical equipment
  • Power devices
  • Lighting and appliances
  • Electrical circuits
Passat B5 
  • General information
  • User manual
  • Weekly checks
  • Maintenance
  • Power unit
  • Engine repair
  • Cooling system
  • Fuel system (petrol)
  • Fuel system (diesel)
  • Engine management
  • Exhaust system
  • Transmission
  • Clutch
  • Car gearbox
  • Drive shafts
  • Chassis
  • Car suspension
  • Wheels and tires
  • Steering
  • Brake system
  • Body
  • Exterior (external elements)
  • Interior (internal elements)
  • Doors and covers
  • Ventilation and heating
  • Electrical equipment
  • Power devices
  • Lighting and appliances
  • Electrical circuits
Passat B4 
  • General information
  • User manual
  • Maintenance
  • Technical data
  • 8-valve engine
  • Engine repair
  • Cooling and lubrication system
  • Supply system
  • Ignition system
  • Fuel injection «Mono-Jetronic»
  • Control system «Mono-Motronic»
  • Control system «Digifant»
  • Control system «Simos»
  • 16-valve engine
  • Engine repair
  • Cooling and lubrication system
  • Fuel injection «K-Jetronic»
  • Control system «KE-Motronic»
  • Control system «Digifant»
  • Diesel engine
  • Engine repair
  • Cooling and lubrication system
  • Power and control system
  • Turbocharging system
  • Digital control system
  • Transmission
  • Clutch
  • Manual gearbox
  • Hydromechanical gearbox
  • Front wheel drive
  • Chassis
  • Car suspension
  • Steering
  • Brake system
  • Body
  • Body elements
  • Electrical equipment
  • Power devices
  • Lighting and appliances
  • Electrical circuits
Passat B3 
  • General information
  • User manual
  • Driving Tips
  • Maintenance instructions
  • Technical data
  • Power unit
  • Engine repair
  • Ignition system
  • Lubrication system
  • Cooling system
  • Supply system
  • Petrol injection system
  • Diesel engine
  • Exhaust system
  • Transmission
  • Clutch
  • Car gearbox
  • Chassis
  • Suspension
  • Steering
  • Brake system
  • Wheels and tires
  • Body
  • Exterior
  • Interior
  • Heating system
  • Electrical equipment
  • Power devices
  • Lighting system
  • Equipment and devices
  • Wiper system
  • Electrical circuits
Passat B2 
  • General information
  • Introduction to instructions
  • User manual
  • Power unit
  • Engines 4-cylinder FZ
  • Engines 4-cylinder
  • Engines 5-cylinder
  • Transmission
  • Clutch
  • Four-speed gearbox
  • Five-speed gearbox
  • Hydromechanical gearbox
  • Front wheel drive
  • Chassis
  • Front suspension
  • Rear suspension
  • Steering
  • Brake system
  • Body
  • Body elements
  • Electrical equipment
  • Equipment and devices
  • Electrical circuits
VWmanual.ru © 2016-2026 | Mobile version | News and articles | Sitemap: EN BG BY UA RS HR RO PL SK HU | Write message | Site search
Passat B2 • Passat B3 • Passat B4 • Passat B5 • Passat B6 • Golf 1, diesel • Golf 1, petrol • Golf 2, petrol • Golf 2 • Golf 3 • Golf 4 • Golf 5 • Polo 3 • Polo 4 • Touareg 1 • Tiguan 1 • Sharan 1 • Transporter T3 • Transporter T4 • LT 28 • LT 2D • Beetle • Caddy 3 •
Our website uses cookies to ensure functionality and convenience.