
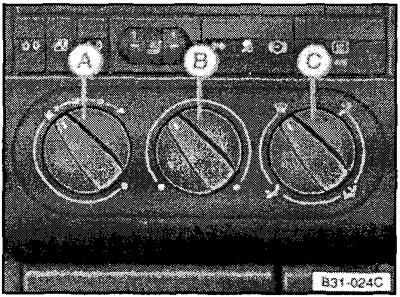
Knob A - Fan mode switch and outdoor air supply regulator
4 fixed modes can be set (speed) fan operation. In the position of the handle between 1 and 0 there is a smooth regulation of the supply of outside air into the passenger compartment.
In position 0, the outside air supply is closed and the fan is switched off. In this mode, polluted air from outside does not enter the passenger compartment, but since the windows may fog up, it is recommended to turn off the outside air supply only for a short time.
In vehicles with a filter on the heater air intake, mode 0 is only necessary to protect against gaseous air pollution (smell) - dust, soot, etc. blocked by the filter.
Knob B - Temperature controller
Turning it clockwise increases the temperature, turning it counterclockwise decreases it.
Knob C - Air distribution regulator
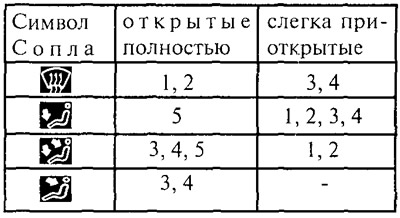
Depending on the position of this handle, the air entering the passenger compartment is directed to certain ventilation grills and nozzles (see table).
Ventilation grilles and nozzles
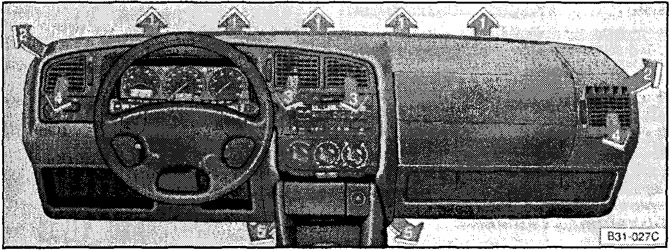
The temperature of the air flowing through the heater to the ventilation grilles is regulated using knob B, and the distribution of the air flow between the grilles (nozzles) - handle C. Grilles 3 and 4 can be additionally opened and closed: by turning the handle located on the side of the grate, the grate opens, by turning it down, it closes.
To change the vertical direction of the airflow, grilles 3 and 4 can be turned up and down.
To change the horizontal direction of the air flow, you need to move the knob located in the middle of the corresponding grille.
Rear lower nozzles (at the feet of the rear passengers) open simultaneously with nozzles 5.
Exemption from hoarfrost windshield and side windows:
- Set knob A to position 3
- Turn knobs B and C clockwise to the stop.
- Close grill 3.
- Warm air can additionally be directed to the side windows through grilles 4.
Protection of the windshield and side windows from fogging:
If high humidity (e.g. during rain) the windows fog up, it is recommended to set the following mode:
- Set knob A to position 2 or 3
- Handle B, if necessary, set to the middle position (heating mode)
- Set knob C to position

- Close grille 3. Additional warm air can be directed to the side windows through grilles 4.
Rapid interior heating:
- Set knob A to position 3
- Turn knob B clockwise until it stops
- Set knob C to position

- Close grate 3; grids 4 open partially or completely.
Moderate interior heating
After the windows have thawed and the desired interior air temperature has been reached, the following mode is recommended:
- Set knob A to position 1 or 2
- Use knob B to set the desired heater temperature
- Use knob C to set the desired direction of warm air supply (
 or
or  ). If the windshield fogs up, set knob C to position 4 (
 ).
). - Close grate 3
- Adjust the desired power and direction of the flow of warm air coming out of the grilles 4.
Ventilation (without interior heating)
- Use knob A to set the desired ventilation intensity (fan speed)
- Turn knob B counterclockwise until it stops
- Set knob C to position #img9#
- Open grids 3 and 4.
If necessary, the handle C can be set to any other position.
General instructions
For the heating and ventilation to work flawlessly, the air intake inlet in front of the windshield must be free of ice, snow and leaves.
Knobs B and C provide smooth adjustment and can be set to any position; knob A has fixed positions 1-4.
To prevent the windows from fogging up at low speeds, always turn on the heater fan at low or medium speed.
Heating depends on the temperature of the coolant - the heater's full output can only be achieved when the engine is warm.
Exhaust ventilation is carried out through openings in the rear of the passenger compartment, access to which must be free. For this reason, in a Limousine, the gap between the luggage rack and the rear window should not be covered with luggage, and in a Variant, it is not recommended to heavily load the rear corners of the luggage compartment.
In addition, on models with a folding shelf, the load must not cover the gap between the shelf and the side consoles of the shelf.
Visitor comments