
English Русский
Български
Беларускі
Український
Српски
Hrvatski
Română
Polski
Slovenský
Magyar
  |  Articles  |  Sitemap  |  Contacts  |    |
Car maintenance Ford Car maintenance Hyundai Car maintenance Chevrolet Car maintenance BMW Car maintenance Audi Car maintenance Opel Car maintenance AvtoVAZ
VWmanual.ru


Main   Passat   Golf   Polo   Touareg   Tiguan   Sharan   Transporter   Others  
Golf 1 (1974-1984, diesel) Golf 1 (1974-1984, petrol) Golf 2 (1984-1993, petrol) Golf 2 (1984-1993) Golf 3 (1991-1997) Golf 4 (1997-2004) Golf 5 (2003-2008)

Starter — removal and installation (VW Golf 5)

  • Main
  • Golf
  • Golf 5
  • Electrical equipment
  • Power devices
  • Starter — removal and installation
            0


Contents: Cars with manual transmission ↓ Cars with automatic transmission ↓ Vehicles with 1.9-/2.0-litre diesel…↓ Cars with a 2.0-liter AXX petrol…↓
To start an internal combustion engine, a small electric motor, a starter, is needed.

In order for the engine to start at all, the starter must spin it up to a speed of at least 300 rpm.

This is only possible if the starter is working properly and the battery is sufficiently charged.

Since a large current is required to start an internal combustion engine, the condition of the wire terminals should be checked during vehicle maintenance.

Rusted contacts should be cleaned and lubricated with the protective grease used to protect battery terminals.

Cars with manual transmission


Removal


The starter is located at the front of the cylinder block above the gearbox.

Attention! Removing the starter is the same for all cars, but depending on the engine type, it is necessary to dismantle a different number of parts that make it difficult to access the starter.


1. Disconnect the power cable terminals from the battery.

First, disconnect the ground (-) wire terminal, and then the positive potential terminal.

2. Vehicles with 2.0 TFSI petrol engine AXH and diesel engine: Remove the upper protective cover from the engine, see the relevant chapter.

3. All engines except 1.4L and 1.4-/1.6L FSI: Remove the air filter.

4. Remove the protective cover 1 of the release relay (see illustration).
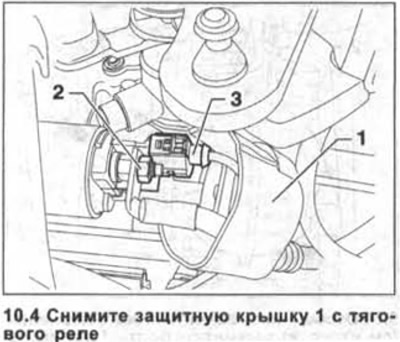
4. Remove the protective cover 1 of the release relay (see illustration).


5. Unscrew nut 2, which secures terminal 30, and disconnect the large cross-section wire from the starter (see illustration 10.4).


6. Disconnect plug 3 at terminal 50 by unlocking it (see illustration 10.4).

7. Unscrew nut 4 and remove terminal 5 of the ground wire (-) from the upper starter mounting bolt (see illustration).
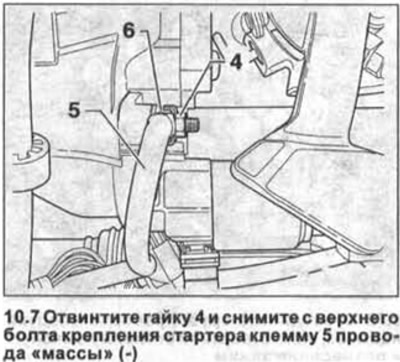
7. Unscrew nut 4 and remove terminal 5 of the ground wire (-) from the upper starter mounting bolt…


8. Unscrew the upper bolt 6 of the starter mount (see illustration 10.7).

9. Remove the engine splash guard (protection), see the corresponding chapter.

10. Unscrew nut 7 and remove the holder 8 of the wiring harness from the lower starter mounting bolt (see illustration).
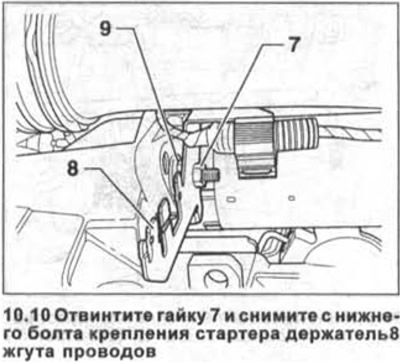
10. Unscrew nut 7 and remove the holder 8 of the wiring harness from the lower starter mounting…


11. Unscrew the lower bolt 9 of the starter mount and disconnect the starter from the cylinder block (see illustration 10.10).

Installation


The starter is installed in the reverse order of removal.

12. Install the starter in place and tighten its mounting bolts with a force of 75 Nm.


13. Tighten the wiring harness retainer nuts, the ground (-) wire terminals and the positive potential terminals to 15 Nm.

Cars with automatic transmission


Removal


Attention! Removing the starter in cars with an automatic transmission is generally performed in the same way as in cars with a manual transmission. Therefore, only the differences in the dismantling procedure are given below.


14. Vehicles with diesel engine: Remove the upper protective cover from the engine, see the relevant chapter.

15. All engines except 1.4L and 1.4-/1.6L FSI. Remove the air filter.

16. Remove the protective cover of the release relay, unscrew the nut and disconnect the thick section wire (+) from the starter terminal, as well as the plug from terminal 50.

17. Remove the engine splash guard.

18. Unscrew the nut and remove the wire harness holder from the lower starter mounting bolt, then unscrew the lower bolt.

19. Unscrew nut 1 and remove holder 2 of the wiring harness from the upper starter mounting bolt (see illustration).
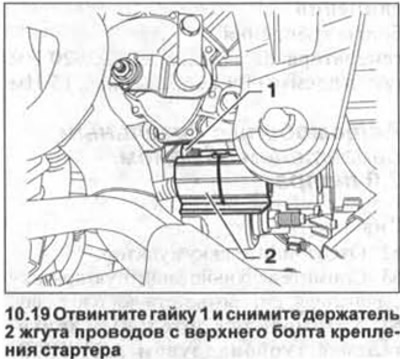
19. Unscrew nut 1 and remove holder 2 of the wiring harness from the upper starter mounting bolt…


20. Unscrew the upper starter mounting bolt.

21. Unscrew nut 1, disconnect the ground wire (-) 2 and place it away from the work area (see illustration).
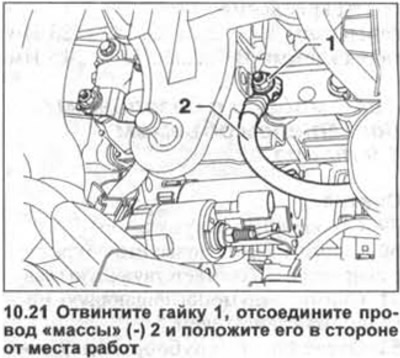
21. Unscrew nut 1, disconnect the ground wire (-) 2 and place it away from the work area (see…


22. Remove the starter from the cylinder block and remove it from the engine compartment by pushing it upwards.

The starter is installed in the reverse order of removal.

Vehicles with 1.9-/2.0-litre diesel engine and direct shift gearbox (DSG)


23. Remove the upper protective cover from the engine, see the relevant chapter.

24. Remove the air filter, see the relevant chapter.

25. Remove the protective cover from the traction relay, unscrew the nut and disconnect the thick section wire (+) from the starter terminal, as well as the plug from terminal 50.

26. Vehicles with 2.0 liter engine: Release the wiring harness from the holder.

27. Unscrew the upper starter mounting bolt.

28. Unscrew the lower starter mounting bolt and remove the starter from the engine compartment by pushing it upwards.

When installing, the starter mounting bolts are tightened with a force of 60 Nm.

Cars with a 2.0-liter AXX petrol engine and a direct-shift gearbox (DSG)


29. Unscrew the two air intake mounting bolts.

30. Disconnect the air mass flow meter plug. The plug is attached to the air duct.

31. Use special pliers, such as HAZET 798-5, to loosen the air hose clamp and disconnect the hose from the air mass meter.

32. Remove the upper protective cover from the engine, see the relevant chapter.

33. Remove the protective cover from the traction relay, unscrew the nut and disconnect the thick section wire (+) from the starter terminal, as well as the plug from terminal 50.

34. Unscrew the upper starter mounting bolt.

35. Unscrew the lower starter mounting bolt and remove the starter from the engine compartment by pushing it upwards.

When installing, the starter mounting bolts are tightened with a force of 60 Nm.

This article is available at russian, bulgarian, belarusian, ukrainian, serbian, croatian, romanian, polish, slovak, hungarian
The text has been checked: Kolesnikov Artem

Share information:

Previous articles
Generator — removal and installation
Generator — Voltage Check
Battery — Check
Battery — Removal and Installation
Next articles


Similar articles from other manuals for VW cars:
Removal and installation the fuel starter valve / K-Jetronic… Passat B3 (1988-1993)
Removal and installation the starter (petrol 1.4 l) Polo 3 (1995-2003)
Removal and installation the starter (6-cyl. engine with… Touareg 1 (2002-2006)
Starter (cars with 1.4 l TSI engines and MQ500 manual… Tiguan 1 (2007-2015)
Starter — general information and malfunctions Sharan 1 (1995-2000)
Starter — General Information Transporter T4 (1990-2003)
Starter Motor — description and testing on a vehicle LT 28 (1975-1991)
Link to this page in different formats


Visitor comments


No comments yet


How much will 16 + 50 =


Golf 5 
  • General information
  • User manual
  • Maintenance
  • Troubleshooting
  • Power unit
  • Engine repair
  • Cooling and ventilation system
  • Fuel system
  • Ignition system
  • Transmission
  • Clutch
  • Mechanical gearbox
  • Automatic gearbox
  • Chassis
  • Brake system
  • Car suspension
  • Steering
  • Body
  • Interior (internal elements)
  • Exterior (external elements)
  • Doors and covers
  • Electrical equipment
  • Power devices
  • Washers and wipers
  • Lighting and appliances
  • Electrical circuits
Golf 4 
  • General information
  • User manual
  • Weekly checks
  • Maintenance
  • Power unit
  • Petrol engines
  • Diesel engines
  • Cooling system
  • Fuel system (petrol)
  • Control system (petrol)
  • Fuel system (diesel)
  • Exhaust system
  • Transmission
  • Clutch
  • Car gearbox
  • Drive shafts
  • Chassis
  • Car suspension
  • Steering
  • Wheels and tires
  • Brake system
  • Body
  • Exterior (external elements)
  • Interior (internal elements)
  • Ventilation and heating
  • Car doors and sunroof
  • Washers and glass cleaners
  • Electrical equipment
  • Power devices
  • Lighting and appliances
  • Electrical circuits
Golf 3 
  • Petrol engine
  • Engine repair
  • Lubrication system
  • Cooling system
  • Ignition system
  • Diesel engine
  • Engine repair
  • Diesel injection system
  • Pre-glow system
  • Transmission
  • Clutch
  • Gearbox and drive shafts
  • Chassis
  • Steering
  • Wheels and suspension
  • Brake system
  • Electrical equipment
  • Lighting and appliances
  • Electrical circuits
Golf 2 
  • General information
  • Introduction to guide
  • User manual
  • Petrol engines 1.3 l
  • Engine repair
  • Lubrication system
  • Cooling system
  • Carburetors
  • Supply system
  • Ignition system
  • Petrol engines 1.6/1.8 l
  • Engine repair
  • Supply system
  • Ignition system
  • Diesel engines
  • Engine repair
  • Lubrication system
  • Cooling system
  • Power and exhaust system
  • Transmission
  • Clutch
  • 4-speed gearbox 084
  • 5-speed gearbox 085
  • 4-speed gearbox 020/4R
  • 5-speed gearbox 020/4T
  • Automatic gearbox
  • Drive shafts
  • Chassis
  • Steering
  • Car suspension
  • Brake system
  • Body
  • Body elements
  • Doors, locks and windows
  • Electrical equipment
  • Equipment and devices
  • Power devices
Golf 2 (petrol) 
  • General information
  • Characteristics
  • Car care
  • Maintenance
  • Power unit
  • Engine repair
  • Engine 1.05/1.30
  • Engine 1.60/1.80
  • Cooling and lubrication system
  • Power and exhaust system
  • Transmission
  • Clutch
  • Car gearbox
  • Drive shafts
  • Chassis
  • Brake system
  • Steering
  • Suspension
  • Body
  • Body and equipment
  • Electrical equipment
  • Lighting and appliances
  • Electrical circuits
Golf 1 (petrol) 
  • General information
  • Characteristics
  • User manual
  • Maintenance
  • Power unit
  • Engine adjustment
  • Engine 1.1/1.3
  • Engine 1.5/1.6/1.8
  • Engine electrical equipment
  • Cooling system
  • Fuel system
  • Transmission
  • Clutch and manual gearbox
  • Automatic gearbox
  • Chassis
  • Steering
  • Front suspension
  • Rear suspension
  • Brake system
  • Electrical equipment
  • Lighting and appliances
  • Electrical circuits
  • Body
  • Body and equipment
  • Optional equipment
Golf 1 (diesel) 
  • General information
  • Specifications
  • Maintenance
  • Power unit
  • Engine repair
  • Exhaust and turbocharger
  • Cooling system
  • Fuel system
  • Fuel injection system
  • Transmission
  • Clutch and drive shafts
  • Car gearbox
  • Chassis
  • Suspension and wheels
  • Steering
  • Brake system
  • Wheels and tires
  • Body
  • Heating and ventilation
  • Exterior (external elements)
  • Interior (internal elements)
  • Doors and windows
  • Electrical equipment
  • Equipment and devices
  • Lighting system
  • Power devices
  • Electrical circuits
VWmanual.ru © 2016-2026 | Mobile version | News and articles | Sitemap: EN BG BY UA RS HR RO PL SK HU | Write message | Site search
Passat B2 • Passat B3 • Passat B4 • Passat B5 • Passat B6 • Golf 1, diesel • Golf 1, petrol • Golf 2, petrol • Golf 2 • Golf 3 • Golf 4 • Golf 5 • Polo 3 • Polo 4 • Touareg 1 • Tiguan 1 • Sharan 1 • Transporter T3 • Transporter T4 • LT 28 • LT 2D • Beetle • Caddy 3 •
Our website uses cookies to ensure functionality and convenience.