



Contents: Checking the supply voltage ↓ Removal the fuel starter valve ↓ Examination ↓ Installing the fuel start valve ↓ Testing a thermal relay with time…↓
When the starter of a cold engine is turned on, the fuel starter valve injects additional fuel into the intake manifold.
A faulty starting valve causes difficulty starting the engine (both cold and hot), transient failures and high fuel consumption.
The time-delay thermal relay limits the fuel injection time of the starting valve depending on the engine temperature. Caution: Perform the check in the following sequence.
Checking the supply voltage
Disconnect the high voltage wire from the ignition distributor (terminal 4) (central wire) and short it to ground, if necessary, use an auxiliary wire with the same cross-section for this.
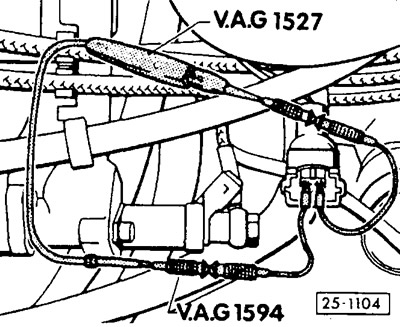
Disconnect the plug from the starting fuel valve and connect a voltage indicator or test lamp to the plug contacts.
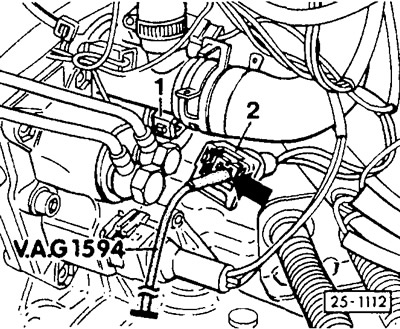
Disconnect plug "2" from time-delay thermal relay "1".
The green/white wire of the time-delay thermal relay is shorted to ground using an auxiliary wire.
Caution: Do not short-circuit the red/black wire to ground. Risk of short circuit!
Turn on the starter, the voltage indicator LED should light up, otherwise, in accordance with the electrical circuit, find and eliminate the break in the wiring.
Removal the fuel starter valve
Disconnect the plug from the fuel starter valve.
Unscrew the fuel line from the starting valve.
Caution: The system is under pressure, so cover the connection point with a rag and slowly loosen the hollow bolt. If the starting fuel valve is removed only for inspection, do not unscrew the fuel line.
Unscrew the fuel start valve and remove it from the intake manifold.
Examination
Remove the fuel starting valve.
Connect the plug to the starting valve, the fuel hose is connected. The plug from the time-delay thermal relay remains disconnected and the green white wire is shorted to ground, see Figure 25-1112.
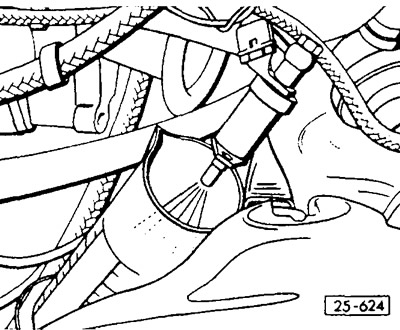
Insert the fuel starting valve into the measuring container.
Turn on the starter briefly. The starting valve should inject fuel in the form of a jet of the correct cone shape.
Dry the starting valve sprayer.
There should not be a single drop of fuel on the spray nozzle for one minute. The starter valve should also not be wet externally, otherwise the valve should be replaced.
Installing the fuel start valve
Place the fuel starter valve together with the new sealing gasket and tighten.
Connect the plug to the time-delay thermal relay.
Connect the high voltage wire to terminal 4.
If it was removed, then tighten the fuel hose to the starting valve with a torque of 10 Nm. Connect the plug.
Testing a thermal relay with time delay
To perform the test, the engine must be cold, the coolant temperature must be less than +30°C. Remove the thermal relay and cool it in a bath of water.
Disconnect the high voltage wire from the ignition distributor (terminal 4) (central wire) and short it to ground, if necessary, use an auxiliary wire with the same cross-section for this.
Disconnect the plug from the starting fuel valve and connect a voltage indicator or test lamp to the plug contacts. The thermal relay is checked through the electrical connector of the starting fuel valve.
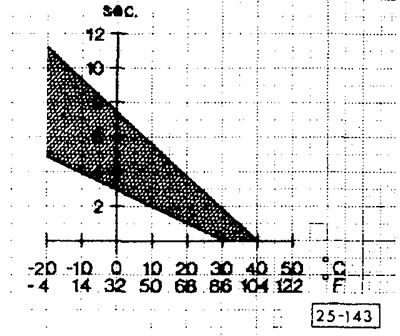
Turn on the starter for about 10 seconds, the voltage indicator LED should light up for 1-8 seconds depending on the temperature of the thermal relay. The first light should be in the prescribed area depending on the ambient temperature, see diagram. For example, the coolant temperature is +10°C. Then the duration of the switch-on should be 2.0-5.5 seconds.
If the specified value is not reached, replace the time-delay thermal relay.
To replace, disconnect the plug from the thermal relay and unscrew the thermal relay. Screw in a new thermal relay with a time delay and connect the plug to it.
Connect the high tension wire to the ignition distributor and the plug to the starting fuel valve.
Check the coolant level and top up if necessary.
Visitor comments