English Русский
Български
Беларускі
Український
Српски
Hrvatski
Română
Polski
Slovenský
Magyar
  |  Articles  |  Sitemap  |  Contacts  |    |
Car maintenance Ford Car maintenance Hyundai Car maintenance Chevrolet Car maintenance BMW Car maintenance Audi Car maintenance Opel Car maintenance AvtoVAZ
VWmanual.ru


Main   Passat   Golf   Polo   Touareg   Tiguan   Sharan   Transporter   Others  
Passat B2 (1981-1988) Passat B3 (1988-1993) Passat B4 (1988-1996) Passat B5 (1996-2005) Passat B6 (2005-2010)

Checking/removing and installing the fuel pump (VW Passat B3)

  • Main
  • Passat
  • Passat B3
  • Power unit
  • Petrol injection system
  • Checking/removing and installing the fuel pump
            0


Contents: Checking the supply voltage ↓ Performance Check ↓ K-Jetronic ↓ Mono-Jetronic, Mono-Motronic,…↓ Measurement pressure, bar ↓ Mono-Jetronic ↓ Mono-Motronic ↓ Digifant, Motronic ↓ Replacing the fuel pump ↓
The fuel pump is located together with the fuel level indicator sensor in the fuel tank. The K-Jetronic injection system has an additional fuel pump under the body next to the fuel tank.

Prerequisite for checking: the battery is fully charged (12 volts), the fine and coarse fuel filters are in perfect condition.

Checking the supply voltage


Check fuse #18 of the fuel pump, replace the fuse if necessary.

Disconnect the high tension wire from the ignition distributor (terminal 4, central wire) and short it to ground, if necessary, use an auxiliary wire with the same cross-section for this.

Turn on the starter briefly, the fuel pump should start to operate audibly.
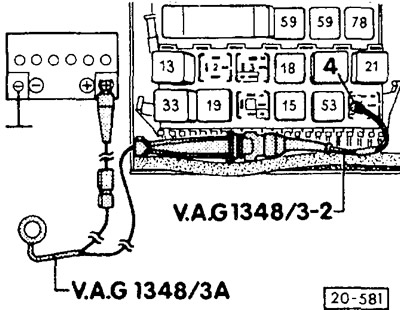
Turn on the starter briefly, the fuel pump should start to operate audibly.


Otherwise, remove the fuel pump relay from the relay board. The fuel pump relay is located on the relay board at position 12 and is labeled 67 or 80.

Contact 4 of the relay block using an auxiliary wire (remote control) connect to the positive pole (+) of the battery. VW workshops use the specified auxiliary cable with a push-button switch and an 8-amp fuse. If necessary, make your own auxiliary cable. Make sure that the sensitive contact of the relay is not damaged when connecting.


If the pump now works, check the fuel pump relay. In cars from 8/92 (RV, PF, 2E) perform diagnostics of executive links (workshop work).
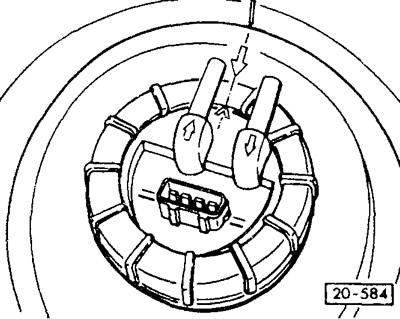
If the pump now works, check the fuel pump relay. In cars from 8/92 (RV, PF, 2E) perform…


Otherwise, disconnect the electrical wire from the fuel level sensor and connect it to both external contacts of the plug (red/yellow and brown wire) control lamp on semiconductor diodes. Turn on the remote control - the LED should light up, otherwise, find the wire break in accordance with the electrical circuit and fix it.

K-Jetronic: check the second fuel pump in the same way (under the body, next to the fuel tank). Loosen the wire fastening to the fuel pump, check the supply voltage with the remote control connected.

If the supply voltage is OK, replace the fuel pump.

Attach the electrical wires to the fuel pump.

Performance Check


Connect a voltmeter to the fuel pump. Turn on the remote control and read the voltmeter. The voltage should not fall below 9 volts, otherwise charge the battery. The voltage on the fuel pump is about 2 volts less than the battery voltage.

Remove the fuel tank cap.

K-Jetronic
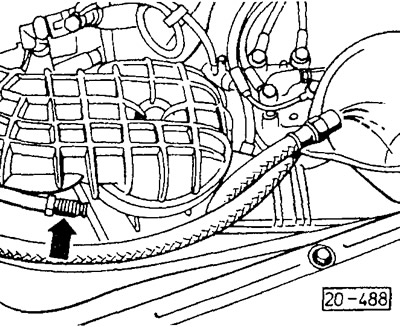


K-Jetronic


Disconnect the return fuel line at the connection point and direct its end into the measuring container.


Hold the remote control switch down for 30 seconds and then measure the amount of fuel supplied by the pump. The pump should supply at least 355 cm³ of fuel within the specified time.

Mono-Jetronic, Mono-Motronic, Digifant, Motronic
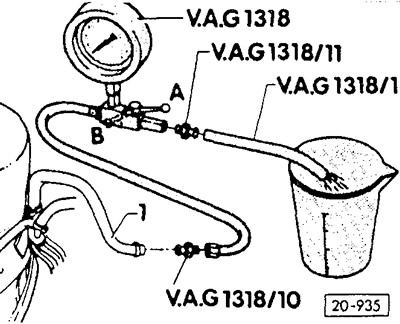


Mono-Jetronic, Mono-Motronic, Digifant, Motronic


Unscrew the fuel supply line and connect it to the adjustable pressure gauge via a connecting element (the VW workshop uses the VAG 1318 device for this purpose). Connect the outlet of the pressure gauge to a hose, the other end of which is directed into the measuring container.

Open the shut-off valve of the pressure gauge completely, placing it in position "A" (along the direction of flow).

Turn on the remote control and at the same time slowly close the shut-off valve until the pressure gauge shows the measuring pressure.

Measurement pressure, bar


  • Mono-Jetronic — 1,2
  • Mono-Motronic — 1,2
  • Digifant/Simos — 3
  • Motronic (4-cyl., 6-cyl. with 8/95) — 3
  • Motronic (6-cyl. up to 7/95) — 4

If the measurement pressure is reached, release the remote control switch and do not change the position of the shut-off valve any further.

Remove fuel from the measuring container.


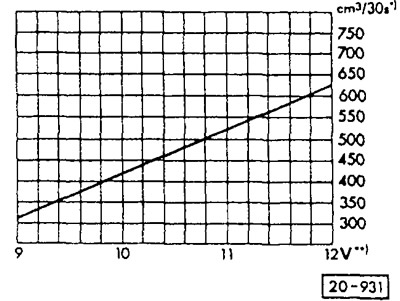
Press the remote control switch for 30 seconds and then compare the amount of fuel supplied by the pump with the prescribed values from the tables.

Mono-Jetronic
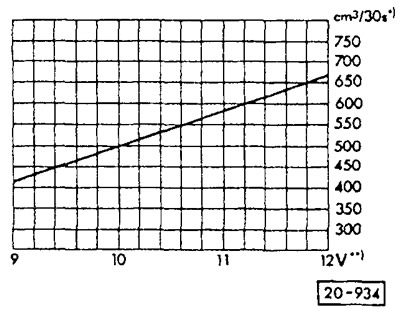


Mono-Jetronic


Mono-Motronic


Mono-Motronic


Digifant, Motronic
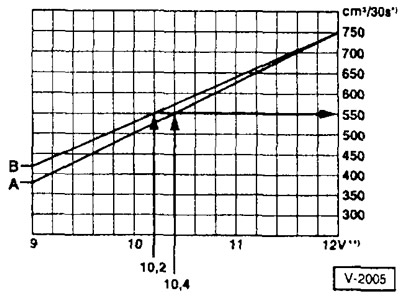


Digifant, Motronic


A — pump performance of the Digifant/Motronic system.
B - different pump performance of 6-cylinder engine with 8/95.

Caution: If the power voltage is normal but the pump performance is too low, please proceed as follows:


Disconnect the fuel supply hose from the fuel filter inlet, connect a measuring device to the hose and repeat the test. If the minimum required pump performance is now achieved, replace the fuel filter.

Remove the fuel supply unit and check the filter mesh for contamination, clean the mesh if necessary. Check the fuel pump load current at idle. The specified load current value is a maximum of 8 amperes. If the specified value is exceeded, replace the fuel supply unit.

If no fault is found, replace the fuel pump.

Replacing the fuel pump


The fuel pump is located together with the fuel level sensor in the fuel tank. Remove the fuel pump, see the section "Removing and installing the fuel level sensor" in the chapter "Fuel system".

Please note: The K-Jetronic system has an additional fuel pump under the vehicle body next to the fuel tank.


Connect the high tension wire to the ignition distributor.

Connect the fuel lines.

Tighten the fuel tank cap.

After replacing the pump, it is recommended to check the check valve and the tightness of the supply system by measuring the supply pressure.

This article is available at russian, bulgarian, belarusian, ukrainian, serbian, croatian, romanian, polish, slovak, hungarian
The text has been checked: Medvedeva Elena

Share information:

Previous articles
Removal and installation / inspection of K-Jetronic valve injectors
Prescribed CO content values
Motronic injection system
Removal and installation the fuel starter valve / K-Jetronic thermostat
Checking the control lever and the distribution piston K-Jetronic, KE-Motronic
Checking and adjusting the position of the K-Jetronic, KE-Motronic flow meter flap
Next articles
Checking the fuel pump relay
Adjusting the gas thrust
Checking the intake air heating
Replacing the air filter
Diagnostics of faults of injection systems K-Jetromic / Digifant


Similar articles from other manuals for VW cars:
Checking the fuel pump voltage supply Golf 4 (1997-2004)
Checking the fuel pump Polo 3 (1995-2003)
Checking the amount of fuel injected (petrol engine) Touareg 1 (2002-2006)
High pressure fuel pump Tiguan 1 (2007-2015)
Checking the performance of the fuel pump Sharan 1 (1995-2000)
Checking for voltage at the fuel pump Transporter T4 (1990-2003)
General information on removing and installing fuel system… Caddy 3 (2003-2010)
Link to this page in different formats


Visitor comments


No comments yet


How much will 31 + 16 =


Passat B6 
  • General information
  • User manual
  • Maintenance
  • Petrol engine 1.6L
  • Engine repair
  • Cooling and lubrication system
  • Fuel injection system
  • Petrol engine 2.0L
  • Engine repair
  • Lubrication system
  • Cooling system
  • Fuel and exhaust systems
  • Diesel engine 2.0L
  • Engine repair
  • Cooling and lubrication system
  • Fuel and exhaust systems
  • Transmission
  • Clutch
  • Mechanical gearbox
  • Automatic gearbox
  • Drive shafts
  • Chassis
  • Wheels and tires
  • Car suspension
  • Steering
  • Brake system
  • Body
  • Exterior (external elements)
  • Electrical equipment
  • Power devices
  • Lighting and appliances
  • Electrical circuits
Passat B5 
  • General information
  • User manual
  • Weekly checks
  • Maintenance
  • Power unit
  • Engine repair
  • Cooling system
  • Fuel system (petrol)
  • Fuel system (diesel)
  • Engine management
  • Exhaust system
  • Transmission
  • Clutch
  • Car gearbox
  • Drive shafts
  • Chassis
  • Car suspension
  • Wheels and tires
  • Steering
  • Brake system
  • Body
  • Exterior (external elements)
  • Interior (internal elements)
  • Doors and covers
  • Ventilation and heating
  • Electrical equipment
  • Power devices
  • Lighting and appliances
  • Electrical circuits
Passat B4 
  • General information
  • User manual
  • Maintenance
  • Technical data
  • 8-valve engine
  • Engine repair
  • Cooling and lubrication system
  • Supply system
  • Ignition system
  • Fuel injection «Mono-Jetronic»
  • Control system «Mono-Motronic»
  • Control system «Digifant»
  • Control system «Simos»
  • 16-valve engine
  • Engine repair
  • Cooling and lubrication system
  • Fuel injection «K-Jetronic»
  • Control system «KE-Motronic»
  • Control system «Digifant»
  • Diesel engine
  • Engine repair
  • Cooling and lubrication system
  • Power and control system
  • Turbocharging system
  • Digital control system
  • Transmission
  • Clutch
  • Manual gearbox
  • Hydromechanical gearbox
  • Front wheel drive
  • Chassis
  • Car suspension
  • Steering
  • Brake system
  • Body
  • Body elements
  • Electrical equipment
  • Power devices
  • Lighting and appliances
  • Electrical circuits
Passat B3 
  • General information
  • User manual
  • Driving Tips
  • Maintenance instructions
  • Technical data
  • Power unit
  • Engine repair
  • Ignition system
  • Lubrication system
  • Cooling system
  • Supply system
  • Petrol injection system
  • Diesel engine
  • Exhaust system
  • Transmission
  • Clutch
  • Car gearbox
  • Chassis
  • Suspension
  • Steering
  • Brake system
  • Wheels and tires
  • Body
  • Exterior
  • Interior
  • Heating system
  • Electrical equipment
  • Power devices
  • Lighting system
  • Equipment and devices
  • Wiper system
  • Electrical circuits
Passat B2 
  • General information
  • Introduction to instructions
  • User manual
  • Power unit
  • Engines 4-cylinder FZ
  • Engines 4-cylinder
  • Engines 5-cylinder
  • Transmission
  • Clutch
  • Four-speed gearbox
  • Five-speed gearbox
  • Hydromechanical gearbox
  • Front wheel drive
  • Chassis
  • Front suspension
  • Rear suspension
  • Steering
  • Brake system
  • Body
  • Body elements
  • Electrical equipment
  • Equipment and devices
  • Electrical circuits
VWmanual.ru © 2016-2026 | Mobile version | News and articles | Sitemap: EN BG BY UA RS HR RO PL SK HU | Write message | Site search
Passat B2 • Passat B3 • Passat B4 • Passat B5 • Passat B6 • Golf 1, diesel • Golf 1, petrol • Golf 2, petrol • Golf 2 • Golf 3 • Golf 4 • Golf 5 • Polo 3 • Polo 4 • Touareg 1 • Tiguan 1 • Sharan 1 • Transporter T3 • Transporter T4 • LT 28 • LT 2D • Beetle • Caddy 3 •
Our website uses cookies to ensure functionality and convenience.