
English Русский
Български
Беларускі
Український
Српски
Hrvatski
Română
Polski
Slovenský
Magyar
  |  Articles  |  Sitemap  |  Contacts  |    |
Car maintenance Ford Car maintenance Hyundai Car maintenance Chevrolet Car maintenance BMW Car maintenance Audi Car maintenance Opel Car maintenance AvtoVAZ
VWmanual.ru


Main   Passat   Golf   Polo   Touareg   Tiguan   Sharan   Transporter   Others  
Golf 1 (1974-1984, diesel) Golf 1 (1974-1984, petrol) Golf 2 (1984-1993, petrol) Golf 2 (1984-1993) Golf 3 (1991-1997) Golf 4 (1997-2004) Golf 5 (2003-2008)

Checking the fuel pump voltage supply (VW Golf 4)

  • Main
  • Golf
  • Golf 4
  • Power unit
  • Fuel system (petrol)
  • Checking the fuel pump voltage supply
            0


Contents: Execution order ↓ Execution order ↓
The fuel pump is located in the fuel tank.

Warning: Gasoline is extremely flammable and explosive, so care must be taken when working on any part of the fuel system.


Warning: Work on the fuel system must be carried out in a well-ventilated area.


Warning: When working on the fuel system, do not use open flames, electric welding or tools that may generate sparks.


The fuel system is under constant pressure. When disconnecting the fuel system components, fuel may spray out, so collect the escaping fuel with a rag.

When checking, the voltage on the battery must be at least 11.5 V.

Execution order


1. Check the condition of fuse #28 for the fuel pump. Replace the fuse if necessary.

2. When the starter is turned on, the fuel pump should turn on for at least 1 second. When the fuel pump is running, a characteristic noise should be heard.

3. If the fuel pump does not work, connect the remote control according to the diagram shown in the figure Remote fuel pump testing.

4. Press the remote control switch. If the fuel pump still does not work, check the fuel pump relay.

If the pump does not work, follow these steps:

Execution order


1. Remove the rear seat and fold back the carpet to access the fuel level sensor and fuel pump flange.

2. Disconnect the electrical connector from the fuel level sensor and fuel pump.
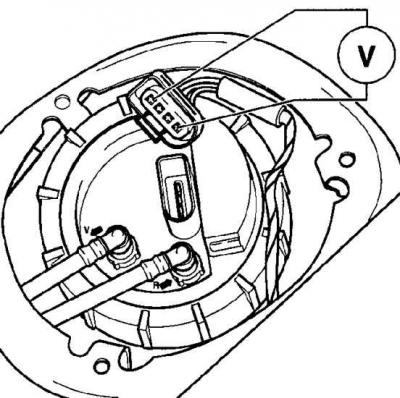
2. Disconnect the electrical connector from the fuel level sensor and fuel pump.


3. Connect a tester or LED probe to the outer contacts of the electrical connector.


4. If voltage is present at the electrical connector contacts, remove the fuel pump.

5. Check the electrical circuit between the fuel pump mounting flange and the fuel pump. Also check the condition of the electrical connector contacts.

6. If the fuel pump electrical circuit is OK, then the fuel pump is faulty and needs to be replaced.

7. Install the fuel pump and fuel level sensor into the fuel tank.

This article is available at russian, bulgarian, belarusian, ukrainian, serbian, croatian, romanian, polish, slovak, hungarian
The text has been checked: Kolesnikov Artem

Share information:

Previous articles
Remote fuel pump testing
Removal and installation the air filter housing
Adjusting the accelerator cable
Removal and installation the fuel filter (petrol engines)
Removal and installation the fuel pump/fuel level sensor
Fuel tank of cars with gasoline engines
Next articles
Checking the performance of the fuel pump
Checking the fuel pump relay


Similar articles from other manuals for VW cars:
Checking the voltage supply to the fuel injectors Passat B5 (1996-2005)
Checking the fuel pump Polo 3 (1995-2003)
Checking the amount of fuel injected (petrol engine) Touareg 1 (2002-2006)
High pressure fuel pump Tiguan 1 (2007-2015)
Checking the performance of the fuel pump Sharan 1 (1995-2000)
Checking for voltage at the fuel pump Transporter T4 (1990-2003)
Checking and adjusting the fuel supply by the accelerator pump Beetle (1960-1986)
Link to this page in different formats


Visitor comments


No comments yet


How much will 13 + 30 =


Golf 5 
  • General information
  • User manual
  • Maintenance
  • Troubleshooting
  • Power unit
  • Engine repair
  • Cooling and ventilation system
  • Fuel system
  • Ignition system
  • Transmission
  • Clutch
  • Mechanical gearbox
  • Automatic gearbox
  • Chassis
  • Brake system
  • Car suspension
  • Steering
  • Body
  • Interior (internal elements)
  • Exterior (external elements)
  • Doors and covers
  • Electrical equipment
  • Power devices
  • Washers and wipers
  • Lighting and appliances
  • Electrical circuits
Golf 4 
  • General information
  • User manual
  • Weekly checks
  • Maintenance
  • Power unit
  • Petrol engines
  • Diesel engines
  • Cooling system
  • Fuel system (petrol)
  • Control system (petrol)
  • Fuel system (diesel)
  • Exhaust system
  • Transmission
  • Clutch
  • Car gearbox
  • Drive shafts
  • Chassis
  • Car suspension
  • Steering
  • Wheels and tires
  • Brake system
  • Body
  • Exterior (external elements)
  • Interior (internal elements)
  • Ventilation and heating
  • Car doors and sunroof
  • Washers and glass cleaners
  • Electrical equipment
  • Power devices
  • Lighting and appliances
  • Electrical circuits
Golf 3 
  • Petrol engine
  • Engine repair
  • Lubrication system
  • Cooling system
  • Ignition system
  • Diesel engine
  • Engine repair
  • Diesel injection system
  • Pre-glow system
  • Transmission
  • Clutch
  • Gearbox and drive shafts
  • Chassis
  • Steering
  • Wheels and suspension
  • Brake system
  • Electrical equipment
  • Lighting and appliances
  • Electrical circuits
Golf 2 
  • General information
  • Introduction to guide
  • User manual
  • Petrol engines 1.3 l
  • Engine repair
  • Lubrication system
  • Cooling system
  • Carburetors
  • Supply system
  • Ignition system
  • Petrol engines 1.6/1.8 l
  • Engine repair
  • Supply system
  • Ignition system
  • Diesel engines
  • Engine repair
  • Lubrication system
  • Cooling system
  • Power and exhaust system
  • Transmission
  • Clutch
  • 4-speed gearbox 084
  • 5-speed gearbox 085
  • 4-speed gearbox 020/4R
  • 5-speed gearbox 020/4T
  • Automatic gearbox
  • Drive shafts
  • Chassis
  • Steering
  • Car suspension
  • Brake system
  • Body
  • Body elements
  • Doors, locks and windows
  • Electrical equipment
  • Equipment and devices
  • Power devices
Golf 2 (petrol) 
  • General information
  • Characteristics
  • Car care
  • Maintenance
  • Power unit
  • Engine repair
  • Engine 1.05/1.30
  • Engine 1.60/1.80
  • Cooling and lubrication system
  • Power and exhaust system
  • Transmission
  • Clutch
  • Car gearbox
  • Drive shafts
  • Chassis
  • Brake system
  • Steering
  • Suspension
  • Body
  • Body and equipment
  • Electrical equipment
  • Lighting and appliances
  • Electrical circuits
Golf 1 (petrol) 
  • General information
  • Characteristics
  • User manual
  • Maintenance
  • Power unit
  • Engine adjustment
  • Engine 1.1/1.3
  • Engine 1.5/1.6/1.8
  • Engine electrical equipment
  • Cooling system
  • Fuel system
  • Transmission
  • Clutch and manual gearbox
  • Automatic gearbox
  • Chassis
  • Steering
  • Front suspension
  • Rear suspension
  • Brake system
  • Electrical equipment
  • Lighting and appliances
  • Electrical circuits
  • Body
  • Body and equipment
  • Optional equipment
Golf 1 (diesel) 
  • General information
  • Specifications
  • Maintenance
  • Power unit
  • Engine repair
  • Exhaust and turbocharger
  • Cooling system
  • Fuel system
  • Fuel injection system
  • Transmission
  • Clutch and drive shafts
  • Car gearbox
  • Chassis
  • Suspension and wheels
  • Steering
  • Brake system
  • Wheels and tires
  • Body
  • Heating and ventilation
  • Exterior (external elements)
  • Interior (internal elements)
  • Doors and windows
  • Electrical equipment
  • Equipment and devices
  • Lighting system
  • Power devices
  • Electrical circuits
VWmanual.ru © 2016-2026 | Mobile version | News and articles | Sitemap: EN BG BY UA RS HR RO PL SK HU | Write message | Site search
Passat B2 • Passat B3 • Passat B4 • Passat B5 • Passat B6 • Golf 1, diesel • Golf 1, petrol • Golf 2, petrol • Golf 2 • Golf 3 • Golf 4 • Golf 5 • Polo 3 • Polo 4 • Touareg 1 • Tiguan 1 • Sharan 1 • Transporter T3 • Transporter T4 • LT 28 • LT 2D • Beetle • Caddy 3 •
Our website uses cookies to ensure functionality and convenience.